Updated April 21, 2010 to include new steps for Windows 7
We’ve all been frustrated when some program on our computer is taking too long to open or freezes for a few seconds every time we click the mouse button. A PC only has so much processing power—and when we have too many applications running at the same or not enough free space on our hard disk, the computer simply can’t keep up. Here are some easy fixes to get things running better:
Step 1: Remove Startup Programs
Believe it or not, there are very few programs required to be loaded at startup. Most can (and should) be started manually from the Start menu when, and if, you actually need them. So, often a simple cleaning will get your computer running like a champ. Follow these steps to get things back in order:
- Make sure you have a program that protects against viruses, spyware and adware. Norton and Kapersky both have highly rated products that protect against all three threats. If you have virus protection installed, it is unlikely that a virus or other evil program is causing the lethargic behavior. If you don't have protection, check out our Computer Security Buyer's Guide. Be sure to turn on “auto updating,”, so you always have the latest virus protection files and schedule the program to do a full scan once a week. And be wary of ads on the Internet for “free” virus scans or protection programs – many of these are actually scams to get you to download malicious software or purchase unnecessary programs.
- Hit your Start button on your screen and go to the Programs menu. You should see a folder called Startup. Inside this folder are shortcuts to programs that will be loaded on, you guessed it, startup. If you don’t need these programs to be loaded automatically, delete the shortcut by right-clicking on the icon and hitting Delete. Don’t worry, you’re not deleting the actual program, just a shortcut that tells the computer to load it. When you need to run this program, you can just browse to it from the Start menu and load it up.
- Click the Start button and hit “Run”. In the window that comes up, type “msconfig” into the Open field and click “Ok.” This will bring up the System Configuration application. Click on the tab that says “Startup” and it will bring up a list of every application that is being loaded on top of Windows. In Windows 7, you can also get to the System Configuration application through the Control Panel (Start>Control Panel>System and Security>Administrative Tools>System Configuration).
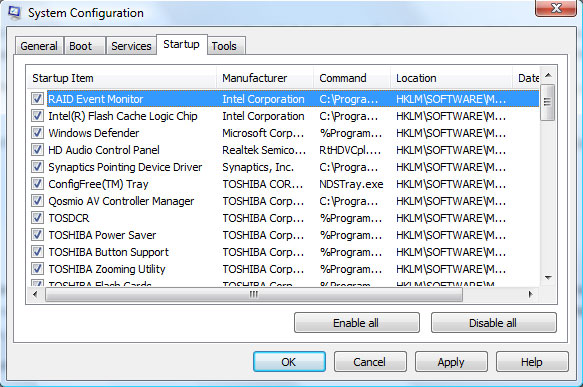
Now this next part starts getting a little technical, but stick with it, because this is where you can significantly improve your computer’s startup speed.
Look through the list of Startup items and ask yourself the question, “Do I need this program to start every time I run Windows? Or can I just start it up when I need to use it?” Programs such as RealPlayer, Adobe Acrobat, Apple Quicktime will often be in this list even though there is really no need to load them at startup. To remove a program from the startup list, simply uncheck the box next to it. Again, this does not delete the program. It simply stops it from loading automatically. Try to remove everything you don’t need and you may see a big difference in your PC’s performance.
If you’re not sure what a program does (and this is a common issue, even for tech experts), there’s a great website www.sysinfo.org/startuplist.php that lets you to look up the name of startup programs and tells you whether they’re needed, not needed, optional, or (worse!) a potential virus threat. Pay close attention to the name of the Startup Item and the Command name (usually an “.exe” file); much of the time, virus programs and valid programs have very similar names. If you still can’t identify the program or you’re not sure if you need it, just leave it alone.
When you are done reviewing the Startup items, click "Ok". You will get a message telling you to restart your computer, which you can do now or wait until later. After you restart, Windows will give you a message letting you know that you are using “Selective Startup”. Click “Ok” and you’re all set. If you have any problems because you unchcecked something by mistake, just pull up msconfig again and recheck the item.
Helpful hint: When you are installing a new application on your PC, pay attention to any “extras” that are included in the installation process. Often this will be indicated by a checkbox on one of the installation screens that will say something like “Install Yahoo! Toolbar” or “Install iTunes.” If you don’t need or want them, your best bet is not to install them.
Step 2: Free Up Space on your Hard Disk
Your computer uses space on your hard disk to store temporary program files. If your hard drive is too full, your computer won’t have room to store all these files—and this can significantly impact performance. Check to make sure you have at least 10% of your hard disk free. This is easy to do by right clicking on your "C:" drive in My Computer and selecting "Properties."
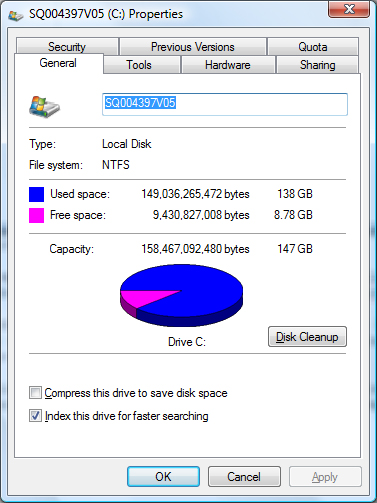
If the “Free Space” is less than 10% of “Capacity,” it is important you make more room. A simple way to do this is with Windows Disk Cleanup. You can get there through Start>Program>Accessories>System Tools>Disk Cleanup. Or, in Windows 7, Start>Control Panel>System and Security>Administrative Tools>Free up disk space.
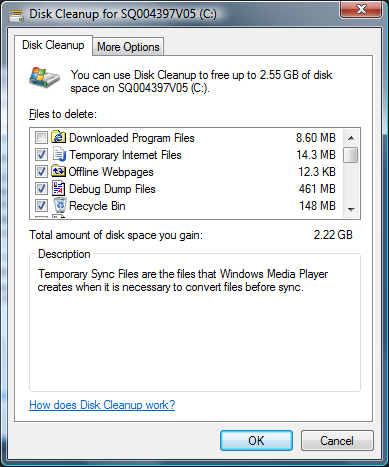
- On the first "Disk Cleanup" tab, you will be given the option to delete various temporary files and empty your Recycle Bin, with a measure of how much disk space you will gain. Generally speaking, there should be no harm in deleting these files.
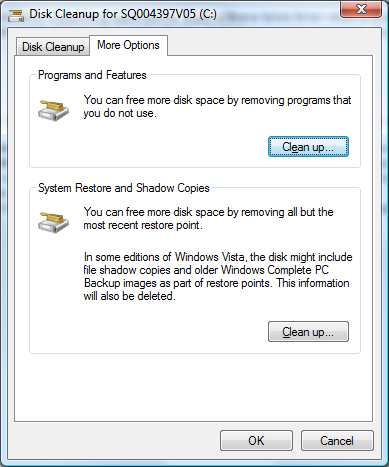
- Now go to the "More Options" tab (Depending on your administrative settings in Windows 7, this tab may not appear initially. If it doesn't, click the button that says "Clean up system files", choose your drive and now the tab should appear). Here you will have the option to clean up "Programs and Features." This will allow you to uninstall any programs you never use, especially games (which can take up considerable space). Click the "Clean up" button. Then highlight the program(s) you want to uninstall and click the "Uninstall" button.
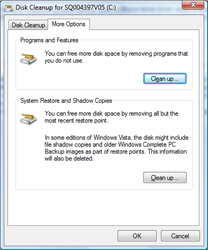
- Also on the "More Options" tab there is an option to clean up "System Restore and Shadow Copies." These backup files allow you to restore your computer to an earlier time, in case something goes wrong, or recover files and folders that you may have accidentally deleted. Windows will store many versions of the backup files and, over time, they can take up a huge amount of space on your hard drive. Clicking "Clean up" will delete all but the most recent version.
Step 3: Don’t Run Unnecessary Programs
Every program running on your PC takes some amount of processing and memory resources. The more you pile on, the more your computer has to strain to keep up. If you have Microsoft Word, iTunes, Outlook, Photoshop and a dozen cool little desktop widgets—all running at the same time on your four year-old laptop, don’t be surprised if programs start responding slowly. Resource-intensive programs, such as games, are especially sensitive to system overload.
The simple solution? Only keep programs open that you are actually using. Are you done with Photoshop? Close it. Does your nine year-old daughter want to play that awesome new Disney game with the beautiful graphics? Close every other program to take advantage of your PC’s full performance.
Step 4: Check the Specifications of your PC
Most software that typically runs on our PCs – Microsoft Office, Internet Explorer, basic photo editing – does not require a high-end computer. Almost any computer made within the last five years should be easily able to handle these programs. Other applications, such as the latest computer games or video editing software, may require significantly more computer resources and will cause performance issues on an older or very low-end machine. Running Vista on an older machine can also be a problem. Most programs will tell you on the box or on their website both the minimum and recommended PC configurations; check your PC’s specifications against those recommended by the software manufacturer.
If you're not sure of your PC's specifications, go to the Windows System panel (Start>Control Panel>System or Start>Control Panel>System & Maintenance>System depending on your setup). Here you'll find your processor type and speed along with the amount of RAM (Random Access Memory).
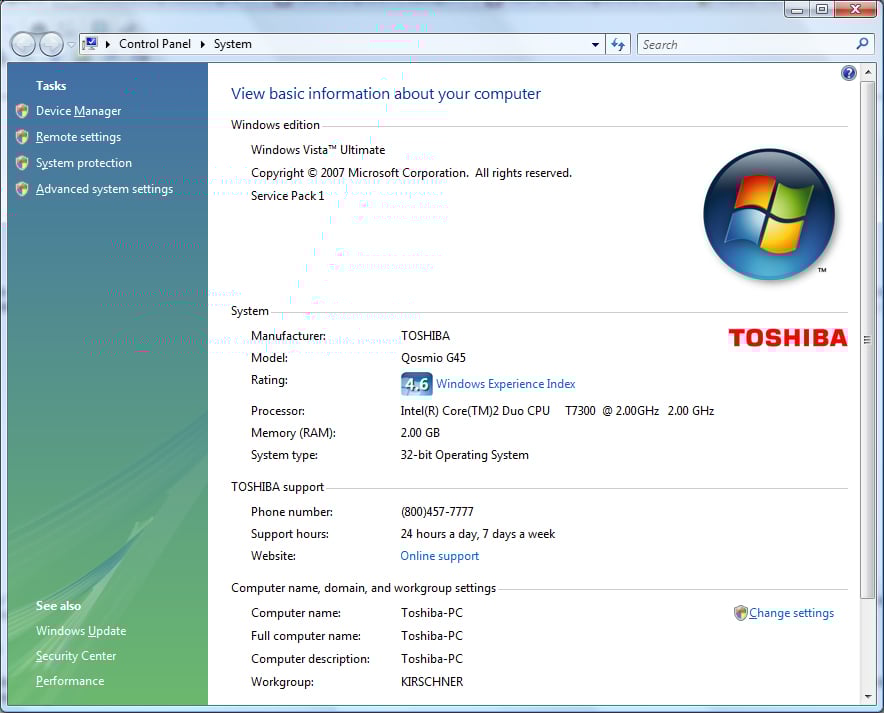
For general performance issues, you may want to look into upgrading your PC’s RAM. RAM is where your computer loads information for running programs, and if you don’t have enough your computer may run like molasses in winter. You should have at least 1 GB (gigabyte) of RAM, preferably 2 GB. For optimal performance go up to 3 GB (going above 3GB probably won't be helpful unless you are running the 64-bit version of Windows Vista or 7). Adding more RAM is very inexpensive and you can either do it yourself or ask your local computer repair shop to help.
Step 5: Defragment your Hard Disk
What? My hard disk is in pieces?!? Well, not exactly, but the data on it is. Every time you add…delete…add…delete…programs and files, the information on your disk gets scattered around. The older your PC, the more fragmented the information is likely to be. This data fragmentation increases the time required for your PC to access programs and files on your hard disk, and slows down your machine.
Luckily, defragmenting is a very easy thing to do. Windows XP includes a basic tool called Disk Defragmenter (Start>Program>Accessories>System Tools>Disk Defragmenter). Just open it up and hit the “Defragment” button. It will take a while to run, so it’s best to do it when you’re not planning to use your PC.
For Vista, we recommend you download a defragmenting program such as Auslogics Disk Defrag http://www.auslogics.com/en/software/disk-defrag/download. It’s free, very easy to use, fast and is highly regarded by the techie world. Alternatively, Vista also has Disk Defragmenter, which you can get to the same way as in XP. The advantage of the Vista version is that it runs in the background when your computer is not busy. However, we don’t recommend this because it can be easily interrupted by your screensaver or other applications—plus, Microsoft removed all visual information to let you know how much progress the program has made, so you have no idea when it’s going to finish.
For Windows 7, the features from XP have returned and you can access the Disk Defragmenter tool the same way (Start>Program>Accessories>System Tools>Disk Defragmenter).
Whichever program you use, try to defragment once every month to keep your PC running at optimum performance.


From Brenda Wilson on July 01, 2011 :: 5:47 am
I upgraded to windows version nine and now cannot play games and enter some contests. Can anyone please help? I am thinking about removing it from my computer. Thanks in advance.
Reply