Tech Made Simple

Hot Topics: How to Fix Bluetooth Pairing Problems | Complete Guide to Facebook Privacy | How to Block Spam Calls | Snapchat Symbol Meaning

We may earn commissions when you buy from links on our site. Why you can trust us.

author photo

How to Capture Screenshots on Your Phone and Computer

by Suzanne Kantra on February 27, 2023

Fact checked and updated on 2/27/2023 with information on Snipping Tool

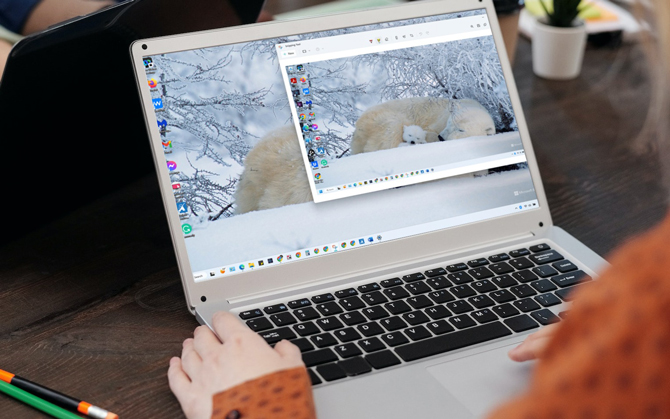
Sometimes you want to keep a copy of something you’re looking at on your computer or phone screen, but it’s not a file that can be saved or a website that can be bookmarked and replicated in exactly the same way.

For example, maybe you’re having computer problems and want to send a picture of exactly what you see on the screen to some tech-savvy person who might know what’s happening. Or, your husband sends you a text message that results in a hilarious and incorrect auto-correct. A screenshot will do the trick.

Screenshots are simple to capture if you know the correct key or button combinations. Below, you'll find step-by-step instructions for your Windows PC, Mac, Chromebook, iPhone, and Android phone.

Windows laptop showing Windows 11 Snipping Tool that has a screenshot of the Windows 11 desktop.

How to create a screenshot on your Windows PC

Your keyboard likely has a key that says “PrtScn.” Once whatever you want to capture is on your screen, press the Shift and the PrtScn keys simultaneously. It will seem like nothing happened, but you copied the image on your screen to the clipboard. From there, you can paste it somewhere else using the keyboard shortcut that involves pressing the “Ctrl” or Control key in combination with the “v” key.

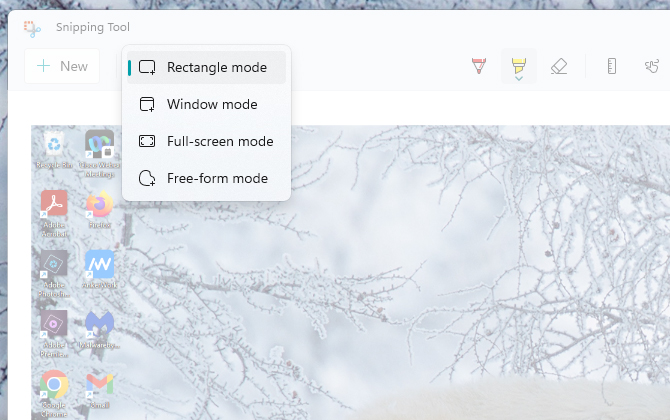
Microsoft also has the Snipping Tool app, which comes preinstalled on Windows PC. You can launch the app by pressing Windows Key + Shift + S. You'll see the screen gray out, and a toolbar will appear with a set of icons for taking different types of screenshots: "Rectangular mode," "Free-form mode," "Window mode," and "Full-screen mode."

Once you snip your screenshot, the image is copied to your clipboard, and you can paste it into documents or an image editor. You'll also receive a notification that a screenshot has been captured. If you click on it, you can open the full Snipping Tool app to save, copy, share, edit, and mark it up with a pen or highlighter.

The Snipping Tool app has more advanced features that you can turn on, including automatically adding a border to your screenshot and adding a time delay of three to ten seconds. The time delay is helpful if you want to capture menu pulldowns and other features that disappear if you hit another key.

Screenshot of Windows 11 Snipping Tool showing a menu with rectangle mode, window mode, full-screen model, and free-form mode.

How to create a screenshot on yourMac

Like the Windows Snipping Tool, Mac OS X lets you capture your screen in several ways, but instead of using a PrtSrn key or a dedicated tool, you use keyboard shortcuts that begin with pressing the Command and Shift keys at the same time.

To bring up the whole menu of screenshot choices, press Shift+Command+5

To capture a portion of your screen and save it to your desktop, press Shift+Command+4, which will bring up a cross-hair. Click and drag the mouse over the part of the screen you want to capture. To save it to your clipboard instead of the desktop, press Shift+Command+Control+4. Then you can paste it into another program.

To capture your entire screen and save it to the desktop, press Shift+Command+3. To save it to the clipboard instead, press Command+Control+Shift+3; then, you can paste the image somewhere else.

To take a screenshot of an open window, press Shift+Command+4+Spacebar. Your cursor is now a camera that you can click over the window you want to capture. The image is saved to the desktop.

How to create a screenshot on your Chromebook

There are two ways to capture a screenshot on your Chromebook using keyboard shortcuts. You can either press Ctrl+Show windows (the Show windows key looks like Show windows button on Chromebook), or you can press Ctrl+F5.

To capture a portion of the screen, you can either press Shift+Ctrl+Show windows or Shift+Ctrl+F5 and then click and drag to highlight the area you want to capture.

How to create a screenshot on your Android Phone

With most Android phones, you take a screenshot by pressing the Power and Volume Down buttons simultaneously. You'll see a notification that a screenshot was taken, and you can choose to share it from there. Or, access your screenshots from your Photo or Gallery app on your Phone. If you don't see the screenshot as your last shot taken, look for a separate folder labeled "Screenshots."

How to create a screenshot on your iPhone

Snapping a screenshot on your iPhone is easy. For iPhones without a home button (iPhone X and later models, except the iPhone SE), press the Power button and Volume Up button simultaneously. For iPhone models with a home button, click (not hold) the home button and power button at the same time.

Two screenshots of iOS 16 screenshot tool. On the left, you see the editing tools you can use with the screenshot. On the right, you see sharing options: from the Done menu, you can save to Photos, File, or Quick Note, you can copy and delete, or you can delete.

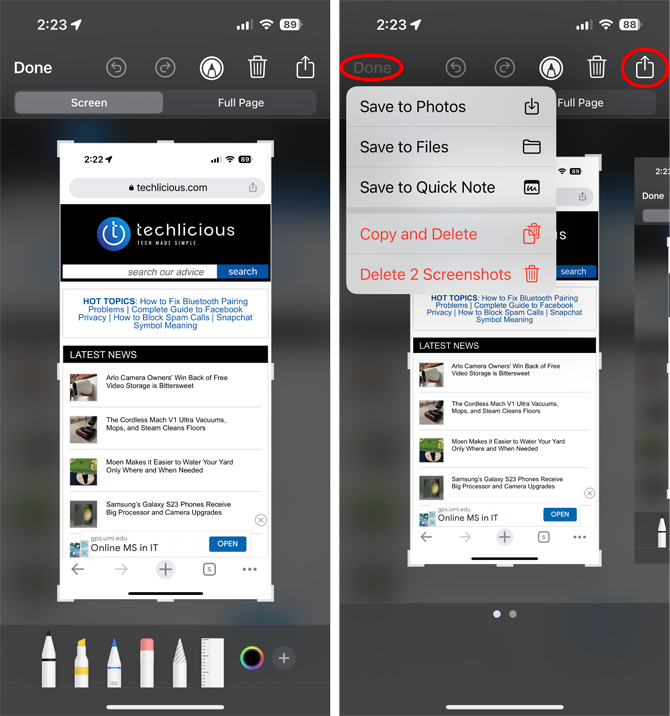
When you first take the screenshot, a preview of the picture comes up in the lower left corner. If you tap on it, you'll be taken to an editing app that enables you to add text and crop the image, among other things, and then send it. If you don't do anything, the screenshot saves to your photo camera roll where you can share it via email or text.

[image credit: screenshots via Techlicious, laptop image via Smartmockups]

For the past 20+ years, Techlicious founder Suzanne Kantra has been exploring and writing about the world’s most exciting and important science and technology issues. Prior to Techlicious, Suzanne was the Technology Editor for Martha Stewart Living Omnimedia and the Senior Technology Editor for Popular Science. Suzanne has been featured on CNN, CBS, and NBC.


Topics

Tips & How-Tos, Computers and Software, Phones and Mobile, Cell Phones, Tech 101


Discussion loading

gravatar

From edward perez on May 27, 2020 :: 5:50 pm


when i bring up Snipping Tool, i get a message that it will be moving to a new home. They suggest checking out the new features in “Snip & Sketch” (accessible via Windows + Shift + S).

in my computing opinion, it’s clunkier than Snipping Tool.
might want to update that part of this article.

Reply

gravatar

From Suzanne Kantra on May 28, 2020 :: 9:28 am


Good point! I’ve added in the information about Snip & Sketch for clarity.

Reply

gravatar

From edward perez on May 28, 2020 :: 9:49 pm


in addition to the snipping modes, snipping tool also lets you specify a time delay before snipping starts. so if you want to snip/snap a menu, set it to 1 to 5 seconds, click New, go to the application w/ the menu, open it and wait for snipping tool to give you the go ahead.
Snip & Sketch only has 3 and 10 secs delay options.

i’ve only found that delay feature in Snagit - $50 one-time + $13 annual maintenance fee :^(

Reply

gravatar

From Tim on May 27, 2020 :: 7:17 pm


Suzanne,

You come up with some good ideas.  An Apple-hater, the first distinct advantage of their operating system to come to my attention is that there’s no mystery to taking a screenshot.  (There are probably other advantages, according to creative users.)

The Control-V trick is new to me.  Apparently this code from the 1980s came back as a result of cloud computing, which is a disaster if used for word processing, but until now I never knew that the PRTSCRN button did anything at all recently.  Maybe that’s because I’ve had trouble grokking the “clipboard,” an invisible utility with apparently no known instructions. 

As my wife is in a software occupation (and mostly using Apple products), it was she who told me about “Clipping Tool.”  What an abomination: first, you have to type in the search box—one level short of bringing up a “Command” line, which only LOOKs abit like Pre-Windows functions.  Secon, its TWO WORDS, and not well chosen.  It’s easy to forget an type in “Clipping Tool,” which of course doesn’t work.  Why this tool cannot be accessed from a desktop icon is a mystery—perhaps Microsoft thought that making screen shots too easy would raise copyright concerns?

Finally, Microsoft recently “upgraded” the Snipping Tool and every time pushes the user to move to the more-editworthy version.  This is simply an obstruction to most of us. 

Maybe there’s a Windows “help” file on this someplace, but I haven’t found it.  And as you probably know about half the time Microsoft’s help files are out of date, referring to no-longer-available functions or simply replacing terminology behind the screen.  Remember the “system tray”?  It’s probably in a help files someplace, but the term is obsolete.

If I weren’t still working, I’d probably switch to Ubuntu.  I still don’t think I’d have much to gain by switching to Apple products, and I would cringe at Apple’s constantly reaching into my pockets looking for more unneeded revenue.  But for us millions compelled to stick with Windows, your advice is frequently a breath of fresh air.

Reply

gravatar

From Josh Kirschner on May 27, 2020 :: 7:38 pm


Since I use the snipping tool all the time, I save a shortcut icon to my taskbar. It’s easy to do. Just search for snipping tool from the Windows Search window then right click on it and select “Pin to taskbar”. Voila! Snipping tool is now available whenever you want it.

Reply

gravatar

From edward on May 28, 2020 :: 10:07 pm


since Snipping Tool is a normal application, you can find the exe and create a shortcut on desktop or in another folder.

Snip & Sketch, on the other hand, probably cos it is a Windows App, is hidden away.  it shows up in Task Manager, but when I attempt to “Open file location”, FileManager pops up a little error msg window: Title = WindowsApps, msg = you dont have permission to access this folder. Click Continue to permanently get access…”. when i do, Windows says “you have been denied permission ...”.
and my windows acct IS an admin acct :^(

oh well ...

Reply

gravatar

From Josh Kirschner on May 28, 2020 :: 11:58 pm


If you want to save a shortcut to Snip & Sketch in your taskbar, you can do it the same way you would for the Snipping Tool. Search for it in Windows Search then right click on it and select “Pin to taskbar”.

I’m not clear what the use case would be to create a shortcut in a folder or on the desktop when it’s already in the taskbar. But I see the same issue you do trying to create one.

gravatar

From Donna Abraham on April 08, 2021 :: 9:46 pm


May i ask u a question regarding a Samsung screenshot?  If someone is sending me screenshots from a grooup chat/ group text,  from their Samsung phone (3 total) the background behind the same message in all 3 screenshots should be the same correct?  Because the screenshot is like a picture of the chat and the background in a pic doesn’t change even if you send it is sections.  Right?

Reply

gravatar

From Josh Kirschner on April 09, 2021 :: 8:25 am


That’s a hard question to answer without a lot more detail, but it’s possible it could change depending on what app they are using and how they are creating the screenshot each time. Did you have a specific concern that is causing you to focus on the background?

gravatar

From edward perez on May 29, 2020 :: 2:55 pm


i am minimalist (wrt computers), so i dont want to fill up my taskbar w/ stuff i only use every so often. thus, i put some shortcuts on my desktop and some in a “utilities” folder filled w/ other shortcuts.  the “put most used things close and less used things farther away” idea.
for me, it’s easier to just dbl click the icon rather than go thru the start menu and/or search.

Reply

gravatar

From Eliza Waciba on January 20, 2021 :: 4:40 pm


yeah

Reply

gravatar

From Bill Hooper on March 01, 2023 :: 5:10 pm


On Microsoft Windows, I am also a big fan of using Win+V with the other screen capture Win+Shift+S
It keeps a list of your last nn copies, screen share or whatever, and you can pick and choose what to Paste from there.

You can even “Pin” certain ones so they’re always there to Win+V Paste anytime.

Quite a handy little tool

Reply

gravatar

From George Mells on March 02, 2023 :: 7:55 am


I have a Pixel XL with Android 10 and the Power/Volume Down method does not work.  However, if I hold the Power button I get a menu that includes Screenshot.

Reply

gravatar

From Gerald Thorburn on October 12, 2023 :: 5:47 am


How do you ‘share’ i.e. send a Screenshot/png in W11 (latest Build) to your Android device from (say) Phonelink, (or via some other method without using a USB cable!). 
Cannot find the method.

Reply

gravatar

From Josh Kirschner on October 12, 2023 :: 10:41 am


I haven’t uncovered any way to send photos from your PC to your phone using Microsoft Phone Link - it appears to be a one-way street that only allows downloads from your phone. Microsoft says that certain “Surface Duo and select Samsung and HONOR devices” offer a two-way street, but this isn’t very helpful for most people.

For sharing, I simply use Dropbox and Google Photos to sync and share files across all of my devices. A less clunky, more flexible solution than Phone Link.

Reply

gravatar

From Josh Kirschner on October 13, 2023 :: 12:44 pm


Suzanne, gave me another method. It’s a little clunky, but works without an external cloud provider. You can use the Drop feature in Edge to sync photos or other files between your phone and PC. You will need to have Edge on both devices and be logged in to the same account. Drag photos into Drop on the PC and they will sync to Drop on the phone. Works for Mac and iPhone, as well.

Reply

Home | About | Meet the Team | Contact Us
Media Kit | Newsletter Sponsorships | Licensing & Permissions
Accessibility Statement
Terms of Use | Privacy & Cookie Policy

Techlicious participates in affiliate programs, including the Amazon Services LLC Associates Program, which provide a small commission from some, but not all, of the "click-thru to buy" links contained in our articles. These click-thru links are determined after the article has been written, based on price and product availability — the commissions do not impact our choice of recommended product, nor the price you pay. When you use these links, you help support our ongoing editorial mission to provide you with the best product recommendations.

© Techlicious LLC.