If you have bought a new iPhone XS, XS Max or, this month, an XR, follow these steps for the best way get it up and running quickly and smoothly. And then, take time to tweak some of the settings for a more enjoyable iOS 12 experience.
1. Upgrade Your Current Gear
Apple does not officially say it's necessary, but I've been told by customer service folks that upgrading your current iPhone and especially your Apple Watch to the current iOS12 and Watch OS5 could help you avoid potential upgrade/re-pairing issues. For your current iPhone, go to Settings > General > Software Update (second listed item). If you own an Apple Watch, go to the Watch app on your iPhone, tape My Watch on the far left of the bottom row, General > Software Update.
In the opening screens of confirming the update to iOS 12, you may be asked if you want to turn on automatic updating. Say yes. We are in an age of constant hacking and security threats, and most occasional iOS updates focus on enhanced security features you definitely don't want to leave your iPhone vulnerable to.
2. Back Up Your Current Gear
Your new iPhone can be cloned from your current iPhone to make sure your change in usage is only in the hardware. To get an exact clone, transferring all your apps, photos, email, settings and passwords from old to new, you'll need to back up your current iPhone just before setting up your new iPhone.
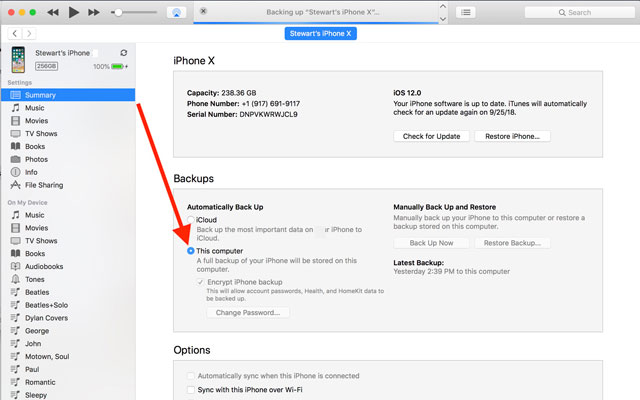
You can back up to iCloud via Wi-Fi, but it can take a very long time, especially if your Wi-Fi isn’t very fast. We recommend firing up iTunes on your Mac or Windows PC, then connect your current iPhone via USB. When the icon for your iPhone shows up above the left sidebar in iTunes, click on it, then click on the top item in the resulting new sidebar, Summary. In the middle left of the Summary screen, under Automatic Back Up, you'll see two backup location choices: iCloud and This Computer. Use the latter. Creating a backup via USB should take no more than 5-10 minutes. Backing up to iCloud can take more than an hour.
3. Set Up Manually
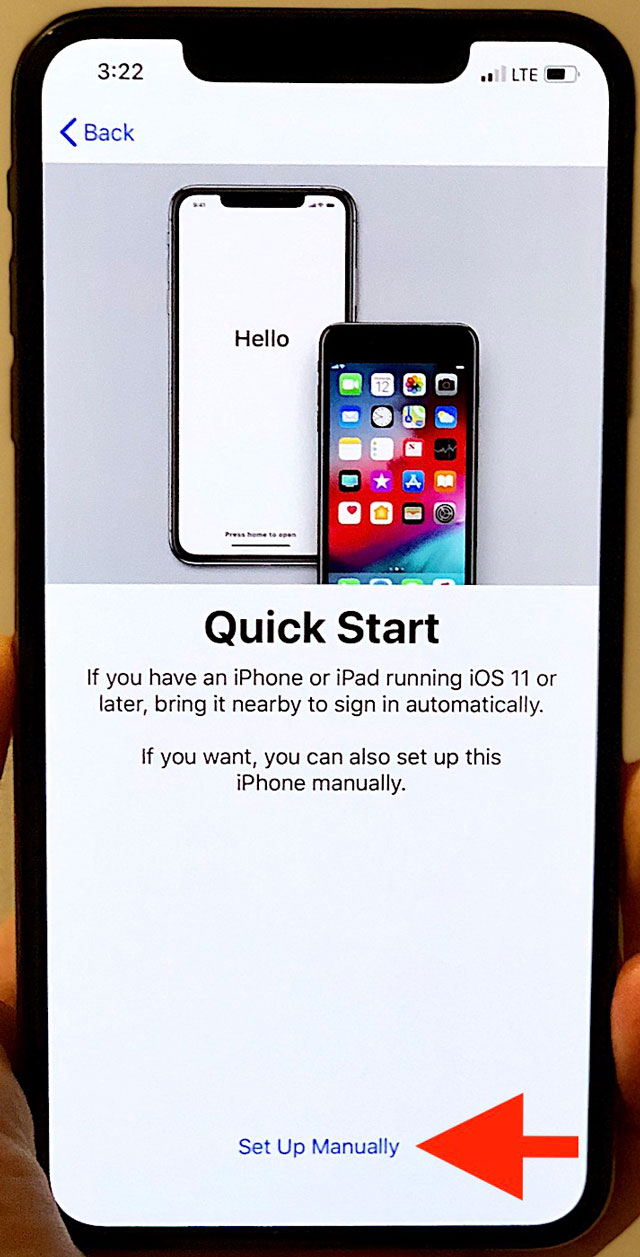
After updating and backing up your current iPhone, eject it from iTunes, unplug it and place it away from your PC. Now hit the button on the right side of your new iPhone XS to wake up it up. After you get past the Hello, Language and Country screens, you'll arrive at Quick Start, where you are told that bringing your current iPhone close to clone it. Don't do this. Wirelessly cloning your old phone to the new can take forever, especially if you've got many gigabytes of goods to transfer. Instead, at the bottom of the Quick Start screen, tap "Set Up Manually."
4. Set up Face ID
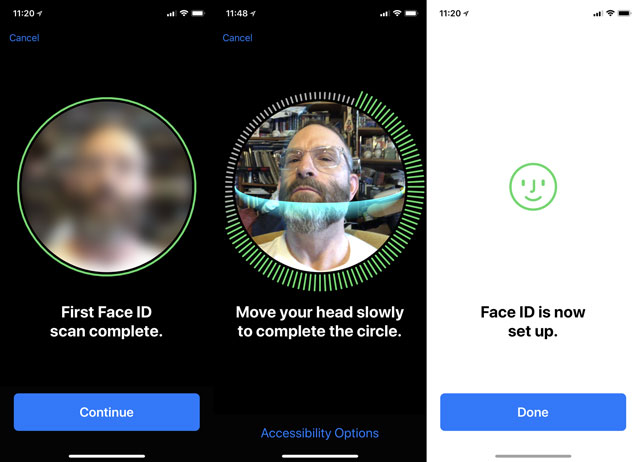
If you're new to the iPhone X series, gone is the familiar fingerprint-reading Home button. Instead, your face is the security key to unlock your phone. Getting your new iPhone XS to recognize you is simple. When you're prompted, just roll your head around until the detection circle on the screen is filled, then repeat. Not only will your face now awaken your iPhone, but you'll be able to create both an Animoji or, new to iOS12, a Memoji, respectively a cartoon figure or personalized representation of your own face to send animated voice messages in iMessage.
 .
.
5. Restore From iTunes
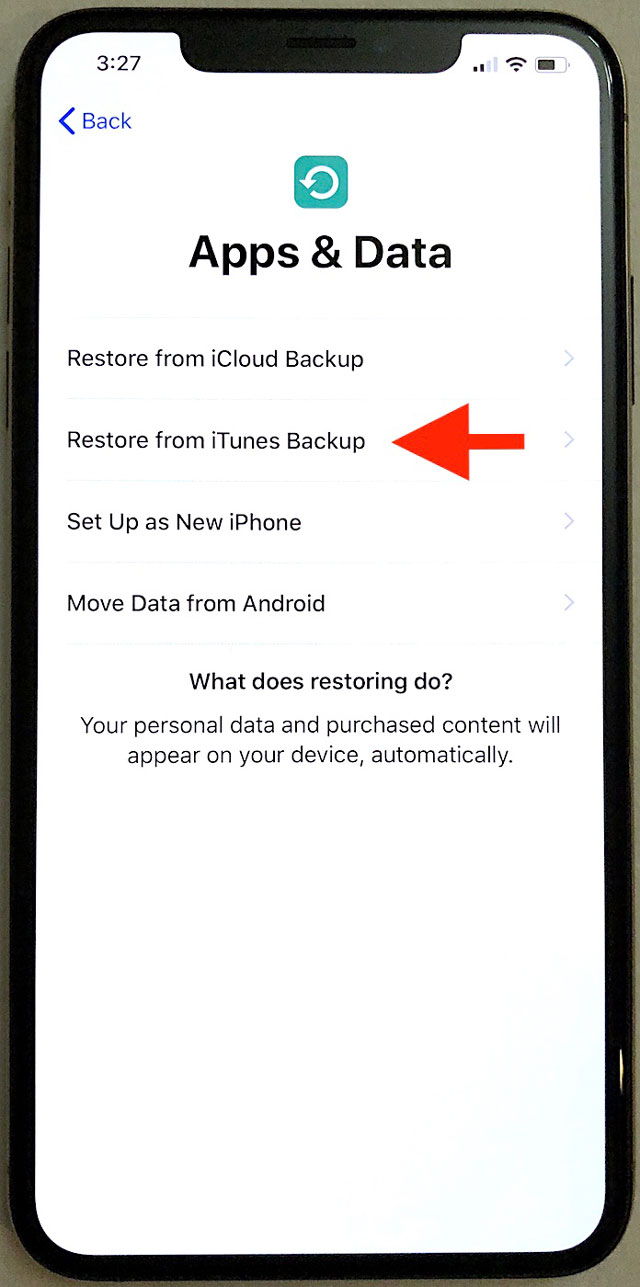
After setting up Face ID and setting an eight-digit passcode, you'll come to an Apps & Data screen – this is the step in which you'll move your data to your new iPhone. Choose the second item: Restore from iTunes. [Again, you can choose to restore from iCloud if you backed up to iCloud, but it will take a REALLY long time.] You'll be prompted to connect your new iPhone XS to your PC and iTunes with the included USB/Lightning cable. On your PC screen with iTunes open, you'll get a Welcome To Your New iPhone page with two choices. Choose the second, "Restore from this backup," choose the backup you just made from the drop-down menu and hit Continue. Apps, email, photos/videos, passwords and settings will now be transferred from the backup to your new iPhone, a process that should take around 30-45 minutes.
6. Add any new accounts and set your default email, contacts and calendar
If you use Apple’s Mail, Gmail, Outlook or another email account, you’ll want to head over to Settings > Passwords & Accounts > Add Account. There you can select your email service and enter your username and password. You can choose whether to also sync that account’s Contacts, Calendar and Reminders and Notes. You can also go to Settings > Mail to set your default email for messages sent outside of the Mail app.
If you use Google or another provider to manage your calendar and contacts, you’ll want to make sure any new calendar and contact entries are saved to the correct calendar and address book. Otherwise, new entries will automatically be saved into your Apple Calendar and Contacts and will not sync with your Google Calendar and Contacts. To select your default Calendar, go to Settings > Calendar > Default Calendar. To select your default Contacts, go to Settings > Contacts > Default Account.
7. Activate your SIM card
First, try calling or texting someone from your new iPhone. If said call or text fails, that means you have to activate your new phone. Calling your carrier and having them make the switch could take a few hours to go through. It may be simpler to simply switch the SIM card from your old iPhone to the new one.
8. Change the Name of Your New iPhone
In iTunes, once the backup is completed, you'll be returned to the Summary page. Since you transferred your old settings to the new phone, the name of your old phone was transferred with it. You can update your new iPhone's name in two places: on the iPhone in Settings > General > About > Name, or, in iTunes, click on the name of the iPhone at the top of the right sidebar, and you'll be able to change its name there.
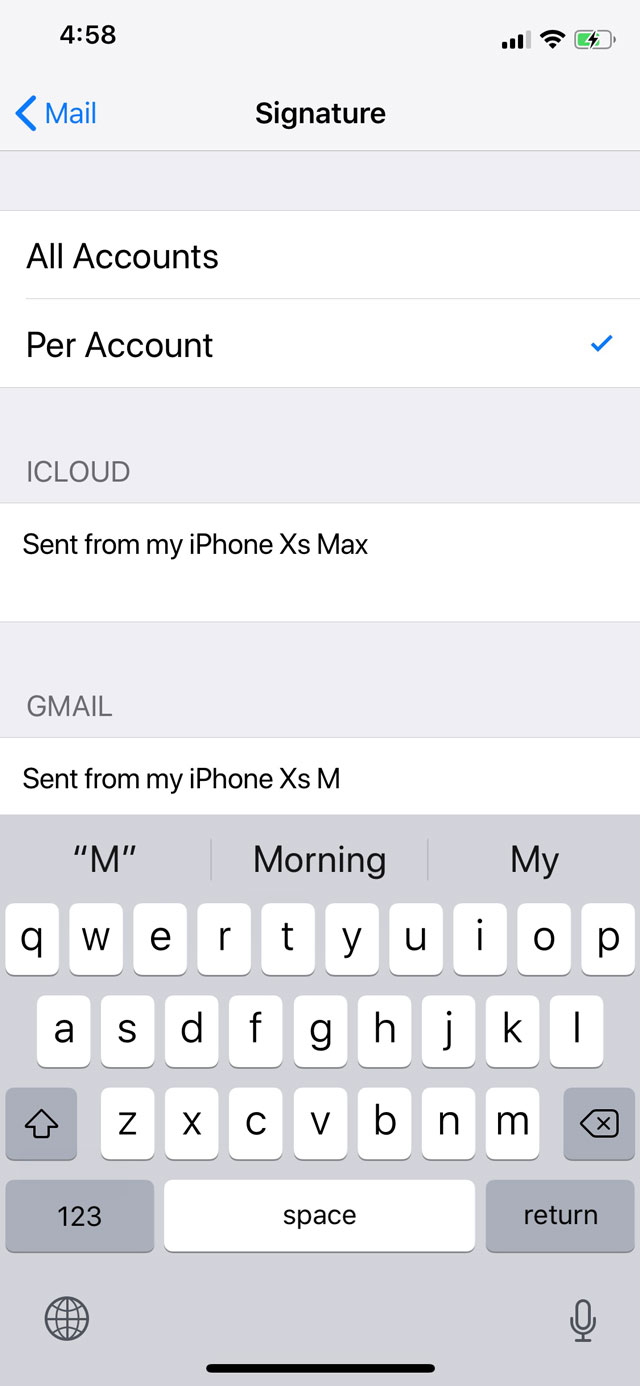
9. Change your email signature
After you update your iPhone's name, go into your new iPhone's Settings àMail (scroll down) àSignatures (last from the bottom) and change the "Sent from my iPhone ?" line to the name of your new iPhone in all your email accounts.
10. Turn on Automatic Back Up to iCloud
While you're on the iTunes Summary screen, click iCloud under Automatically Back Up. This way, in case of emergency (i.e., a lost/stolen phone you have to replace), you'll have a constantly fresh backup of your new iPhone at your disposal.
Or, on your iPhone, go to Settings > Apple ID > iCloud > iCloud Backup and turn on automatic backup.
11. Transfer your music to your new iPhone
If you had music stored on your old phone and you backed up to iTunes on your computer, your music might not have loaded on your new iPhone. Go to Settings > Music (scroll down a bit) and toggle off iCloud Music Library. Then go back to iTunes on your PC, click on Music (directly below Summary in the left sidebar) and you'll see your iTunes music syncing options.
Settings to change in iOS 12
Whether you’re getting an iPhone for the first time or trading in an old one for a new model, you’ll want to ensure your settings for iOS 12 are optimized for security and battery life. Here are six settings you should check now.
Change your Lock Screen Notifications
From the Lock screen or Home screen, slide the screen to the right, and the notifications panel appears. The way you had these configured on your old iPhone – if you had them configured (or even knew these were there) – will be transferred to your new iPhone.
On this swipe-right Notifications page, you'll find widgets that pull and lists quick-glance information from and quick access to a variety of both Apple and non-Apple apps – Calendar, Weather, News, Stocks, the new Screen Time app, which lets you track yours and your kid's phone usage, etc. If you've never seen this page before, scroll down to the bottom and tap Edit to select which widgets run on your Lock screen and in what order you want them listed.
The information in regular Notifications — calls, texts and so on — is now more in-depth and interactive. You can now read and respond to text messages, among other tasks, even from the Lock screen.
You can adjust the amount of information that appears for each app – and whether the app delivers lock screen Notifications at all – by going to Settings > Notifications. There, you can select specific types of Lock Screen Notifications for each app.
But this Lock Screen access convenience should be balanced by privacy and security – your Notifications are now easier for someone else to access. Conversely, if you need information from an iPhone you've accidentally left at home or the office or if you lose your phone, access to some apps might make it easier for a family member, co-worker or good Samaritan who finds it to help you out.
Depending on your attitude, you may want to restrict what can be accessed when your phone is locked. Go to Settings > Face ID & Passcode, and you'll see a list entitled Allow Access When Locked. Here, you can toggle on and off access to Today View (those widgets), Notifications View, Siri, Reply with Message, Home Control and Wallet. Home Control lets you control devices like smart lights and other smart home devices. For each of these, you'll need to weigh your privacy versus convenience.
Automatic app updates
Since Apple apps are all carefully curated to remove unwanted malware and spyware, there's no reason to update apps manually as you do on an Android phone. That's why Apple lets you automatically update apps in the background – but you have some choices to make. Go to Settings àiTunes & App Stores and turn on Updates for Automatic Downloads. If you have a limited data plan, make sure you toggle Use Cellular Data to off.
Background App Refresh
iPhone can automatically update your apps in the background when they're not actively running. If your data plan is limited, you may not want your apps to update automatically unless you're actively using them. To turn off background app refresh, go to Settings > General > Background App Refresh to choose to turn background app refresh on or off. If you turn on automatic refresh, you can choose to have this refresh via Wi-Fi-only or Wi-Fi & Cellular Data and to allow access for each app on a case-by-case basis.
Wi-Fi or Cellular App Connectivity
You also have an option about how your apps connect to the Internet when you're actively using them. Go to Settings > Cellular and scroll down to Cellular Data to see a list of apps and choose whether they can be accessed via a cellular connection. Turning on an app allows it to connect via cellular, turning it off means that app will connect only via Wi-Fi. For instance, you don't want to inadvertently start watching a movie on Netflix or a video on YouTube when there's no Wi-Fi and burn through your monthly data allotment in two hours.
Sometimes your Wi-Fi connection isn't wonderful. So, at the bottom of the list, you can choose to let a cellular connection help out Wi-Fi for those apps you really need to have access to, and a separate toggle for cellular to assist Wi-Fi when accessing your iCloud Drive. If you have a limited cellular data plan, you'll want to be careful here. Are you getting a fulsome Wi-Fi signal? If not, turning on Wi-Fi Assist may result in you burning through your monthly cellular data allotment quickly at home when you think you're just using Wi-Fi.
Wi-Fi Calling
If you get spotty cellular reception at home or another location you frequently visit, you'll want to turn on Wi-Fi Calling to ensure your calls come through. Go to Settings > Phone > Wi-Fi Calling. There you can choose to turn on the feature. You'll be prompted to enter your emergency address, which should be the address where you'll be using Wi-Fi calling.
If you've got a Mac, MacBook or iPad connected to your iCloud account and to Wi-Fi, toggle on Add Wi-Fi Calling For Other Devices, which let them get calls routed to them if your phone's not nearby.
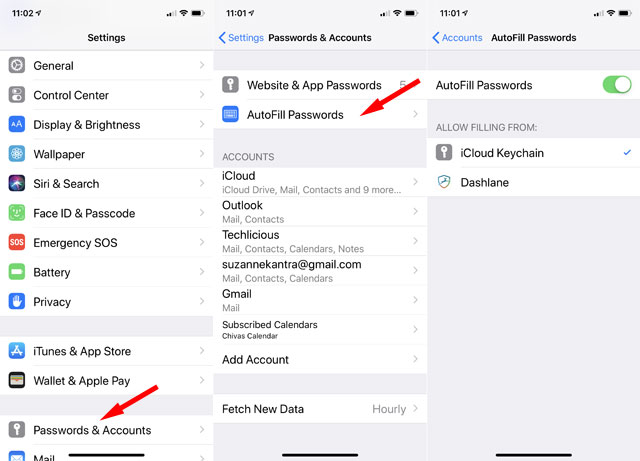
Turn on AutoFill Password
iOS 12 has made it easier to autofill your passwords with support not only for Keychain but also third-party apps — right now, Dashlane, LastPass and 1Password. Go to Settings àPasswords & Accounts > AutoFill Passwords and select the app you want to use under "Allow Filling From." You’ll only see third-party apps listed if you have one installed on your iPhone.
Turn on Do Not Disturb
If you don’t want to be woken up at night by app notifications, text messages and calls, you can set Do Not Disturb hours (Settings > Do Not Disturb). I’d suggest enabling “Allow Calls From your Favorites” and “Repeated Calls” (a second call from a number within 2 minutes), so someone who is calling in an emergency can get through. You can also turn on “Do Not Disturb While Driving” to limit notifications when your phone is connected to your car or a hands-free accessory.
Other important considerations for your new phone
Do You Need Insurance?
When you purchase your new iPhone, you'll be presented with an option to add the Apple Care+ ($199 or $9.99/month for 24 months) extended warranty. Your decision to buy Apple's insurance depends (or any insurance) somewhat on how long you plan to own your new iPhone and your personal klutz quotient.
Apple includes one year of hardware repair coverage, which includes two incidents of accidental damage coverage with a $29 fee for screen damage and $99 fee for any other damage. If you want protection against loss and theft, look to your carrier or Worth Ave. Group, which provides 2 years of full coverage with a $50 deductible for $189.00 for a $999 iPhone XS.
Get a case and screen protector
These new iPhones are not cheap, topping out at $1,449 for the 512GB iPhone XS Max. Even the baseline iPhone XR, available this month, starts a pricy $749. Do you really want to risk slinging this investment around unprotected? That's a rhetorical question.
My iPhone XS Max is currently encased in a Speck Presidio V-Grip ($44.95 on SpeckProducts.com, check on Amazon) case, drop-tested to 10 feet and, other than its ridged and rugged colored or opaque choice of perimeter protection, is otherwise clear to exhibit the iPhone's gold rear. Whatever case you purchase, make sure it has been drop-test rated to at least six feet.
Protecting my iPhone XS Max's screen is a Zagg Invisible Shield Glass + Visionguard ($44.99 on Zagg.com, check price on Amazon), which claims to make iPhone's display three-times more shatter-proof than it is naked. Look for a tempered-glass screen protector, like the Zagg, with a 9H hardness rating and good reviews for touch-sensitivity. (Note: While the American Academy of Ophthalmology says "there is evidence that blue light can interfere with humans’ circadian rhythms, making it harder to fall asleep. For some people, it can be a good idea to limit screen time before bed. Or to filter out blue light from screens before bedtime." But the AAO also says "there is no scientific evidence that blue light from digital devices causes damage to your eye.")
[Image credit: Stewart Wolpin/Techlicious]


From Hollis Neil Parsons on July 11, 2019 :: 10:13 pm
Trying to set up my Facebook account
Reply