Just like you would ask Google Assistant or Siri to accomplish tasks on your phone, you can also talk to your Windows PC to get things done hands-free. While you can use basic commands to perform simple tasks like opening files and navigating within applications, the built-in speech-to-text feature opens up another level of productivity. For example, you can dictate emails, take voice notes, and write reports just using speech-to-text.
If you’re running Windows 10, you’ll see speech-to-text referred to as dictation. For Windows 11, the feature is called voice typing. Both versions of speech-to-text use online speech recognition to convert your spoken words into text, so you’ll need an internet connection for the technology to work.
Speech-to-text is built into the Windows OS, but it’s not on by default. Here’s how to set it up and use speech-to-text for your PC.
How to enable speech-to-text in Windows
- Type the Windows Keyboard shortcut: Windows key + H. If speech-to-text is already set up, you’ll see a pop-up window with a microphone, and you can check out how to use speech-to-text below.
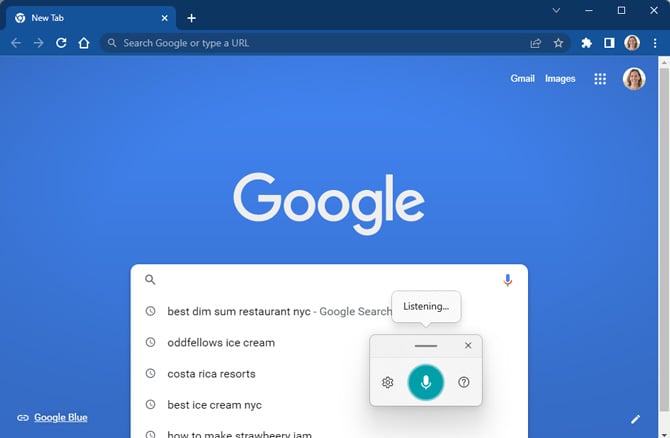
If you don’t see the microphone window pop-up, you will see a pop-up with a link to enable Speech Recognition. Click the link. - In the Speech settings window that pops up, toggle on “Windows Speech Recognition.” If Speech recognition isn't already setup on your PC, the Speech Recognition setup window will open up. If the Speech Recognition window doesn’t open, you’re done and can start using speech-to-text as outlined below.
- In the Speech Recognition window, select “Next.” You may see a window asking you to select the microphone you want to use for speech-to-text. If you do, you’ll be stepped through setting up your mic, including calibrating it for speech recognition.
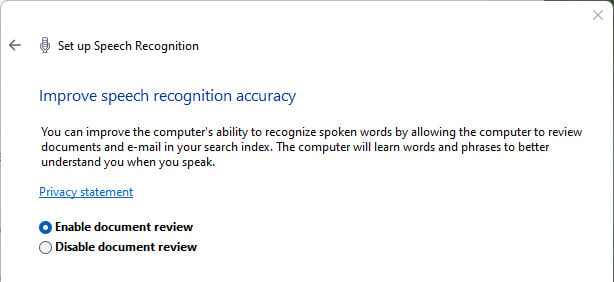
- You next have the option for Microsoft to read your documents and email and use the content to improve the voice recognition accuracy. The flipside of this is that your content will be sent to Microsoft for analysis, so you are giving up some privacy. Because of this, I recommend selecting “Disable document review.” If you're having trouble with accuracy of the speech-tp-text, you can take the time to retrain the computer to recognize your voice. And you can always enable document review later in Control Panel, select Ease of Access > Speech Recognition > Advanced speech options and check the box "Review documents and mail to improve accuracy."
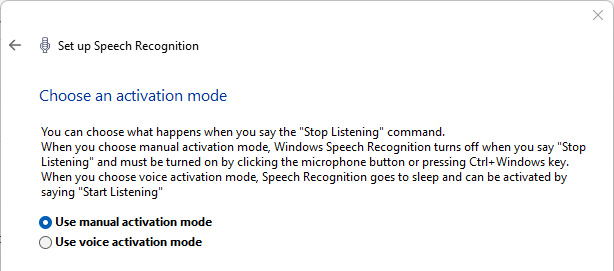
- In the "Choose an activation mode" window, I recommend selecting “Use manual activation mode” to protect your privacy, which prevents your computer from always listening for voice commands. If you decide you want voice activation, you can turn on the option later in Control Panel, select Ease of Access > Speech Recognition > Advanced speech options and check the box "Enable voice activation."
Using speech-to-text once it is enabled on your PC
- Open the app in which you wish to use speech-to-text. It could be Microsoft Word, a web browser, or anything else that accepts text.
- Place the cursor where you want to enter text.
- Press the Windows key + H keys to open the speech recognition tool.
- Hit the mic button and start talking. Whatever you say will appear in your document as text.
Generally, whatever you say will be added to the document, unless it’s punctuation or a command to select text or navigate within the document. For instance:
- To enter a new line, say “new line.”
- Instead of manually hitting the pause button, you can say “pause dictation” to stop the speech recognition window from listening to your voice.
- Instead of scrolling up or down, you can say “go to the start of the page/document” or “go to the end of the page/document.”
- To undo, you can say “undo.”
- To select previous words or paragraphs, say “select the previous three paragraphs,” or in place of paragraphs, say “words.”
To understand the full range of commands available, check out Microsoft's complete guides to the voice commands to edit text and navigate within a document and the voice commands to add punctuation.
If saying punctuation gets in the way of dictating, you can turn on “Auto punctuation,” which you can find by clicking on the Settings icon in the microphone pop-up window. In our testing among the Techlicious editors, Windows added the proper punctuation most of the time, though we highly recommend proofreading everything you dictate before sharing it.
If you have a non-native accent and speech-to-text is not working well, you can head over to Settings > Time & language > Speech. There you can check the box "Recognize non-native accents for this language."
If you're still having trouble, you can retrain the computer to recognize your voice in Control Panel, select Ease of Access > Speech Recognition > Train your computer to better understand you.
Want to take advantage of more Windows shortcuts? Check out our guide to the most useful Windows keyboard shortcuts.
[Image credit: screenshots via Techlicious, laptop on table via Smartmockups]
Sagar Naresh Bhavsar has been writing about technology for more than two years. Previously, he was a staff writer at Guiding Tech and TechWiser. He loves working out, having a cup of coffee, and playing guitar.