When you’re working on an Excel worksheet with complex formulas, the last thing you want is to accidentally delete a formula or set of data and completely change the output. Fortunately, you can protect cells from being modified or deleted.
When you create a new Excel workbook, all the cells in each worksheet are locked, but the worksheet is in unprotected mode so that you can make changes. When you put a worksheet in protected mode, you can’t make changes to the cells that are locked. For a worksheet that will be frequently updated, instead of unlocking individual cells, it is better to unlock all the cells and then lock the ones whose values will never be changed.
Without any further ado, let's jump right in.

How to lock cells in Excel
- Open the Excel workbook and select all cells in the worksheet with the cells you want to lock by pressing the Ctrl + A buttons on your keyboard.
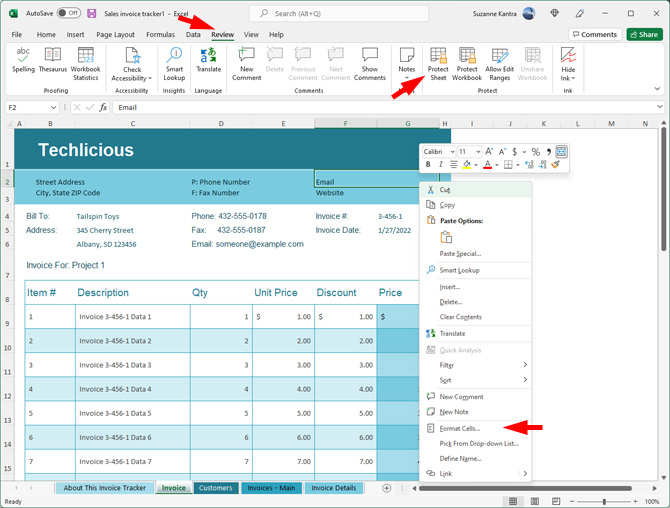
- Press the Ctrl + 1 buttons or right-click the selected cells to open the Format Cells window.
- Click on the Protection tab.
- Uncheck the Locked option to unlock all cells and click the OK button to save the changes.
- Now, in your worksheet, select the cells you wish to lock.
- Right-click and select the option to Format Cells.
- Under the Protection tab, check the box before the Locked option and click OK. Once you have protected all of the cells, you need to protect your Excel worksheet for the protection to take effect.
- Click on the Review tab in the top menu bar.
- Select the Protect Worksheet (if you’re not working full screen, you may need first to select Protect to show the Protect Worksheet option). Here is where you can choose to password-protect the option to change the worksheet from protect mode to unprotected mode.
- Click the OK button.
Now, if you try to change the data in a locked cell, you will receive a pop-up that tells you, “The cell or chart you’re trying to change is on a protected sheet. To make a change, unprotect the sheet. You might be requested to enter a password.” And when you right-click on a cell in the worksheet, the Format Cell option will be greyed out. Importantly, you can still change the values in the unlocked cells.
If you wish to unlock the worksheet later, simply head over to the Review tab on the toolbar and select the Unprotect Sheet option. And when you finish editing, you can go back to the Review tab and select the Protect Sheet option to prevent changes to locked cells again before saving.
[Image credit: Screenshots via Techlicious, laptop showing Excel via Techlicious/Smartmockups]
Sagar Naresh Bhavsar has been writing about technology for more than two years. Previously, he was a staff writer at Guiding Tech and TechWiser. He loves working out, having a cup of coffee, and playing guitar.