Image courtesy of Katherine Gray.
What's the difference between a snapshot and a really good photograph? Sometimes it's a matter of using the correct settings, but many times, the answer is composition. Good composition is one of those things that's hard to define, but you know it when you see it. Like most things in art, good composition is largely subjective, but there are some basic guidelines you can follow.
The term "composition" refers to the balance of elements in the image, the way they are arranged in relation to each other and within the frame of the photograph. Where do you put your subject – in the center, or off to one side? How many different things are in your image, and how will your viewer know which to focus on? These are questions you should ask yourself as you compose your shot. Remember, you don't need to put your subject smack dab in the middle of your photo, staring directly at the camera!
The guidelines below will help get you thinking about ways you can make your photographs more interesting–regardless of the type of camera.
The Rule of Thirds
Images courtesy of Katherine Gray.
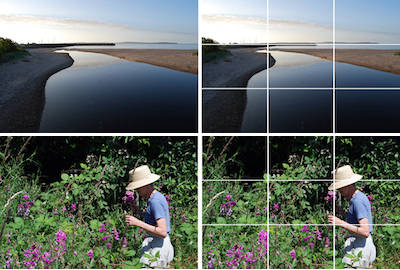
The most basic element of composition is called the rule of thirds. This guideline states that if you divide your image into thirds both horizontally and vertically, most of the action should occur either along those imaginary lines or at the points where they intersect. Doing so lends a sense of movement and interest to your image.
Take, for example, a picture of the beach. If you put the horizon line directly in the middle of your frame, it makes the image seem static and uninteresting. If, however, you put the horizon line along one of the imaginary horizontal third lines, you will instantly make your image more dynamic. If you put the horizon along the top line, so there's more of the land showing, then the focus will be on the water, the waves, and the seashore; if you put it along the bottom line, the focus will be on the clouds and sky. Either makes for a pretty excellent photo!
Similarly, if you're taking a portrait, try having your subject off-center, so that her face is at one of the intersections of the third lines. The basic rule of thumb is to give your subject somewhere to "go" – that is, to have them facing into the larger part of the photograph. In the example image of the woman picking flowers, she is facing and reaching into the photo, and both her head and hand are at the intersections of third lines.
Symmetry
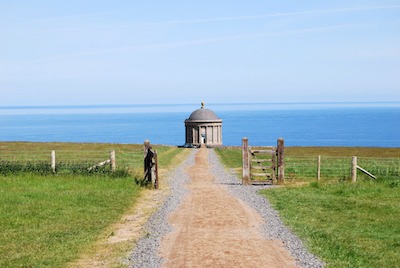
Image courtesy of Katherine Gray.
Now that you've got the hang of putting the elements of your image off center using the rule of thirds, we'll talk about doing exactly the opposite! Sometimes putting your subject in the exact center of your photograph can be quite an effective technique, especially if the two halves of your scene are symmetrical.
You have to be extremely careful when using this technique, though – if lines that are supposed to be level (such as the horizon) are even a little bit crooked, it will be very obvious! Using symmetry is a great way to show off a particularly impressive or amusing subject, because it really makes the viewer sit up and take notice.
Leading lines

Image courtesy of Katherine Gray.
Another way to bring a sense of movement into your photos is to use "leading lines." These are lines within your image that draw the viewer's eye along them, leading us from one element to another within the scene or drawing us toward the subject. Roads or pathways are obvious lines that are easy to find, but you could also look for lines created by tree branches, mountaintops, even a queue of people waiting for a show.
Leading lines can take many forms, and all have a different sort of feel to lend to your photo. They can be spiral or radial, straight as arrows or gracefully curved. Pay attention to the lines in the scene you're photographing and use them to your advantage.
Depth of field

Image courtesy of Katherine Gray.
Depth of field refers to how much of your image is in focus, and it's a very important decision to make as you consider composition. A sweeping vista of mountains and distant villages will probably be best captured with a very wide depth of field, so that objects both near and far will be in focus. For a portrait or close-up of a flower, however, you might want to have only your subject in focus, with the background softly blurred.
Depending on the type of camera you have, choosing your depth of field might mean selecting a scene mode such as portrait, landscape, or macro. If your camera has more manual controls, you might use the aperture priority setting to adjust it – remember, the larger the aperture number, the smaller the opening, and the wider the depth of field.
Simplify the background
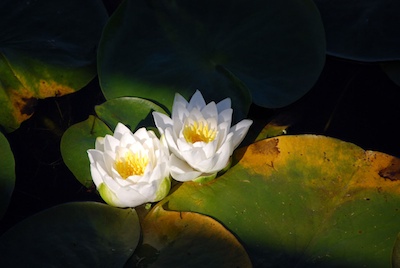
Image courtesy of Katherine Gray.
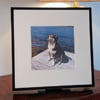
One thing that can easily ruin an otherwise great photograph is a cluttered background. This is particularly true for portraits or photos of a single object in a busy situation, where the things going on behind your subject can distract from the subject itself.
There are a lot of ways to combat this problem. If possible, arrange your subject so that the background is as simple as possible, preferably a solid color. That could mean standing a person in front of a thick evergreen bush, for example, or against a wall. Putting your subject at a distance from anything in the background, and then using a narrow depth of field so that everything other than your subject is blurred is another good way to make sure that your viewer is paying attention to what you want them to see.
Mix up your perspective

Image courtesy of Katherine Gray.
Many people take every photograph from exactly eye level – it makes sense, since that's the easiest way to do it! But it doesn't always make for terribly interesting pictures. Try mixing it up a bit instead. Get down low and shoot upwards, or climb above your subjects and shoot down. Find a different vantage point than the usual.
Getting down to your subject's level is particularly great for taking portraits of children and animals. Not only does it go a long way toward putting your subject at ease, but it also can result in some marvelously candid shots.
Experiment!
The best photographs are quite often the result of experimentation. Don't be afraid to try all sorts of different techniques – the worst that can happen is you delete some photos that didn't work out! Take some time to observe everything around you with an artist's eye, and try to find new ways to show your vision to the world.
Looking for a new camera? See our top picks in our Digital Camera Buying Guide