There's nothing like a watermark on your photos to let others know they're not public domain. If you have Adobe Photoshop or another high-end photo processing program, adding a watermark is simple. But if you don't want to spend more dough, GNU Image Manipulation Program (GIMP), for Mac and Windows, does it for free.
.jpg)
.jpg)


 Download GIMP (For Mac, or Windows PC)
- Launch GIMP. You’ll notice that it takes a while for the program to open. This only happens the first time. (For Mac users, GIMP also opens a program called X11. This is normal. You need X11 open to run GIMP.)
- Select File, then Open to open the image you want to watermark.
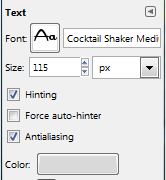
- Click on the letter “A” in the toolbox to select the text tool. When the text tool is selected, you’ll see options for selecting the font, font size and color below the tools.
- Click on the box next to the word “Font” to select your font.
- Select the size of the font. You’ll want to experiment with the size depending on the font you’re using, but start out with a 50-100 px font and adjust from there.
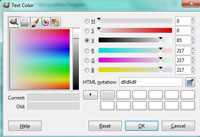
- Click on the box next to the word “Color” to change the color of the text. A box will pop up that will let you choose your text color. The default color is black. You’ll see a column of sliders with letter next to them. Move the “V” slider 85. This is just a starting point. You’ll want to experiment with the color—lighter for photos with dark backgrounds and darker for photos with light backgrounds. Select “OK” to finalize your selection.
- Select “Layer” from the main menu bar and then New Layer. Keep the default setting for “Layer Fill Type” as “Transparency” and select “OK.”
- Click on the area of the image where you want your watermark to appear. A box will pop up called “GIMP Text Editor.”
- As you type your text into the box, you’ll see it appear on the photo. If the font is too big or small, type a new font size into the box labeled “Size” on the Toolbar and click the “Use Selected Font” box. Checking and unchecking the box updates the text you see on the photo. IF you select a larger font, it won’t all appear in the box, so use your mouse pull out one of the corners of the box to accommodate your text.
- When it’s the right size, move your mouse over the box that contains your font until you see a cross with four arrows. Click and drag your watermark to the portion of the image where you want the watermark to appear. Then click “Close” in the GIMP Text Editor box.
- Select “Image” from the main menu bar and then “Flatten image”
- Select “File” from the main menu bar and then “Save As” to create a final watermarked version of your photo.


From Mungee's Ma on June 14, 2010 :: 11:36 am
Glad to have found your tutorial, thank you!
Reply