
Encryption is ubiquitous in modern computing, from the padlock icon in a web browser showing a secure connection to the end-to-end encryption in WhatsApp. If these exchanges are worth protecting (and they are) then all the data on your computer hard drive is, too. Macs offer this capability in a tool called FileVault. (In Windows, it's called BitLocker.)
But there's a catch: FileVault can also keep you out of your drive if you lose or misremember the login to your Mac. If you choose to enable FileVault (which we recommend), you can protect against lockouts by safely storing the recovery key that decrypts your drive. You can enter the recovery key at startup to unlock the disk if no user password works.
Apple has made the process much easier on the new macOS 26 Tahoe by automatically storing the key in your Passwords app, but you don't need to upgrade to store your key safely.
Read more: Forgot Your Apple ID Password? Here’s What to Do
It's possible you enabled FileVault when you set up or updated your Mac. To check, click the Apple icon in the upper left of the screen, then System Settings (or System Preferences on older operating systems) > Privacy & Security > FileVault to see if it's already on. If not, toggle the switch. You may see a popup window where you enter your password to authorize the process. From here, the steps diverge depending on the OS.
Saving your recovery key in macOS 26 Tahoe
With FileVault toggled on, confirm that the recovery key has been stored. Launch the Passwords app, click the All category in the upper left and search for "filevault" or the name of your Mac. An entry for your recovery key should appear.
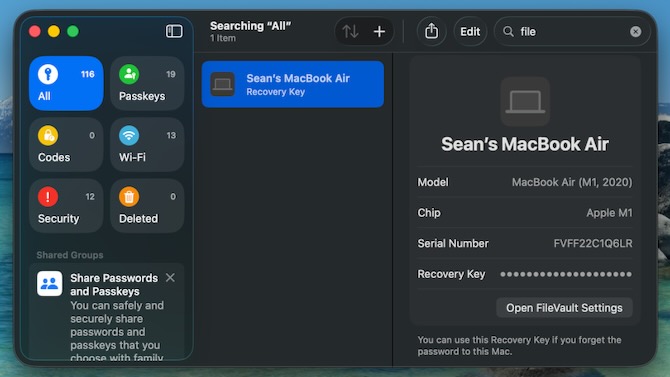
But what if you lose access to your Passwords app (which can happen if you lose access to your Mac)? It's safest to store a second copy of the recovery key somewhere else. In Passwords, click on the recovery key entry to display the 24-character code. You can write the key down, screenshot it, or copy and paste it into another app. (You can do the same from the FileVault settings.) Skip to "Storing an offline copy," below, for next steps.
Saving your recovery key in older macOS versions
Earlier versions of macOS allow you to store the recovery key in your iCloud account or make a separate copy, but not both. After you turn on FileVault, you'll be presented with two choices:
“Allow my iCloud account to unlock my disk”
“Create a recovery key and do not use my iCloud account.”
We recommend the first option, as Apple, with all its technology and security resources, handles storage. However, there are caveats. Apple doesn't guarantee that even this method will gain you access to your drive. Also, this requires that you have your iCloud login to retrieve the key.

If you are concerned about losing multiple logins, you can go the second route to print, write down, or digitally store the key somewhere else.
Read more: Apple’s M5 iPad Pro Blurs the Line Between Tablet and Laptop
Storing an offline copy
Whether you store your recovery key outside Apple's system as a backup (macOS Tahoe) or the only option (earlier OSes), you'll need a safe place to put it.
If it's on a paper copy, put it somewhere secure – ideally in a safe, or at least not out in the open or anywhere near your computer (where a thief could grab both). If storing the key digitally, placing the file on your computer won't help, since this is an emergency measure for when you can't get into your system.
The best option would be to copy it into a password manager. If you have macOS Tahoe, the key is already stored in the Passwords app, so you would want another app for redundancy, such as 1Password, Dashlane, or Google Password Manager that work on virtually all platforms.
The previous version of macOS, Sequoia, does have the Passwords app. So you could manually enter your recovery key to get essentially the same result as what Tahoe does automatically. Then you could store another copy in a second password manager as a backup. Or if you have an older version of macOS without the Passwords app, you can use any of these other password managers.
[Image credit: Sean Captain/Techlicious via Nano Banana]