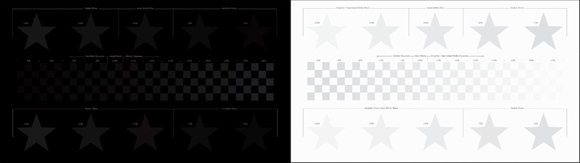
 The brightness and contrast setup patterns from Disney’s WOW Blu-ray)
If you haven’t adjusted the settings on your HDTV, you’re not getting its full performance. By eye or with a Blu-ray setup disc, having an understanding of what each picture control does is crucial to getting the best picture.
With a Goldilocks-esque “just right” amount of technical bits and practical advice, our guide should have you on the road to a better picture in minutes.
Picture Modes
Nearly all TVs have picture modes that adjust multiple settings to create a certain “look” to the image. The best idea is to start with the “most accurate” setting, then adjust as you see fit. With nearly all TVs, this mode is called “Movie,” “Cinema,” or something similar. If these aren’t options, “Standard” is likely close.
If you’ve been watching your TV for a more than a few minutes, switching to one of these modes is going to be a shock. It will seem red (warm) and soft. It isn’t, which I’ll explain as we go.
Contrast
This control adjusts the bright parts of the image: Clouds, white shirts, snow, etc. The idea is to set this control high enough that the image “pops,” but not so high as to mask detail. All TVs have a maximum contrast setting, above which you’re not making the image any brighter, you’re just making near-white objects totally white.
If you’re using a setup disc, the contrast pattern will have a ramp of progressively whiter bars. The idea is to be able see most of these (but not those labeled “above white”).
If you’re not using a setup disc, find a TV show (ideally a live sporting event) that takes place outside. Skiing works great for this, though baseball does as well (fly balls, any shot of the sky). The idea is to be able to set the control so that you can still see detail in bright white objects. There should almost never be bright white blobs on the screen. If there are, turn the contrast control down some.
There is no average number to use as a guideline for this setting, but it’s almost never 100 or anything close. Try somewhere around 80% and go from there.
Brightness
This is the opposite of the contrast control. It adjusts the dark parts of the image: Shadows, black hair, black leather jackets. The idea here is to set this control low enough that the picture has lots of contrast (as in, the difference in the light and dark parts of the image), but not so far that there’s just huge swaths of blackness on screen during any night scene.
If you’re using a setup disc, the brightness pattern will have a ramp of progressively darker black bars. The idea is to be able see most of these (but not those labeled “below black” or similar).
If you’re setting this by eye, any night or darkly lit scene will do. Set the control fairly low, past the point where you lose detail. Now gradually increase it until you see detail. If the picture looks gray or washed out, you’ve gone too far.
Color/Tint
Generally speaking, you shouldn’t have to adjust these at all. These are holdovers from the old tube TV (CRT) days. With component and HDMI connections, the TV shouldn’t need adjustment to color or tint.
But so you know, color is color saturation. Set too high, people will look sunburned, and everything will seem cartoony. Tint adjusts the green/red in the image (Martian/lobster). Without specific color filters (that usually come with setup discs), you can’t adjust either of these settings these correctly. Skip.
Sharpness
This is a highly misleading control. Generally speaking, the Sharpness control adds enhancement to the image to make it appear sharp. Ironically, by doing so, it’s actually masking true fine detail in the image. This setting should be set as low as possible. Some TVs actually soften the image if you set it too low (bizarre, to be sure), so watch out for that. Look for dark lines on a bright background. Edges of buildings work great. Lower this setting so there isn’t any ghost line next to the dark edge. This ghost line is called “edge enhancement,” and goes a long way in making the image look artificial.
Once you get used to the naturalness of the image without edge enhancement, you’ll never go back.
Color Temperature
This one is going to be tough. Not because it requires any labor on your part, it’s just going to do something to the image that at first is going to seem bad.
Color temperature is how bluish or reddish the image looks. Picture a typical scene of people walking down a street. Set the color temp too cool, and it will look like they’re walking down the street in winter, with that season’s normal bluish tones. Set the color temp too warm, and it will be a reddish warm day instead.
With most TVs, the idea setting is “Warm” or “Low.” In some cases, this is too warm, and “Normal” is closer. If you’re changing the settings for the first time, and the TV was set in the “cool” color temp mode, it is definitely not accurate and even “Normal” will appear to your eye as too warm. Give your eyes time to adjust. Watch on “Normal” for a few hours, and “Cool” will seem incredibly blue.
Backlight
Backlight controls are as important to an excellent image as the brightness and contrast controls for LCD and LED LCD TVs (plasmas don’t have backlights). Interestingly, no setup disc offers instructions on how to set this control.
The backlight setting is like a volume control for the image. Turn it up, and the entire picture (bright whites and dark blacks alike) get brighter. Turn it down, and everything gets darker.
If you leave this turned all the way up, not only are you wasting energy, but at night your TV can be hard to watch. Modern LCDs are extremely bright, and watching such a small bright object in a dark room can create severe eye fatigue.
During the day, set this as high as you want. For critical viewing, or watching at night, the idea is to get the best black levels, while still creating a watchable image. Once the you set contrast and brightness correctly, turn the backlight control all the way down. This will likely be too dark for most viewing. Turn it up to the point where it looks the best. Often, at night, this could be as low as 20%, depending on the TV.
Conclusion
It’s not possible for a TV to be set at the factory with the best settings possible for your home. Twenty minutes or so on your end can drastically improve the picture quality of your TV. We strongly suggest a setup Blu-ray. They’re cheap, and the Disney WOW disc is especially helpful and easy to follow.
Beyond that, a local ISF Calibrator will dial in your TV perfectly, including calibrating the color temperature and often the actual color points of the TV.