Downloading photos to your computer without organizing them is the digital equivalent of stuffing printed photos into shoeboxes. When you want to find a particular photo, you’ll have to sift through dozens, hundreds or (if you’re like me) thousands of photos. But if you’ll spend a few minutes organizing your photos when you download them to your computer, you won’t find yourself doomed to hours trying to find them later.
No matter how easy it is to remember everything about a photo you’ve just taken, the more time that goes by, the harder it becomes to remember the details. Did you download those photos of the family reunion after the trip to Arizona or with the pictures from Jimmy’s birthday? And which birthday was that?
While I’d like to say that there are free, simple organizing apps, many have been discontinued. Mac users still have a free option with the Photos app (which replaced iPhoto). Windows users may need to spend money to do it right. Windows Live Gallery used to be the best organizing and editing app, but it’s been discontinued. The current Photo Gallery for Windows can display photos but offers no organizational tools. Adobe Photoshop Elements ($59.99 on Adobe.com, $54.99 on Amazon) is easy and fast to use and worth the investment to ensure you can find those precious memories in the future.
Before you download your photos
Save time and hard drive memory by making sure your camera’s date and time settings are correct and editing out the bad photos before exporting them to your computer.
Check the date and time. Although you may have set the time and date on your camera when you first set it up, when you change the batteries or time zones, these settings can drift over time by minutes or hours. Go into the camera’s menu and check that the settings are still correct. This is especially important when you’re downloading photos from two or more sources such as your digital camera and smartphone or when you’re downloading photos from a friend. With correct date and timestamps, photos taken at the same time of the same subject will appear next to each other in your photo library, making it easier to browse to find your favorite photos.
Turn on GPS. It’s surprising how quickly we forget exactly where a photo was taken. Many digital cameras have GPS, but leaving it turned on can drain the battery. If you’re going out for a long time, try taking the first couple of photos at your first location with GPS turned on. Then turn it off until you arrive at the next location.
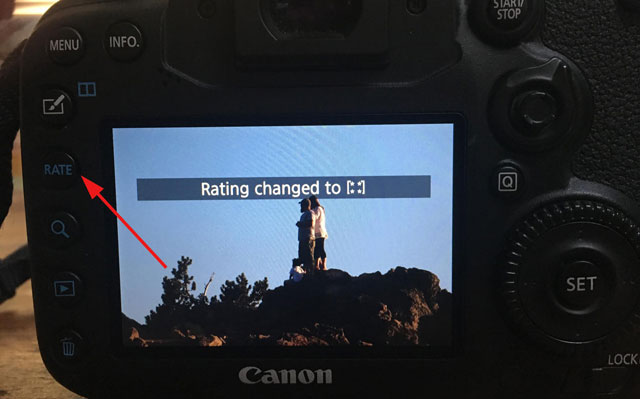
Rate and trash unwanted photos. Before you download anything to your computer, get rid of unwanted photos. Although you may want to save many photos of the same subject, there are some you’ll probably never want: pictures that are out of focus, extremely overexposed or underexposed, or unintentional shots of your hand or the inside of your bag.
Many cameras offer an easy way to rate pictures. Some cameras let you add a heart or star to favorite the photo. Look for a rating or favorites button when playing back the photos on the back of the camera. When you import the photos to your computer, the photo library software will transfer the ratings with the other metadata about the photo to help you find your favorites fast.
Find photos when you want them
Naming and tagging folders and photos are the keys to finding a single photo you are seeking. Use these five tips to make it easy to find your photos.
- Name the folders and save them to a special place on your computer’s hard drive. Try creating subfolders in the Pictures folder.
- Add keywords and tags (or titles and descriptions) that describe what’s in the photo.
- Use the face recognition feature in photo software.
- Assign a location via GPS or manually in a photo library.
- Create a collection or album of your favorite photos from each event, vacation or period of time, such as “summer around home.”
Keywords and tags
Be consistent naming and tagging your photos with keywords you’ll remember and use. A tag or keyword can be a phrase or a single word. Don’t skimp when using keywords. Free associate to come up words that describe your photos. As you get ready to import your photos to your computer, think about the event, the subject and where the photos were taken. Add multiple keywords by using a comma between keywords in the image tag or keyword entry.
Genre What is in the general theme of the photo? Try keywords like these: people, family, mountains, trees, rivers, city, flowers, birds, clouds, food, holiday, birthday, sports, dance, vacations, travel and concerts.
Time of day, seasons Times and seasons can be helpful both as a descriptor and as a way of grouping photos for a period of time—for example, with keywords for winter, summer, spring or autumn. Searching for “autumn” might bring together photos from the start of school, Halloween and so on. “Night” could display all of the photos you shot at night.
Specifics Name the event: “Sally graduation,” “Frankie soccer tournament,” “Southwest vacation,” “Thanksgiving,” “dinner,” “charity run,” “away games,” and so on.
If you don’t take a lot of photos, you might be able to get away with more general keywords. The keyword “flowers” might pull up only a few dozen photos to look through. It may be easy to find the photo of the daisy without adding the word “daisy.” The more specific the keyword or tag, the easier it will be to find the exact photo you want.
Subject matter Describe what’s in the actual photos. For sports, you might choose “game play,” “crowd shots,” “after game,” “practice.”
Organizing with Photos on a Mac
The Photos app is part of Mac OS X. The app organizes your photos and offers basic editing functions. Photos from your iPhone and iPad are added here automatically along with the location of the photo. A single click lets you order prints and books or share a photo or album with your family.
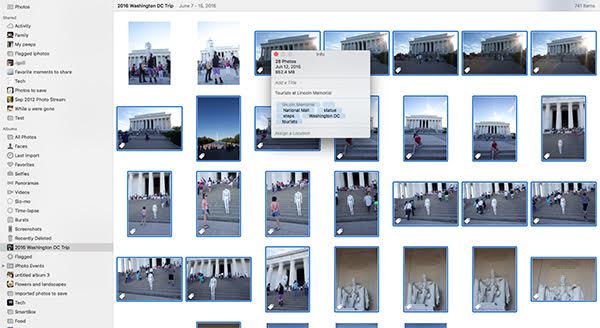
You can add keywords, facial recognition and location information to your digital photos in the Info window after importing them. To bring up the Info window, click on a photo (or group of photos) to highlight it (you’ll see a blue outline), and press Command + i(or go to the Window menu, then Info).
In the Info window, you can:
Add a title. This names the file if you want to export and saves it in a folder on your computer.
Add keywords. This is essential for quickly finding photos in the future.
Favorite the photos. Clicking on the heart adds the photos to your favorites album.
Add a location. If your camera doesn’t have GPS, add a location by typing in the city, state, country, landmark, theme park or other location detail. Photos will automatically suggest places; click on the best match. A pin will appear on the map below. Be sure to wait until the chosen location is filled out so it gets saved with the photo(s). You can adjust the location pin by dragging and dropping it. To find photos from a particular location, run a search for the place name.
Add a face. When choosing a single photo, the option to add a face appears. Clicking on the + symbol displays a circle on the photo. Drag the circle over the face you are naming, and type in a name. If the person is in your contacts, you can choose the suggested name from a list.
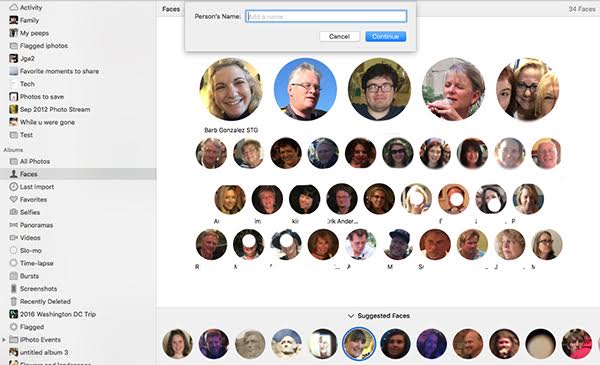
For photos that were previously imported, set aside some time to name the faces to make tagging easier in the future. Go to Albums, and click on the Faces album. This will be where you find the faces later.
Organize pictures in Adobe Photo Elements
Buying Photoshop Elements may feel like a real investment ($59.99 on Adobe.com, $54.99 on Amazon), but it’s worth it. Elements is designed for the casual photographer (compared to Adobe Lightroom, which is designed for the enthusiast or professional). There is a 30-day free trial on Adobe.com, so you can try it out to see if it works for you (If you want to save the $5, you can enter the product key you get from your Amazon purchase after your free trial).
Adobe Photoshop Elements is available for Mac too. Unlike Mac’s Photos app, Elements imports photos into folders so you can find them on your computer. This is handy when you want to save the photos to an external drive and connect that drive to another computer or directly to the USB port on your TV.
Photo Elements has a number of built-in organizing tools that can be readily adjusted to regroup photos, making them easier to find. To start, choose Organizer in the welcome window.
 Choose where to save your imported photos. Do this in three steps.
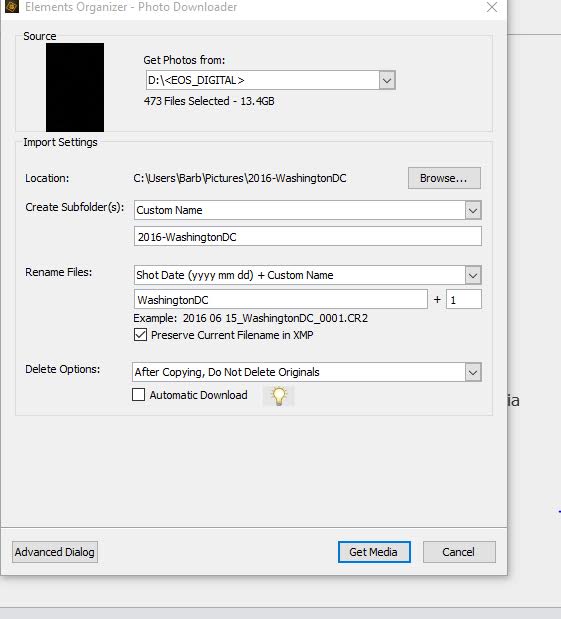
- Click on Import. The Import window will open. It’s important to choose where to save your photos and name the folders. To do this, click on Advanced Settings in the bottom left of window.
- Under Import settings, browse to the location of the folder on your computer or external hard drive where your photos will be saved. The default is the Pictures folder.
- Create a subfolder for the current photo import. This will help you find the photos outside of the Photoshop Elements app. The default is to name the folders by date, but you may find it easier to remember the name of an event than when a photo was taken. Use the drop-down menu to choose Custom name. Name the folder for the event(s) that you are importing—“JohnnyRecital” or “Recital-Prom-Grad”—so you’ll be able to find the photos on your computer by searching for the folder.
I like to create a hierarchy of folders. The top folder is my Pictures folder. The next folder is a broad subject such as “holidays,” “Oregon” or “around town.” I browse that folder in the location setting, then create a new folder for the specific event that I’m importing, such as “2016Thanksgiving.” When looking for files, I can go to the Holiday folder and find all of the holidays for all of years—handy if I don’t remember what year Johnny got the bike for Christmas.
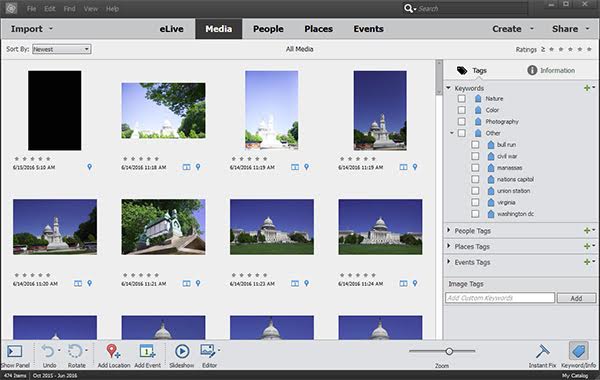
Create events with sliders. When taking photos, there may be days where you shoot one event in the morning and another in the afternoon. It’s easy to group and view these events separately in Photoshop Elements.
Under the Media tab, look for the slider. Choose Min (minimum) to include more photos in an event (several months, several days, etc.) or Max (maximum) if you want to separate an event that took place in the morning from the one in the afternoon. Once the event has been created, click the pencil to name it something like “brunch with Grandma” or “playing in the park.”
The slider can be adjusted to create new Events (groups). Move the slider toward minimum and create an event called “family weekend” to include all events over a number of days. Photos will included when choosing both events—“brunch with grandma,” and the broader event “family weekend.”
Add a location to a photo or event. In the Places view, you can add a location to an event or group of photos by clicking on Add Location and then typing in a location. It takes a moment to appear. Choose the matching location from the suggestion list. A pin will appear on the map.
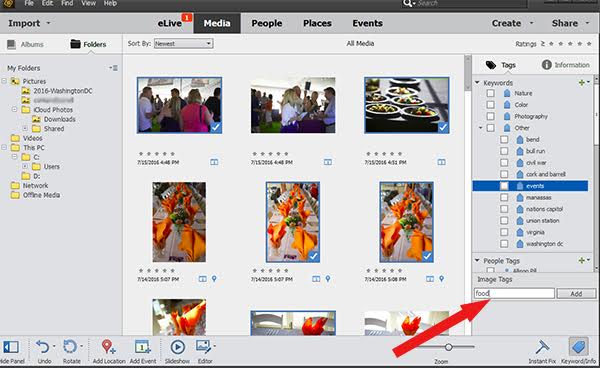
Add a tag. For photos that cross events and locations, you'll want to add a tag. This can be as simple as food or sunsets.
Add face recognition to photos. The People view will display unnamed faces found in your photo library so you can name them. It will suggest matching faces from other photos so you can confirm to add them to the group of photos of that person.
Import photos after each event. Organizing photos may seem like a lot of trouble, but it’s worth it. After a few imports, it will become a habit. Importing photos after each event speeds up the process because there are fewer photos to tag and manage. You’ll also be more likely to share your photos with friends and family right after a big event.
Updated August 25, 2016 with new software information and recommendations
[Image credit: travel photos via Shutterstock, Barb Gonzalez/Techlicious, Apple, Adobe]