Are you tired of hopping between different gaming platforms to access all your favorite games? Wouldn’t it be great if you could launch them all from one place? Well, Steam has got you covered!
As an avid gamer who manages a diverse gaming portfolio across multiple platforms and a long-time user of Steam, I've found it worthwhile to add my non-Steam games to my Steam library. This has eliminated the hassle of remembering where each game is installed or managing multiple desktop shortcuts.
Read more: Roblox Introduces New Ad Format with In-Game Rewards
Whether it’s a classic game gathering dust on your hard drive or a recent purchase from another store, Steam makes it super easy to consolidate your collection. Here’s how you can add non-Steam games to your Steam library, simplifying your gaming life and keeping everything just a click away.

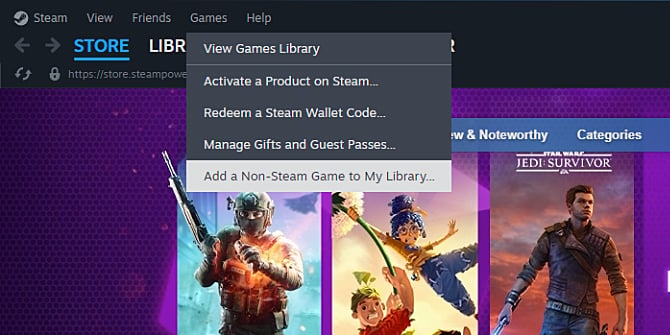
1. Launch Steam
Launch Steam on your computer to add your non-Steam games to your Steam library. Once it’s up and running, navigate to the top of the window and click on the Games tab. This is where you’ll find various options related to your game collection, including the essential tool for this task: the “Add a Non-Steam Game to My Library” option. Selecting this will take you to the next step, where you can choose which games to include in your Steam library.
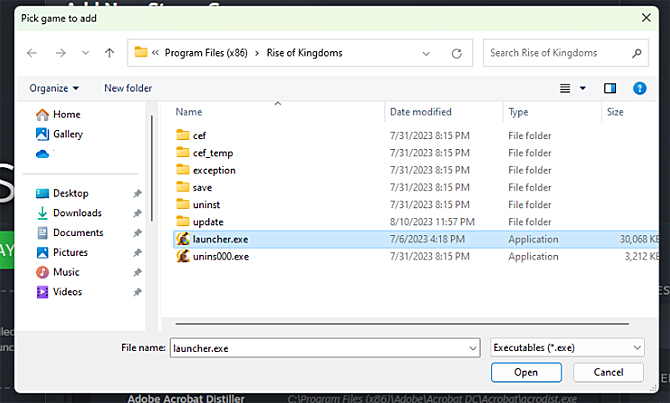
2. Find the non-Steam Game you want to add
After selecting “Add a Non-Steam Game to My Library,” a new window listing available applications will appear on your computer. If your desired game isn’t immediately visible in the list, click on “Browse.” This allows you to navigate your computer’s directories to locate the game’s executable file (usually ending in .exe). In my case, I wanted to add Rise of Kingdoms to my Steam library. In the directory where the game is installed, I located the launcher.exe file, which is the primary executable for Rise of Kingdoms.
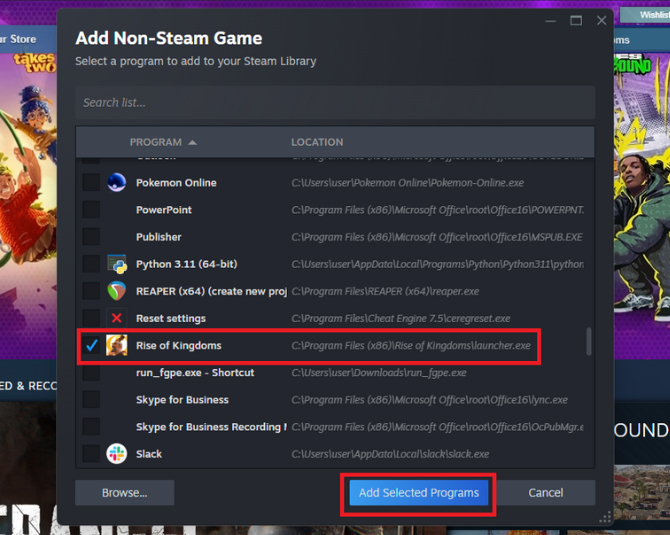
4. Add your game to Steam
Return to the Steam window once you’ve located and selected the executable file. Ensure your game is checked in the list of programs. Then, click on “Add Selected Programs.”
5. Find your game in the Steam library
After adding your non-Steam game to Steam, click on the "Library" tab at the top of the Steam client. This will display all the games you have in your Steam library, including the newly added non-Steam game. Scroll through your list or use the search function to quickly find Rise of Kingdoms or any other game you’ve just added. From here, you can easily manage settings and launch the game.
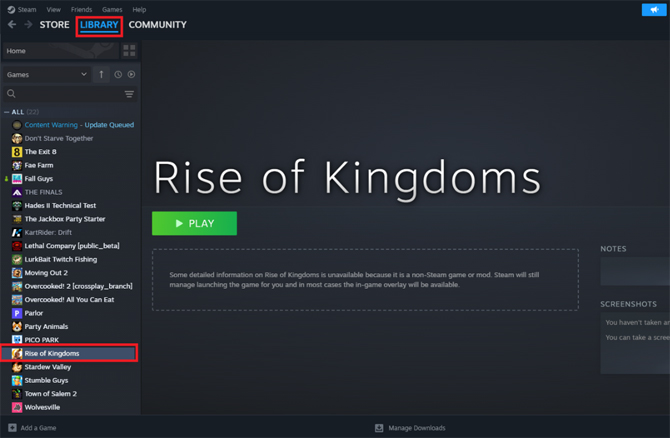
Note that the title of the game is taken from the name of the game's executable file. Some indie games have generic or abbreviated executable names that do not clearly reflect the full game title. If the game title is not showing up properly, right-click on the game in your library’s sidebar, select “Properties,” and type in a new name. I often rename games to ensure my library is neatly organized and easily navigable.
Read more: Keycaps 101: Find the Perfect Set for Your Mechanical Keyboard
[Image credit: screenshots via Techlicious, gaming concept prompted by Techlicious and generated by Midjourney]
Wilbert Soriano is a freelance writer with more than a decade of experience covering a wide range of topics, including business, health, technology, and relationship advice.