Ship times for Apple's new iPhone X are now around 3-4 weeks. If you just got your hands on an iPhone X or patiently awaiting your iPhone X's arrival, there are steps you should take to ensure a smooth setup.
Although its gleaming stainless steel trim is an obvious aesthetic homage to the original iPhone, the new iPhone X (as in the Roman numeral 10, not the letter "X" as in Malcolm) is a radical remaking of Apple's signature product. Gone is the familiar Home button, which means nearly all your muscle-memory iOS navigation methods will have to be re-learned. And, gone is Apple's pioneering Touch ID fingerprint reader introduced with the iPhone 5S back in 2013, replaced with a new security protocol called Face ID that makes your face your iPhone entry ticket.
Also gone is the 5.5-inch HD LCD screen found on the iPhone 6/7/8 Plus premium models, replaced by a longer/larger, brighter and crisper 5.8-inch nearly edge-to-edge AMOLED (Active matrix Organic Light Emitting Diode) display packed with 25 percent more pixels. This new display is somewhat marred by a cutout notch on top, which houses the 3D Face ID sensors and the selfie camera. On either side of the notch are the status icons for wireless connectivity strength and battery life.
These changes result in radically different ways of setting up the iPhone X. Here is a 10-step guide to getting through the iPhone X setup with the greatest alacrity.
1. Contemplate spending $199 on AppleCare+

Even if you've already ordered the iPhone X, you might want to add phone insurance, especially if you plan on owning your iPhone X for more than a year. Unlike previous iPhones, both sides of the X are covered with glass and so is far more fragile than previous iPhones. If you've ever dropped and cracked an iPhone, AppleCare+ or another insurance plane will provide some piece of mind.
2. Buy a Case
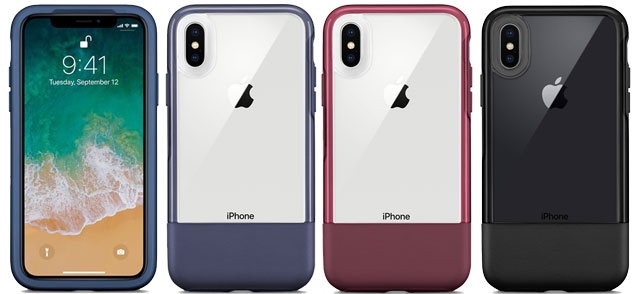
Whether you buy AppleCare+ or not, why take chances? While Apple's iPhone X leather cases are beautiful, they don't offer much drop protection. Try and find an iPhone X case that boasts about its shock absorbing properties, even if it masks the phone's beauty. We like the Speck Presidio Ultra ($49.95 on Speck, $39.95 on Amazon), Otterbox Statement Series (shown, $35.95 on Apple) and the Lifeproof NEXT case ($79.99 on Lifeproof).
3. Back up your old iPhone via iTunes
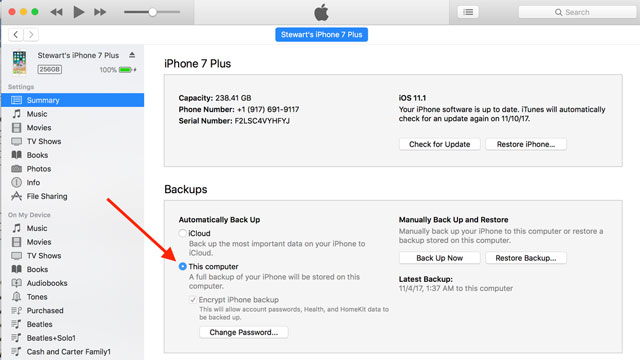
I'm assuming you're upgrading from an earlier iPhone here. So before you do anything with the new phone, do a backup of your current iPhone to your PC or Mac, even if you auto-backup via Wi-Fi to iCloud. Using a physical USB connection to load your iPhone X from a backup is appreciably faster than pulling the backup from the cloud via Wi-Fi. A physical connection to iTunes also will speed your X's upgrade from iOS 11 to either 11.1 or the pending 11.2.
4. Do NOT clone from your previous iPhone
After unboxing your phone, swiping up at Hello and choosing your language and country, etc., you'll encounter a Quick Start screen that advises you to bring an iPhone or iPad running iOS 11 nearby to essentially clone its settings to your new phone. This sounds and is cool, but, if you've got hefty files on your old to transfer – any more than a few hundred photos, music and especially video files – along with your settings and apps, this turns out to be a painfully slow method that is measured by hours. If you've followed my advice and made a backup of your current iPhone to your Mac or PC, choose the "manual" option to set up your iPhone X.
5. Set up Face ID
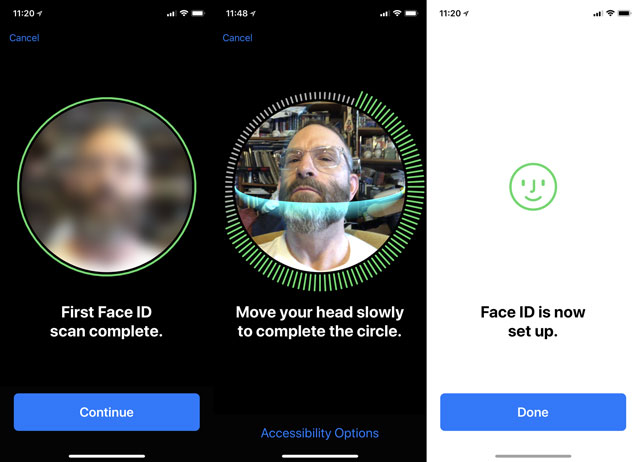
Setting up Face ID is super easy: when prompted, you just roll your head around until the detection circle is complete, then repeat the process. The whole thing took around 15-20 seconds, far faster than the Touch ID fingerprint setup process. If the phone doesn't recognize your face, you'll have to enter your passcode. If you want the phone to recognize your new look, try unlocking the phone with your face a few times in a row, and it should make the adjustment. Also, note that you can disable Face ID temporarily by pressing the power button 5 times and selecting
Once Face ID is set up, make sure you head to the Messages app and play with the new Animoji – 12 animated heads that you can record your voice messages through. You can find more precise Animoji guidance here, and a pile of the newest craze – Animoji Karaoke (invented by Fast Company tech editor Harry McCracken) – here.
6. Activate your SIM card
Unless prompted or notified otherwise, call your carrier to activate cellular service on your new X.
7. Don't pair your Apple Watch when prompted
My setup process became confused when I tried to pair my Apple Watch with my new iPhone X during the course of the initial setup. You may find it easier to skip the Watch pairing when prompted and do the un-pair/re-pair after your X is all set up. You will have to erase your Watch (choose the Erase option that keeps your cellular plan intact), but don't worry – you'll be able to restore its Face, Complications, Apps and other settings from the backup stored in the Watch app that you just transferred.
8. Learn the new X navigation gestures

While your phone updates, familiarize yourself with X's new navigation and control gestures. These new gestures and controls include:
- Swiping up from the bottom is equal to pushing the old Home button for all functions.
- Swiping up and holding in the middle of the screen produces a horizontal array of open apps like when you double-tapped the Home button (this gesture is easier than it sounds). Tap-holding an app produces a red minus sign above each one so you can force close apps that aren't performing correctly.
- Access the Control Center by swiping down from the right corner (signal strength/battery meter)
- Access your Notifications by swiping down from the left corner
- Swiping across the horizontal bar at the bottom of an open app toggles between the most recently opened apps
- To power off your X, simultaneously long-press either Volume button on the left side and the On/Sleep button on the right side
- To force restart a frozen phone, quick press Volume Up, then Volume Down, then long-press the right On/Sleep button until the Apple logo appears
- To snap a screen shot, simultaneously quick press the Volume Up and the On/Sleep.
- To activate Apple Pay, double-tap the On/Sleep button on the right; you can adjust the speed of this double-tap in Settings > Accessibility
- To voicelessly activate Siri, long press the right side On/Sleep button
- To quickly turn on the flashlight, long-press the flashlight icon on the bottom left of the lock screen; ditto with the camera icon on the bottom right of the lock screen
9. Change the Name of Your New iPhone
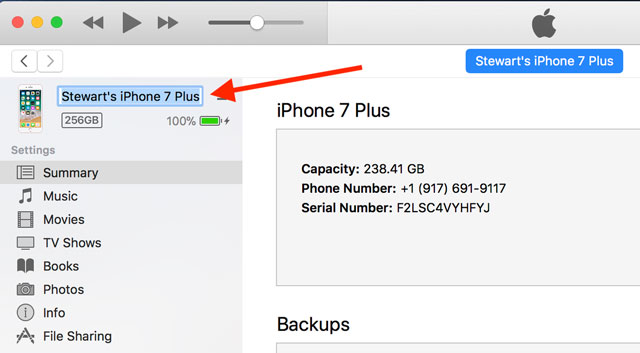
Your new iPhone X will inherit your old iPhone's name. In iTunes, when you have the iPhone information on your screen (click the iPhone icon in the upper left-hand corner), click on the name of the phone on the top of the contents list on the upper left. When the name is highlighted, you'll be able to overtype it to replace the old name with a new name of your choice. You may not see the new name reflected on the iPhone itself, however, until you disconnect the phone from your PC. You can also change the phone's name in Settings > General > About > Name (the first listed item). Also, when you send or respond to an email on your iPhone, each email is labeled by default at the bottom with "Sent from my iPhone (whatever your old model is)." To make sure this line displays "Sent from my iPhone X" – or eliminate the line altogether – go to Settings > Mail > Signature (second item from the bottom).
X. Don't wait for the Face ID unlock icon
Admittedly this is more of a usage tip, but there's no need to wait and watch the Face ID animation to unlock before swiping up. Just ignore the lock animation. Simply look at the screen and swipe up in one, smooth motion – Face ID will identify you without waiting for the lock animation. This single swipe motion will quickly become second nature, along with all the other iPhone X navigation changes.
iOS 11 Settings you should change right away
Change your Lock Screen Notifications
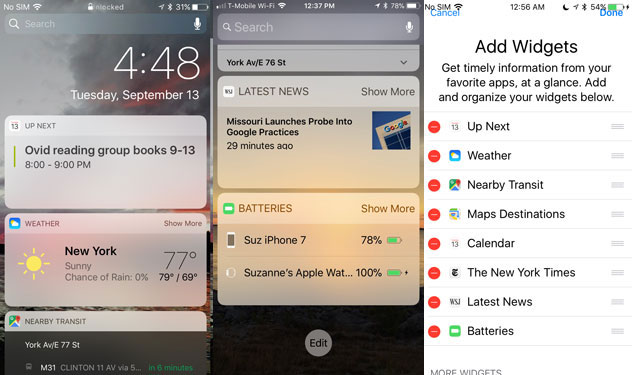
From the lock screen or home screen, slide the screen to the right, and the notifications panel appears. There you will find widgets that pull information from your calendar, the weather app and nearby local transit information and news, among other information. You'll want to scroll down to the bottom where it says Edit to select which widgets run on your lock screen.
The information in regular notifications — calls, texts and so on — is now more in-depth and interactive. You can now read and respond to text messages, among other tasks, even from the lock screen. That also means these things are easier for someone else to access. If you want more privacy, adjust the amount of information that appears for each notification and whether the app delivers lock screen notifications at all by going to Settings > Notifications. There, you can select settings for each app.
You may also want to restrict what can be accessed when your phone is locked. Go to Settings > Face ID & Passcode, and you'll see a list entitled Allow Access When Locked. Here, you can toggle on and off access to Today View (those widgets), Notifications View, Siri, Reply with Message, Home Control and Wallet. Home Control, a new feature of iOS 11, lets you control devices like smart lights and other smart home devices. For each of these, you'll need to weigh your privacy versus convenience.
Automatic App Updates
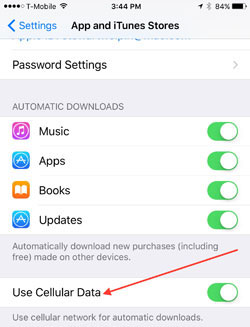 Since Apple apps are all carefully curated to remove unwanted malware and spyware, there's no reason to manually update apps as you do on an Android phone. That's why Apple let's you automatically update apps in the background – but you have some choices to make. Go to Settings > Apps and iTunes Stores and turn on Updates for Automatic Downloads. If you have a small data plan, make sure you toggle Use Cellular Data to off.
Go to Settings-General-Background App Refresh – it should be at the bottom of the first screen you see – and choose the apps you want automatically updated.
Background App Refresh
iPhone can automatically update your apps in the background, when they're not actively running. If your data plan is minimal, you may not want your apps to automatically update unless you're actively using them. To turn off background app refresh, go to Settings > General > Background App Refresh (9 items down) to turn on or off background app refresh for all apps, or allow access for each app on a case by case basis.
Wi-Fi or Cellular App Connectivity
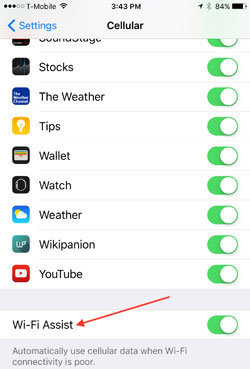 You also have an option about how your apps connect to the Internet when you're actively using them. Go to Settings > Cellular (4 items down) and scroll down to see a list of apps. Turning on an app allows it to connect via cellular, turning it off means that app will connect only via Wi-Fi. For instance, you don't want to inadvertently start watching a movie on Netflix when there's no Wi-Fi and burn through your monthly data allotment in two hours.
Sometimes the Wi-Fi connection isn't what it ought to be so, at the bottom of the list, you can choose to let a cellular connection help out Wi-Fi for those apps you really need to have access to the net. If you have a limited data plan, you'll want to be careful here. You may find yourself burning through data quickly at home when you think you're just using Wi-Fi.
Wi-Fi Calling
If you get spotty reception at home or another location you frequently visit, you'll want to turn on Wi-Fi calling to ensure your calls come through. Go to Settings > Phone > Wi-Fi Calling. There you can choose to turn on the feature. You'll be prompted to enter your emergency address, which should be the address where you'll be using Wi-Fi calling.
[Image credit: iPhone X unboxing via BigStockPhoto, Apple]

From Sam on November 16, 2017 :: 2:28 pm
For Face ID, make sure you hold the phone vertically,, otherwise it won’t unlock. Apple should have add a step in the Face ID settings to train the algorithm when holding the phone horizontally. Well, hopefully in next soft update.
Reply