Gone are the days when you needed a bulky scanner to digitize important documents: Your iPhone is a high-quality scanner that you always have in your pocket. Whether you need documentation for personal reference or wish to create PDFs for sharing and archiving, the Notes app has a built-in document scanner to serve these needs. For more scanning features, including the ability to create multi-page PDFs and name your files when you create them, the free SwiftScan app makes short work of the task.
We’ve tested the apps by scanning hundreds of documents in various lighting conditions and have found that when you use your iPhone as a scanner, the quality can rival a document scanner’s. You point-and-shoot, and the Notes app and SwiftScan isolate the document, correct for distortion, and compensate for ambient light. Keep in mind, though, that there’s only so much the apps can do in poor lighting conditions or if the paper is crumpled. You can sometimes see shadows and wrinkles.
How to use the Notes app to scan documents
- Fire up the Notes app on your iPhone, and either select an existing note or create a new one.
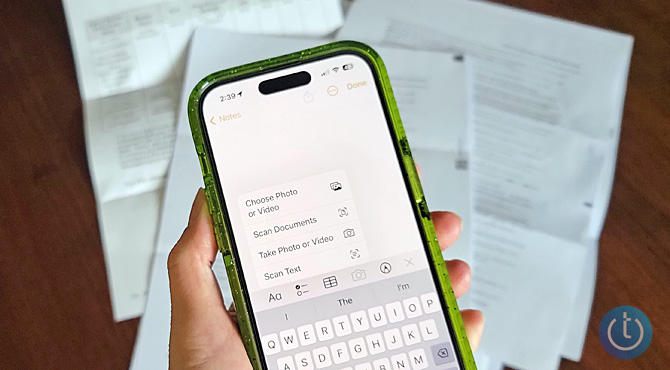
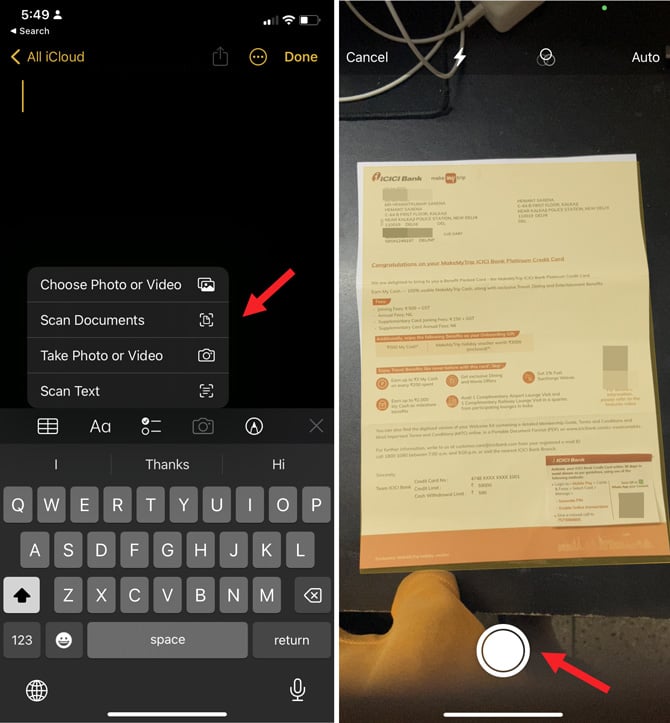
- Tap the Camera icon sitting just above the keypad. When a list of options pops up, choose Scan Documents.
- The scanner is by default in Auto mode, meaning it will take a picture of your document once it is in view. If you want more control, you can tap Auto in the upper right corner to toggle to Manual. With Manual mode, you’ll need to tap the shutter button for each shot.
- Make sure the document is in the camera’s view. You will see a yellow box over what your iPhone thinks is your document. If the iPhone is having trouble, you’ll have the opportunity to drag the corners to get just the document in frame.
- Tap the Shutter button to complete the scan. If you’ve got Auto mode on, your iPhone will do the heavy lifting for you.
- If you’re satisfied with your image, hit the Save button. Or, tap the thumbnail of the image if you want to crop, rotate, or change the appearance. It defaults to a color scan, but you can also choose grayscale, black-and-white, or the original image.
- If you have multiple pages to scan, you can keep scanning and then save.
Once you’ve saved your scan, you can edit and share your document. Use the Markup tool (the pencil tip icon) to add text, annotate, highlight, or sign the document. Tap the Share icon to send the document as a PDF via email or text. You can also use the Share icon to save the document as a PDF to your Files app, Google Drive, or another file storage service, or save it as a JPEG to your Photos app.
How to use SwiftScan to scan documents
If you’re after more bells and whistles, check out SwiftScan. The free version of the app lets you capture high-quality images and PDFs, annotate and sign them, and share and save them like the Notes app. In addition, SwiftScan gives you the option to turn on the flashlight to help in low light, select the size of your scan (or set it to Auto), and manually focus if Auto Focus isn’t working well for you.
- Download and install the SwiftScan app on your iPhone.
- Open the SwiftScan app. Avoid pointing your phone's camera at the document until you are ready to begin scanning.
- To adjust the output size of the document, tap the Auto Size icon and select your preferred document size.
- When you’re ready to scan, frame your document with the phone’s camera. The app will provide guidance during the scanning process. If lighting is inadequate, tap the Light icon to activate your phone’s flashlight. Once the app thinks it has a good image of your document, the app will scan the document.
- After you’ve finished scanning, options to crop, rotate, and filter the image will appear below the scanned document. If you have multiple pages, you can tap the Add Pages icon to add another page to your PDF. At the top, you can tap on the default name the app gives your file and add your own file name.
- When you’re done, tap Save.
Now, you can choose to save it as a PDF to your Files app, Google Drive, or another file storage service, or save it as a JPEG to your Photos app and share it as a photo. You can also use the app to send your document as a Fax for $1.99.
Ready to get rid of more paper documents? Find out how to go paperless with a digital filing system.
[Image credit: Techlicious]
As a lifelong tech enthusiast, Hemant Saxena is always looking for the latest gadgets that intersect with his hobbies. For more than a decade, he has been writing about consumer gadgets, popular apps, and social media tips for publications, including Windows Club and Techmate Tricks.