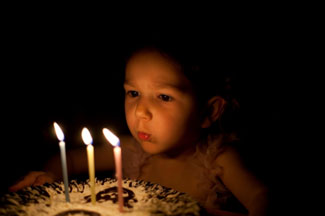
 Whether it’s a lit Christmas tree, a child blowing out birthday cake candles or an impromptu dinner party, there are plenty of great low-light shots waiting to be made. Taking these pictures can be tough, though, with dark, blurry images frequently the norm. So here are some surefire tips to taking better photos in low light.
Raise the ISO Level
Nearly all digital cameras let you adjust the ISO setting, which controls the camera’s sensitivity to light. The higher the ISO, the higher the sensitivity, which means you can shoot in darker places or take photos faster, which reduces the blur caused by camera shake.
 As with most camera settings, though, there’s a trade-off involved in boosting the ISO. As ISO levels increase, you’ll start to see more noise in your photos. Noise is a grainy-looking imperfection, most noticeable in solid-colored areas.
The balance between more image detail and image noise varies from camera to camera as ISO increases. And the amount of image noise that’s acceptable depends on how you’re planning to use your photos. If you’re just going to post them on Facebook or look at them on your computer screen, you can tolerate a lot more image noise than if you’re planning to make 8 x 10 prints, or want to crop a photo tightly after shooting.
You can’t get a good idea of how much noise appears in your pictures based on how they look on the camera’s LCD screen – you need to look at them on a large computer monitor or print out samples.
The fact that a camera offers high ISO settings doesn’t mean you’d actually want to use them – all too often these top settings are more for marketing purposes than practical photographic choices. Ordinarily you'll find little to worry about up to about 400 ISO. To find your camera's top ISO setting, take a series of shots under the same lighting conditions at all the ISO settings. I like to use a collection of canned food for this, since the cans combine areas of solid color with lettering that reveals image flaws in detail reproduction.
This is an area where a more expensive camera usually does a noticeably better job, with interchangeable-lens cameras outperforming compact models.
Optimize Flash Results
Ideally you shouldn't use a flash when trying to capture low-light scenes. However sometimes a room is just too dark to take a picture without added light and flash can be the difference between getting the shot and missing it entirely.
Using an External Flash
A few high-end compacts and nearly all interchangeable-lens cameras have a slot on top of the camera called a hot shoe for attaching an external flash unit. Simply adding an external flash that fires straight ahead will cut down the chance of red-eye in your portrait shots–that children-of-the-damned red glow that happens when the light from a flash reflects off the blood vessels at the back of the eye.
To really solve the low-light problem, though, you’ll want a flash unit with a head that pivots up and down. This enables a technique called bounce flash – you aim the flash up at the ceiling, and it illuminates the room with natural-looking light, minimizing harsh shadows. Bounce flash units start at around $50, with high-quality models setting you back $150 or more, depending on the manufacturer, light output level and features provided. It's a worthwhile investment that will radically improve your indoor photography for years to come.
Using the Built-in Flash
Your basic camera flash produces a direct blast of light, creating harsh shadows and annoying your subjects. If it’s a question of using the flash or missing the shot, try standing several feet away from your subject to lower the glare.
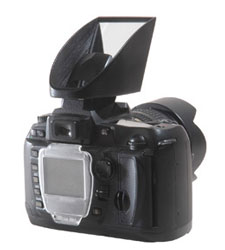 If you’re using the pop-up flash on a digital SLR, try the Lightscoop, an ingenious add-on that mounts on top of your camera. It has an angled mirror up front, which reflects light from the built-in flash up to the ceiling for an instant bounce effect. It’s not as flexible as a true bounce flash, which lets you change the firing angle to minimize shadows, and it won’t work with all camera models, but at $30
 it’s undeniably a thrifty alternative.
Set a Manual White Balance
When shooting indoors under normal room lighting, you’re likely to find photos come out unnaturally orange (with standard tungsten bulbs) or greenish (with fluorescents). Different light sources produce differently colored illumination, and cameras have a tough time adjusting to those variations automatically. All but the cheapest digital cameras let you improve results by taking a manual white balance reading.
How to Set Manual White Balance
The procedure is simple, even if the specific button presses vary from camera to camera. You aim the camera at a white surface (could be a white wall, or a sheet of printer paper works fine) and tell the camera “this is true white, adjust your color reproduction to match.” Yes, you can tweak color after the fact, using image editing software, but spending 30 seconds taking a white balance reading is much easier.
Use a Tripod
If you’re shooting low-light scenic shots as opposed to people or other moving subjects, a tripod is a tremendous assist. With the camera mounted securely, you can stretch shutter speeds to let more light in without raising ISOs to quality-crushing levels. It’s best to set the camera’s self-timer when shooting on a tripod in the dark, to avoid the brief shake that inevitably occurs when you press down on the shutter button.
Use a Fast Lens
Finally, some camera lenses allow more light through than others, making them superior performers in low-light photography. The figure we’re looking at here is the maximum aperture (the number after "f/" in the specs)–the lower the number, the better the lens performs.
A typical zoom that comes with an interchangeable lens camera might have a maximum of f/3.5, which isn’t great for low-light photography. A good zoom lenses with lower maximum aperture figures of f/2.8 or lower are available, but they are double or more the cost.
The alternative: ditch the zoom and pick up a low-light-loving fixed-focus lens. You’ll find 50mm f/1.8 lenses from camera manufacturers selling for under $150. A 50mm lens produces an image that’s about the same size as what you see with the naked eye, and an f/1.8 lens will greatly increase your ability to get a nice sharp shot when shooting handheld in low light conditions.


From Kristy Holch on December 21, 2010 :: 7:31 pm
For point-and-shoot users, here are two more tricks to add.
I’ve been the family memory-keeper and travel-shooter for years, using a pocket-sized camera. My little camera doesn’t have an option for external flash, and by the time I remember how to navigate through the menu to settings, or set up a tripod, the shot is gone. But, the tiny camera is always on me, so I get shots other people don’t.
Here are my two instant tricks for getting decent shots, whether or not using flash.
1) Set the camera down on a surface, turn on self-timer, and let it shoot the scene with as long an exposure as it wants. You aren’t touching it, so the image will be sharp. Works every time. If that’s not feasible…
2) Lean the camera against something solid while shooting, such as a tree, wall, lightpost, etc. Our bodies move imperceptibly, which the camera picks it up during its long exposure. Let something solid brace the camera. Again, use self-timer to trigger the shutter, rather than your finger, so that you don’t inadvertently shake the camera as you reach for and press the shutter. Lastly, hold your breath while the shutter goes off, and try to be as still as a rock!
I let the little point-and-shoot camera choose its own settings. I just work on keeping it rock-steady, using self-timer and a solid brace. Self-timer is the secret weapon!
Reply