Google’s 15GB of free storage is pretty generous compared to the freebies included with many other cloud storage services. Even so, it’s easily frittered away on everyday storage for the by-products of digital life.
Google storage is divided three ways:
1. Gmail, including email and attachments
2. Google Drive, where you back up files and store Google Docs, Sheets, Slides and other Google services documents
3. Google Photos
If you’re nearing the perimeter of your free Google Drive storage — or better yet, if you’d like to avoid that distressing day — follow this step-by-step breakdown to declutter your digital hoard.
Check what is eating up the most storage
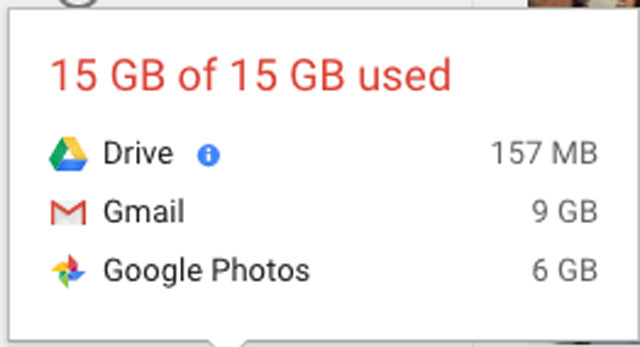
Log in to Google Drive, and look in the left column to see how much storage you’ve used. Hover the mouse over this information to get a further breakdown of usage by Drive, Gmail and Photos.
If you’re at or close to your limit, work in triage mode. Start decluttering in whichever area is hoovering up the most storage. That will help you claw back the bytes ASAP.
Free up storage in Google Photos
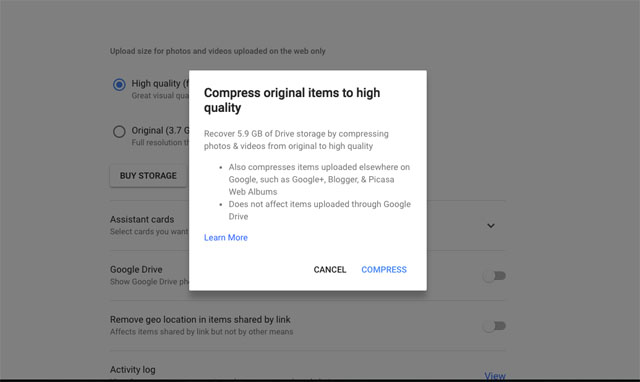
If you don’t need to back up your photos in full resolution, you can save a lot of space. Head to Google Photo settings and select the Recover Storage tab. You can instantly convert any full-resolution pics you have into lower-res pictures that won’t count against storage — all without deleting a thing. This lower-resolution file size looks the same on monitors, and according to Google, prints nicely up to 24 by 16 inches.
Once you adjust this setting, future photos will all be saved at this lower resolution. Google does not count photos saved at this resolution against your storage limit.
You may prefer to keep some photos in full resolution if you’re editing them for professional use or to create seriously large prints. In this case, download the files you want to save at full resolution to your computer before compressing your photos as above.
If you want to keep all your photos in full resolution, download your photos to a hard drive, either by manually selecting all (click on one, then shift and scroll to the last) or heading to Google Takeout to export a copy of your pictures. You can then compress your photos to maintain a cloud backup and free up their storage. Repeat when you hit the free storage limit again.
Free up storage in Google Drive
Depending what kind they are, the files you keep in Google Drive may not count against my storage limit.
What counts against storage: PDFs, images, videos, documents
What doesn’t count against storage: Google Docs, Sheets, Slides and Forms, files in the “Shared with me” tab
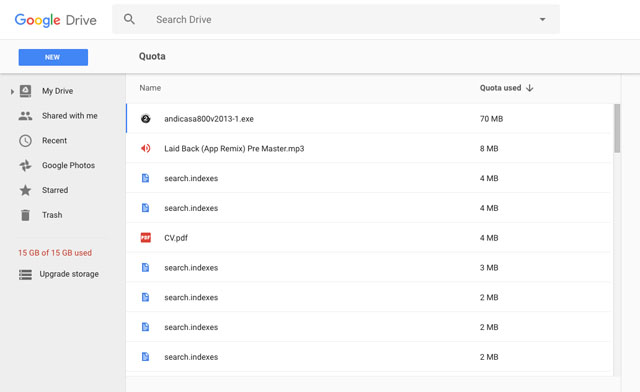
To free up space in Google Drive, start with the files taking up the most space. Head to your storage quota to order your files from largest to smallest. Documents don’t take up much space and can largely be ignored, unless you want to declutter for the sake of a pristine cloud drive. Instead, focus on getting rid of cumbersome files like programs you’ve already installed, old backups and copies of videos.
Another way to organize the process is to click on My Drive on the left, then select “Last Modified by Me.” Now you can start going through files you haven’t touched in years.
Select multiple files by pressing Cmd or Ctrl and clicking on the file, then delete all at once by clicking the trash icon in the top right.
If you frequently collaborate on non-Google Docs documents using Google Drive, you could have a ton of previous file versions taking up space. Once you reach 100 versions of a file, Google deletes older versions after 30 days, but you have to take care of the rest on your own. Right-click on a file name and select “Manage Versions” to view any previous versions, and delete them to save space. Unfortunately you can’t delete multiple versions of more than one file at a time.
Free up more space without deleting items by converting documents, spreadsheets or presentations into their Google Docs counterparts. Keep in mind that the Google Docs office suite uses more basic formatting features than Microsoft Office, and you could lose design details and features on more complex files.
Free up storage in Gmail
The golden rule for cleaning out email is to start with the easy wins, like marketing emails you can delete en masse. Thankfully, Gmail’s auto-sorted tabs (Promotions, Social, Updates, Forums and Primary) make it easy to methodically separate the emails you definitely don’t need from those you might. Gmail’s excellent search function makes it possible to filter specific categories of emails, too.
To get started, head to Gmail (rather than the Inbox view) on your desktop computer, rather than your mobile device.
Delete all emails in some tabs at once

Many emails have a shelf life best measured in seconds. Take the Social tab, which contains alerts from social networks and dating sites. Promotions contains marketing mails from shops, events and other businesses. If you haven’t already opened these, they’re probably no longer relevant. (But if they are, head to the next section.)
Click on the Social or Promotions (or other) tab, then select the checkbox at the top left [screenshot-“Gmail-Promotions-34000”]. Hit the dropdown triangle and select All. You’ll see a message that says “50 conversations are selected.” Click to “Select all [number of] conversations in [tab].” Go ahead and click the trash icon for instant liberation.
Use Gmail search to specify certain messages to delete
On the other hand, maybe you only want to delete certain messages within a tab or one of your own predefined labels. In this case, use Gmail’s “is:” and “label:” and “has:” filters in the search field above the inbox to drill down to particular messages. These filters can help you find messages that are read, unread, starred or unstarred; messages that are under a particular tab or label; or messages that have attachments that are sneakily eating up that yummy free storage.
For example, the Forums tab is where Gmail sorts your messages from online groups and discussion boards. You might want to keep unread messages until you’ve responded. Type “is:read label:forums” to display all read Forum messages. Then tap the top-left checkbox to select All, and delete all messages fitting this criteria.
Use the filter “larger:[number]M” to find messages bigger than a certain number of megabytes. For example, display emails with attachments over 5MB using the “has:attachment larger:5M” filter. (Similarly, there’s a “smaller:[number]M” filter, too.)
Save important emails, then delete the rest
Maybe you only want to save a few emails —for example, only upcoming itineraries from the Updates tab, which houses email confirmations of purchases, flights and deliveries. First, search for the information you know you need (for example, upcoming delivery or flight details), then star the necessary emails. Then use the search “is:unstarred label:updates” and delete the messages that turn up.
Or save your wanted emails manually into a separate label (for example, one for “Important Stuff”). Then delete the remaining messages in the tab.
Delete all messages from a particular sender
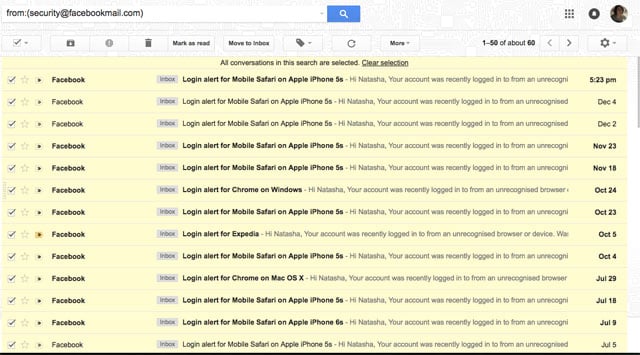
Type “from:email@address.com” into the search box to view all messages from a particular sender so you can delete ’em all. If you don’t know the email address (say, in the case of never-ending order update emails), click on one, then select More in the top toolbar, then Filter messages like this. You’ll see a filter setup screen with the offending email address. Click back into the inbox, select All in the top-left checkbox, then hit Delete to wipe them out of your life for good.
Empty the All Mail folder
Still in the Gmail view, you may find your All Mail folder still contains several thousand emails. Some of these (10,000-plus in my case) will simply be the personal or important messages in the inbox that you didn’t delete. You may also see messages with the label Notes – these are synced from the Notes app from your Android phone, or if you set it up that way, your iPhone.
The rest comprise emails you archived, messages on which you swiped “Done” in Inbox view, and email threads you muted. To delete these, you’ll have to apply a crafty search workaround, since these are the messages that slipped through your nets above:
Click on your inbox, check the Select All box and click “Select All [number] conversations]”.
Click the label icon, and create a new label, say, “Keep this” (you’ll delete it later).
Now, in the search box, type “has:nouserlabels” to bring up all email that wasn’t in the Inbox. This should be the remainder of emails in All Mail – in my case, there was a mix of personal messages, promos and updates, none of which I needed.
If you want to delete all, your task is easy - select “all conversations that match this search” and hit the trash icon.
However, if you don’t want to delete-all without checking what gems you might have archived, you’ll have to go through the messages and delete in bulk where you can, following the above rules, such as applying a filter to delete “messages like these” (say, Amazon delivery notifications you archived), or save messages with the label Notes, for example.
After you’re done deleting, for the sake of tidiness, click on the “Keep this” label you created, open its sub-menu and select "Remove label."
Make sure you are deleting instead of archiving
Going forward, you may want to delete on your phone, rather than the default choice of archiving. Here's how.
On Android phones, go to the Gmail app and select the triple bars > Settings > General settings > Gmail default action > Delete.
On iPhone, if you’re using the Gmail app, go to the Gmail app and select the triple bars > Settings > your account > “When removing messages, I prefer to…” > Move to Trash.
On iPhone using the Mail app, go to Settings > Mail > Accounts > your account > your account name > Advanced > “Move Discarded Messages Into” > Deleted Mailbox.
Don’t forget to empty your trash
Though Gmail’s Trash empties itself of messages older than 30 days, if you’re on a purge, you’ll want to hit Empty Trash right about now. Be prepared to wait a few minutes for it to do its thing.
[Image credit: Google apps on phone via BigStockPhoto, Google]