We may earn commissions when you buy from links on our site. Why you can trust us.
The Best 360 Cameras and How to Use Them
Want to take a stroll through an old plaza you visited on your last vacation, replay your daughter’s 5th birthday party or dive off the cliffs into your favorite river—again? Being "surrounded by" a 360-degree virtual reality (VR) video gives a stronger sense of being somewhere than any regular video, still or even panoramic photo can do—watching the video can feel almost like what you experienced when you shot it. VR video is also the ultimate way to share your adventures or travels.
What’s so special about 360 photos and VR videos
When we take a photograph or regular video, we point the camera at a specific object in an environment. We tell our own story through the compositions we frame with our camera as we move through a place. A VR photo or video uses two lenses, on opposite sides of the camera, to capture a full 360-degree sphere—which includes looking up at the sky, down at the ground and at everything in between. As the viewer, you feel like you're in the center of the environment. Instead of the person capturing the image or video determining your viewpoint, you can choose your own perspective and experience of the location.
Watching a 360 VR video of a sport—whether it's rock climbing, diving, bike riding, ski jumping or riding a chair lift, Ferris wheel or hot-air balloon—makes the viewer feel like the hero. And you can heighten the viewing experience by using an immersive VR headset.
Selecting a 360 camera
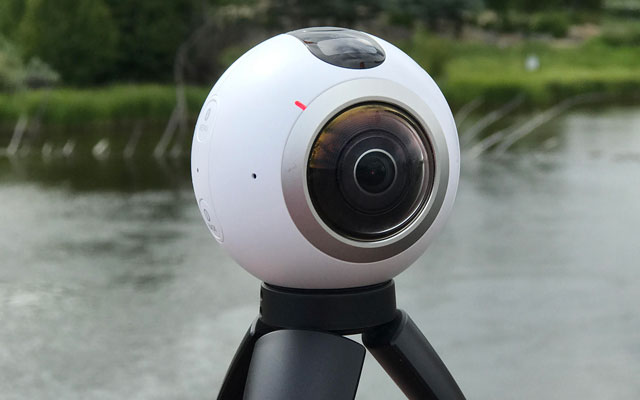
Most full 360 cameras are less than 4 to 6 inches long and can fit in your pocket. They may be round, square or rectangular, with lenses on opposite sides. Each lens captures over 220 degrees of view, and the two fields are stitched together (usually automatically) when the video is imported into a phone or computer app to create the 360-degree video. There can be a little blurring in the video at the stitch point, and a little bit of the picture will be missing at the bottom of the 360-degree sphere, as the photo is virtually folding in on itself.
All cameras have an accompanying phone app that lets you start a video or take a photo and change the camera settings remotely. When you're done shooting, videos and photos can be viewed from the camera or downloaded to the phone app.
Note that 360 cameras connect wirelessly to smart phones; it's a direct WiFi connection that doesn’t need a WiFi network or hot spot. In the phone’s WiFi settings, choose the camera instead of a WiFi network to make the direct connection.
Many cameras can also connect to a phone via low-power Bluetooth, and some use NFC (Near-field communication) to transfer videos to Android phones by tapping the camera to the phone.
The best value: Samsung Gear 360
The Samsung Gear 360 camera is one of the easiest 360 VR cameras to use when paired with a Galaxy phone and the Gear VR headset. It shoots 4K Ultra HD video and 15-megapixel photos, and both picture and sound quality are excellent. You can still find the 2016 model for under $100, and a newly designed 2017 model—which works with iPhones as well as Samsung Android phones—costs $171 on Amazon. A grip on the bottom of the ball-shaped camera means you don’t need to attach a tripod to hold it. The camera is water-resistant and can be submerged to 5 feet for up to 30 minutes, so it can be used for kayaking and water sports.
Best video quality and camera control: Kodak PIXPRO SP360 4K Dual Pro Pack
Kodak currently offers the Kodak PIXPRO SP360 4K Dual Pro Pack VR Camera, a set of two single-lens cameras: Each shoots 235 degrees. An included double camera mount and wrist remote help synchronize shooting video with both cameras; the videos can then be stitched together in the PIXPRO stitch app (for both Mac and PC). The picture quality is excellent. The cameras have a number of settings that are similar to those of standard cameras, including a high-speed mode for sports and a night mode, as well as controls for exposure and white balance. The set, which shoots 4K UHD video and offers various 360 formats along with the typical spherical VR, includes a selfie stick and several mounts along with the two cameras for around $650. Later in 2017, Kodak will release the ORBIT360 4K, a single camera with two lenses. If it uses the same high-quality lenses and apps as the current model, it could be one of the best consumer VR cameras available.
Tips for making great VR videos
Although shooting a VR video is as easy as holding a camera up and letting it record the environment, the format has some unique characteristics you should consider to get the best results. Because you're shooting everything at a location at the same time, the rules are different than when shooting a single-view video or photograph.
Give some thought to where to place the camera
You don’t need to worry about what direction you'll be shooting in—the camera will capture a 360-degree sphere—but you do need to consider where the center of the action should be.
Think of the camera as the eyes of the viewer. If you put the camera somewhere a person wouldn’t naturally be, the unusual perspective will have an impact. If you put it up in a tree, the viewer will feel more like a bird looking down at the world. It might be okay to place the camera low to the ground if there are objects or critters at that height—but you may not want to angle it up at people from down there.
If there are people in the video, the best height is at the subjects' eye level. If you shoot the video too near the floor, it could look like you're in the land of giants, as you'll have to look up at everything around you. If the camera's too high, the video will feel like you're flying: I held a 360 camera on a selfie stick above my head while walking through a museum. The exhibits were below it at eye level. Watching it afterward, I felt like a basketball player strolling through the galleries.
Be sure there isn’t a wall or other barrier that would limit the full-circle experience.
Pay attention to poles or other objects that would block the view when looking in that direction.
VR videographers have noticed that it's better to place the camera as if it were a person seated at a table than to put it in the center of the table. Again, the camera represents the eyes of the viewer, and most people don’t sit on the table in the middle and look around at others.
Keep the camera level
If you tilt it, the ground and horizons will look off-kilter and the viewer will feel off-balance. This can be used for dramatic effect, but for most videos, it’s best to hold the camera upright and keep the horizon level.
Think about where to hide your stuff
When shooting a standard photo or video, your camera bag and equipment won’t be visible when you pile them on the ground behind you. In a 360 video, the only way to hide your gear is to put it behind something large (e.g., a rock), around the corner of a building or just outside the room, or carry it in a backpack while you hold the camera above your head.
Consider the camera equipment itself, too
Either you’ll be holding it or you’ll need a mount, tripod or light stand. Light stands are better than tripods as the legs are narrower and may disappear in the stitching gap below the camera.
In the same vein, if you're recording someone talking, a microphone stand or boom mic will be visible. Use a wireless lavalier microphone instead.
Are you in the shot or hiding under the camera?
There's no place for you to hide when you're shooting a 360 video, unless you're doing it remotely from behind furniture, outside a doorway or around a corner. If you're walking with the camera, you’ll need to choose whether to hold it on a selfie stick overhead or at arm’s length, where a viewer will be able to see you. If you want to narrate and walk along with the camera, you might want to be in the shot—just make sure to hold the camera far enough away so you're not distorted.
Use narration to direct the viewer to special points of interest
VR video lets viewers focus on whatever interests them in any direction. If there are special objects, landmarks or details that you think are must-sees, be sure to include them in the narration when you're shooting (and remember that you don’t have to turn the camera toward the point of interest, as it will already be part of the scene).
Insert a logo for a professional look
A spherical photo must be "stitched" together at some point, often below the camera. (This can be helpful, as it means that you're less visible if you're holding the camera on a selfie stick above your head, or you can camouflage the tripod.) To give the video a slightly more polished look, you can set the camera to add a logo (with the brand name and model) to cover the stitched-together bottom area of the photo.
Consider when to shoot video instead of a photo
360 cameras can shoot both video and still photos. Sometimes a still photo will be enough to give the viewer a sense of the scene—inside a room or a small courtyard, along an empty street or in a static landscape. Shoot video if the landscape includes a river or waterfall, there are people or activities happening around you, there's a sound that helps set the scene, or you want to take your viewer on a stroll. And, of course, if you're doing a sport or other activity—skiing down the mountain or riding up in the chairlift—and want the viewer to feel like they're in the middle of the action, be sure to shoot video.
Choose your scene carefully
Note that the camera "sees" differently than your naked eye. Distant mountains may seem clear and feel closer than they are, but they won’t look that way to the camera or viewer. 360 cameras have the ultimate wide-angle lens, which means that far-away objects will look smaller. Walking through a field with mountains in the far distance won't be very interesting, as they'll be small and hard to see. Hiking up a trail with trees, waterfalls and other objects closer to you will be much more compelling and create a better "being there" experience for the viewer.
Put an object in the foreground—but not too close
Those distant mountains in the background are great to set a sense of place and scale, but they should only be there as background. There should be nearer objects to catch the viewer’s eye—a boulder, chairs, a tree, people, etc.—but not so close to the camera that they become distorted. Shoot a test video to determine how far away you need to place people or objects so they look natural.
Start the scene with the audience oriented in the "right" direction
Although there's no set direction, because the viewer can look anywhere, start the video with the camera facing the direction that makes sense for the story you're telling. If you're doing a video at the Eiffel Tower, face the tower when you start the video. The viewer can look around from there.
Don’t turn the camera
Unlike when shooting regular video, there's no need to turn the camera—the beauty of 360 video is that the viewer can look wherever they want. You can simply set up the camera or walk through a place and never have to turn it or yourself. This bears repeating, since it's natural to turn to look at something of interest, but you have to resist.
Be aware of changes in the light
In a regular video or still photo, streaming light from a side window can add drama and impact. In a 360 video, that same light could blow out the view in that direction. Some cameras let you manage exposure compensation, which can help in this situation, but the end result could be too dark. Use the camera view on your phone to find the best compromise.
Most importantly, have fun
Wherever you go, think about shooting a VR video that will make your friends or family feel like they were right there with you. VR videos can take you back to your favorite vacations and other places you want to enjoy again and again.
Viewing VR video
You don't need a special headset to watch a 360 video or photo. It can be viewed in a web browser—the latest version of Chrome, Opera, Firefox or Internet Explorer, but not Mac’s Safari—using a mouse to "look" up, down, forward, back, right or left. The 2017 models of LG TVs and the NVIDIA Shield Android TV player have a YouTube app that lets you use the remote control to look around VR videos. You can also view 360 videos and photos using a YouTube, Vimeo or Facebook app on a smart phone: Move the phone as if it were a window through which you're looking at the scene. Tilt it in the direction you want to look, or turn yourself and the phone around entirely to see behind you.
The next level of VR requires a cardboard headset, i.e Google Cardboard (Try the Minkanak Google Cardboard kit for $8.69 on Amazon). Insert the phone into a slot in the cardboard, and look around by turning and tilting your head. A step up from moving the phone around, it gives you more of a sense of being in the middle of the action.
For a "Wow! I feel like I’m really there," VR experience, there are headsets that use special lenses to enhance the video playing on the phone. The Gear VR ($99.99 on Amazon) from Samsung (with technology developed by Oculus) connects to a Samsung Galaxy phone using Samsung software. The headset tracks your eyes, so you simply look at a menu item and then tap the touchpad on the side of the headset to control playback. I challenge anyone to put on one of these headsets and not feel like you're actually riding that chairlift, floating on a canal in Venice or sitting at the table watching the birthday boy blow out his candles.
Tip for using VR headsets
When you put on a headset, you're immersed in the reality of the pictures around you. Your eyes perceive movement but your body is steady—this might cause a wave of dizziness or nausea. I find that I can avoid motion sickness if I sway my head or body a little to match the speed of the movement in the video.
[Image credits: Barb Gonzales/Techlicious]

