Tech Made Simple

Hot Topics: How to Fix Bluetooth Pairing Problems | Complete Guide to Facebook Privacy | How to Block Spam Calls | Snapchat Symbol Meaning

We may earn commissions when you buy from links on our site. Why you can trust us.

author photo

Make Important Email Standout in Outlook with Color Coding

by Suzanne Kantra on April 22, 2024

Updated on 4/22/2024 with information and instructions for New Outlook.

Are you tired of constantly sifting through your crowded inbox, trying to find that important email from your boss or a critical update from a family member? Microsoft Outlook offers a feature that allows you to color-code your emails, making it easier to identify and prioritize messages from specific contacts or other criteria.

Outlook's color coding is based on rules that you set up to highlight emails with a specific color when they arrive. For instance, you could set up a rule that emails you receive from your boss will appear in green.

How those colors appear in your inbox will vary slightly based on which version of Outlook you have. In earlier versions of Outlook, which Microsoft calls "Classic Outlook," the subject line will appear in a green font. In the most recent version of Outlook, which Microsoft calls "New Outlook," a green tag will appear in front of the subject line text.

While there are a few steps to go through to set up your color-coding rules, the process is straightforward. Check out the steps below for color-coding your emails in New Outlook, Classic Outlook, and the even older Outlook 2019 below.

Color coding emails in New Outlook

New Outlook comes pre-loaded on new Windows 11 computers, and you can use the basic software for free. However, color-coding with Rules is only available if you have a paid subscription to Microsoft 365.

  1. Go to View tab.
  2. Select View Settings.
  3. In Settings, select Mail and then Rules.
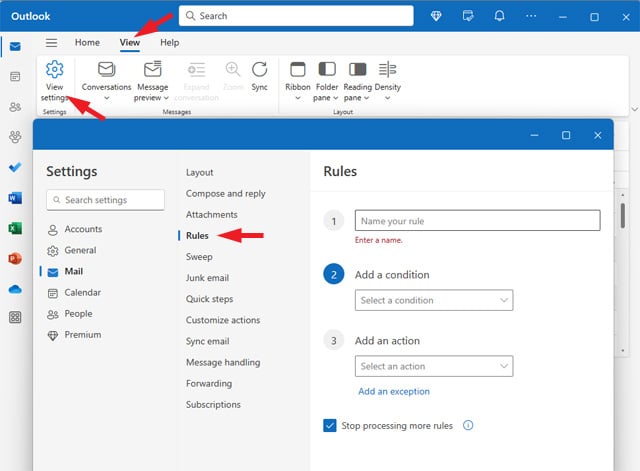
    Screenshot of the New Outlook with the View, View Settings, and Rules options pointed out.

Within the rule creation window, you have a few options for defining how your color rules will operate.

Add a condition to trigger your rule

In the Add a condition dropdown, you can color code your emails based on a number of different criteria, everything from who the email is from to the subject line or specific keywords.

Add an action

The Add an action dropdown provides all your choices for what to do with an email when it meets your set condition. To color code your emails, select Categorize. From the dropdown menu on the right, choose an existing category color or select New Category to create a new color tag (a window will open for creating the category, but it may be annoyingly hidden behind the Settings window). I highly recommend creating a new tag with a meaningful name so you can easily see both the name and color of the tag when scanning through your emails.

Choose whether to stop processing additional rules

Rules will be applied starting with the newest rule. There may be times you don't want multiple rules applied to an email. For example, you may want to color code emails from your boss with as red, but you wouldn't want a later rule triggered that sends all emails with embedded images to your spam folder. In this case, keep the box checked for Stop processing more rules.

Click the Save button to finish setting up your rule.

Below, you will see examples of a red "Important" tag and a green "Work" tag next to the subject line based on rules I created.
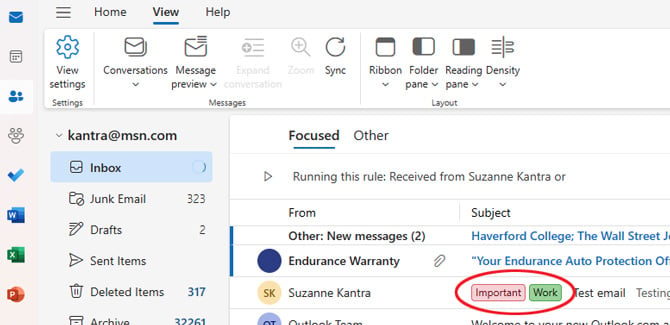
The New Outlook color coding show up as colored tags.

Read more: Don't Panic! A Step-by-Step Guide to Retrieving Unsaved Word Files

Color coding emails in Classic Outlook

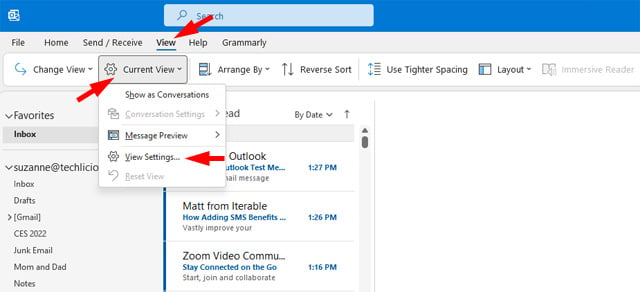
  1. Go to the View tab.
  2. Select Current View.
  3. Select View Settings.

    Outlook View tab with Current View selected and View Settings in the pull-down menu pointed out.
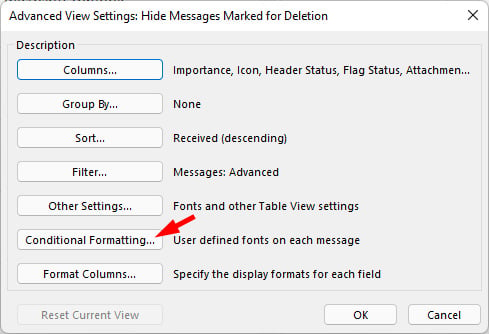
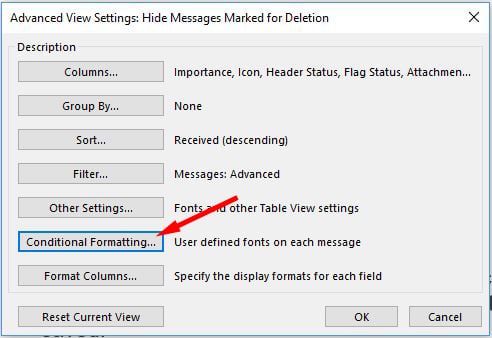
  4. Choose Conditional Formatting.

    Outlook 2021 Conditional Formatting pop up box with options for Columns, Group by, Sort, Filter, Other Settings, Conditional Formatting (pointed out) and Format Columns.
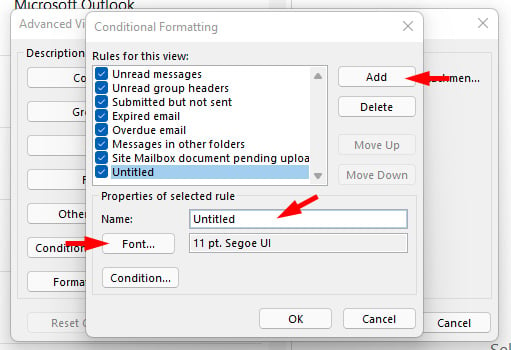
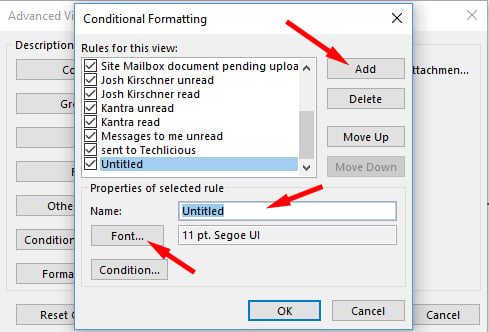
  5. Click Add.
  6. Name your rule.
  7. Click on Font.

    Conditional Formatting pop up box showing the option to Add a new rule in the top right. Below the box entitled Rules for this view, you see Properties of selected. In that section you see Name next to a box with the word Untitled highlighted and pointed out. Below that is button with the word Font (pointed out) and a box with the font name and size. Below that is a button entitled Condition.
  8. Pick a color, style and size and click OK.
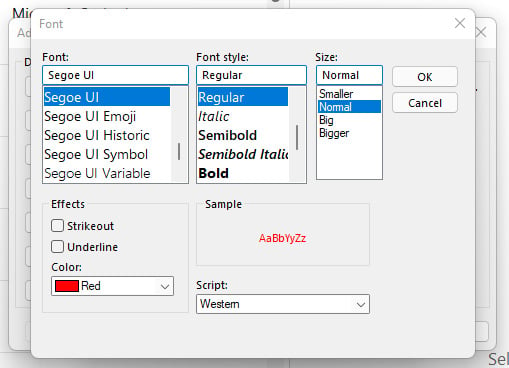
    Outlook Font selection a box for the font (with font name below, Segoe UI highlighted), Font stye with options below (Regular highlighted) and Size (Normal highlighted). Below are Effects you can apply including strikeout, underline and Color (Red is selected) and a box next to it entitled Sample shows how the text will appear.
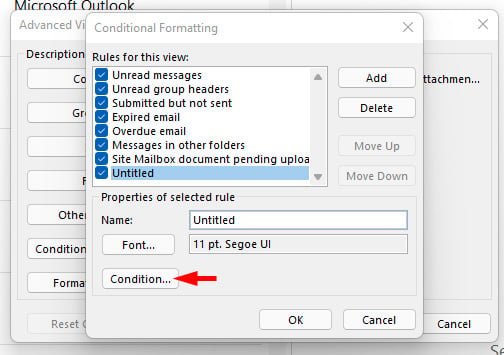
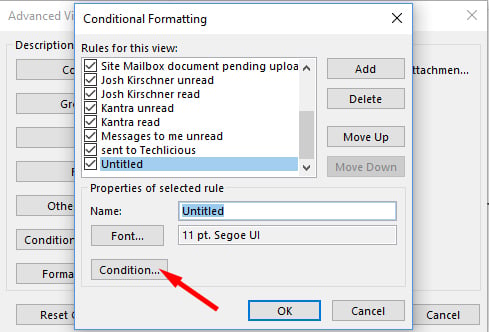
  9. Click on Condition

    Conditional Formatting pop up box showing the option to Add a new rule in the top right. Below the box entitled Rules for this view, you see Properties of selected. In that section you see Name next to a box with the word Untitled highlighted. Below that is button with the word Font and a box with the font name and size. Below that is a button entitled Condition (pointed out).
  10. Type in the email address of the sender or senders you want to highlight. For multiple people, separate the email addresses with a semicolon. And, if you want all emails from a particular company with a unique domain name, you can use the "@" domainname.com. For example, Techlicious would be: @techlicious.com. Then select OK.
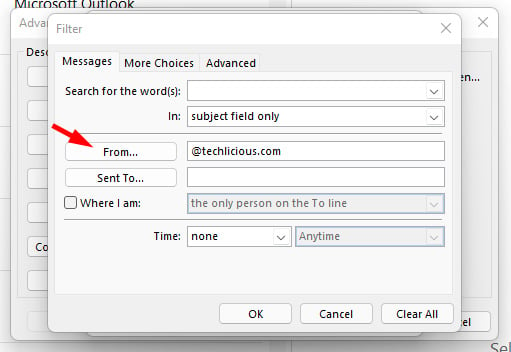
    Outlook 2021 conditional formatting Filter box. Showing the Messages tab with boxes for Search for the word(s), In (with subject field only selected). In the next section the is a From button with a box next to it with @techlicious.com, below is a sent button with an empty box next to it. Below is an option to click Where i am and the option to be the only person on the To line.

Here's how email will appear if you assign red to a contact.
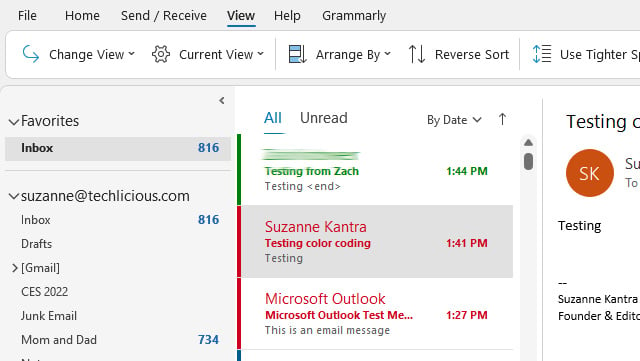
Outlook 2021 with View tab open showing the Inbox. On the right is a list of messages. There is a green message and then two red message.

If you want to apply this color coding to all of your email folders, go to:

  1. View.
  2. Change Views.
  3. Apply Current View to Other Mail Folders.
  4. Select the folders where you want the conditional formatting. There's a box at the bottom that lets you choose to Apply view to subfolders so you'll be covered if you create new subfolders.
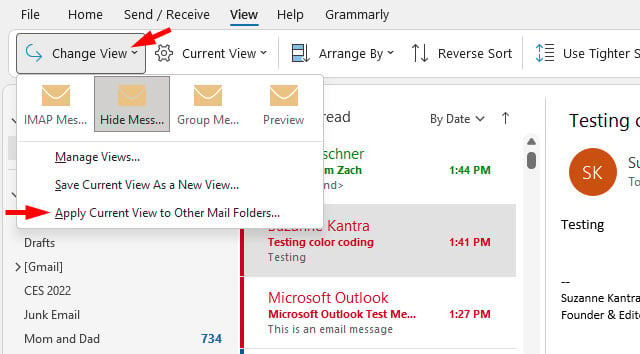
Outlook 2021 screenshot of View tab. Shows Change View selected and the pull down menu with the option to Apple Current View to Other Mail Folders

Read more: How to Switch Email Accounts Without Losing Emails

Color coding emails in Outlook 2019

  1. Go to the View tab.
  2. Select View Settings.

    Outlook View tab with Current View selected and View Settings in the pull-down menu pointed out.
  3. Choose Conditional Formatting.

    Outlook 2016 Conditional Formatting pop up box with options for Columns, Group by, Sort, Filter, Other Settings, Conditional Formatting (pointed out) and Format Columns.
  4. Click Add.
  5. Name your rule.
  6. Click on Font.

    Conditional Formatting pop up box showing the option to Add a new rule in the top right. Below the box entitled Rules for this view, you see Properties of selected. In that section you see Name next to a box with the word Untitled highlighted and pointed out. Below that is button with the word Font (pointed out) and a box with the font name and size. Below that is a button entitled Condition.
  7. Pick a color, style and size and click OK.
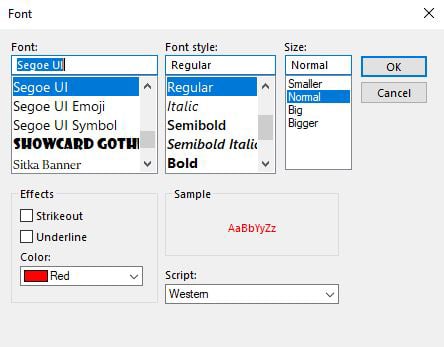
    Outlook Font selection a box for the font (with font name below, Segoe UI highlighted), Font stye with options below (Regular highlighted) and Size (Normal highlighted). Below are Effects you can apply including strikeout, underline and Color (Red is selected) and a box next to it entitled Sample shows how the text will appear.
  8. Click on Condition.

    Conditional Formatting pop up box showing the option to Add a new rule in the top right. Below the box entitled Rules for this view, you see Properties of selected. In that section you see Name next to a box with the word Untitled highlighted. Below that is button with the word Font and a box with the font name and size. Below that is a button entitled Condition (pointed out).
  9. Type in the email address of the sender or senders you want to highlight. For multiple people, separate the email addresses with a semicolon. And, if you want all emails from a particular company with a unique domain name, you can use the "@" domainname.com. For example, Techlicious would be: @techlicious.com. Then select OK.
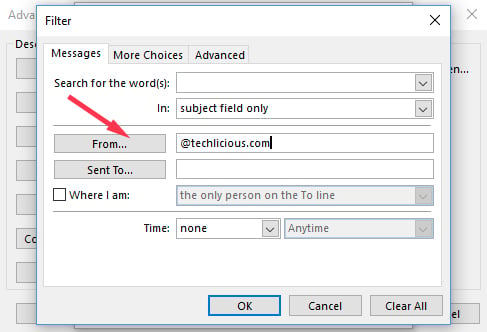
    Outlook 2016 conditional formatting Filter box. Showing the Messages tab with boxes for Search for the word(s), In (with subject field only selected). In the next section the is a From button with a box next to it with @techlicious.com, below is a sent button with an empty box next to it. Below is an option to click Where i am and the option to be the only person on the To line.

Here's how email will appear if you assign red to a contact.
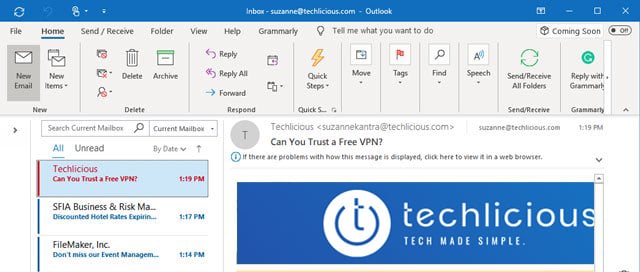
Outlook 2019 with View tab open showing the Inbox. On the right is a list of messages. There is a green message and then two red message.

If you want to apply this color coding to all of your email folders, go to:

  1. View.
  2. Change Views.
  3. Apply Current View to Other Mail Folders.
  4. Select the folders where you want the conditional formatting. There's a box at the bottom that lets you choose to Apply view to subfolders so you'll be covered if you create new subfolders.
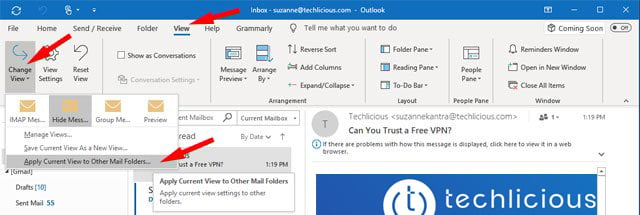
Outlook 2019 screenshot of View tab. Shows Change View selected and the pull down menu with the option to Apple Current View to Other Mail Folders

[Image credit: important email concept via BigStockPhoto]

For the past 20+ years, Techlicious founder Suzanne Kantra has been exploring and writing about the world’s most exciting and important science and technology issues. Prior to Techlicious, Suzanne was the Technology Editor for Martha Stewart Living Omnimedia and the Senior Technology Editor for Popular Science. Suzanne has been featured on CNN, CBS, and NBC.


Topics

Computers and Software, Software & Games, Productivity, Tips & How-Tos, Tech 101


Discussion loading

gravatar

From Claire on August 13, 2020 :: 3:36 am


Please would you post instructions for a Macbook running Outlook 365? These work perfectly for a Windows based system and we would like the same for our Macbook users, please.

Reply

gravatar

From gary on October 22, 2020 :: 1:52 pm


Is there any way to color code emails from specific people in gmail? I need some emails to “pop” out with different colors so I don’t miss them.
Thanks for letting me know. .(JavaScript must be enabled to view this email address)

Reply

gravatar

From Skeleton O'Rourke on October 20, 2022 :: 6:47 am


Use the ‘from’ option in ‘condition to specify forma relating to who the email has come from.

Reply

gravatar

From NJBS on February 22, 2021 :: 4:13 pm


It seems the rules (color) keeps disappearing every 2 weeks and I have to keep setting it up. Why does it do this? How do I lock in the rule?

Reply

gravatar

From Cory on April 29, 2021 :: 11:15 pm


I want to be able to color code messages that are in my inbox by color so I can easily find messages relating to a particular topic or task. Using the category colors doesn’t work because that only puts a color code on the opened email. I want to see the color in the inbox.

Any ideas?

Reply

gravatar

From Allen Bennett on June 19, 2021 :: 5:23 pm


I sent a test email to myself, and it showed up as regular until I deleted it. Then I check the deleted items folder, and it showed up there it the font and color that I had specified.

Reply

gravatar

From Wendy on July 15, 2021 :: 12:13 pm


I am trying to colour code a sender.  I have read most of the instructions above but for some reason, the rule is not saving.  I have tried closing outlook and going back on.  Any thoughts?

Reply

gravatar

From Lynn on November 08, 2021 :: 12:11 pm


I want to be able to color code my subfolders where I have my saved emails that are in my inbox as subfolders.

Reply

gravatar

From Komen Tar on November 23, 2022 :: 2:37 am


I would also like this option… Currently it looks so bland.

Reply

gravatar

From Sheila Berndt on November 12, 2021 :: 6:25 pm


Hello, I had color coding on emails and I just added another one and it’s not working. I’m wondering if this process has changed from these original instructions?  I’ve done everything a couple times and it won’t take.
Thanks for any help!

Reply

gravatar

From Judy Farnham on January 12, 2022 :: 10:31 am


Hello, I am an admin and I receive meeting requests for my bosses directly in my inbox, I have 3 bosses and get hundred of requests per day, is it possible to color code the emails (received for) so that I have 1 color for each boss.  I have tried the above but it doesn’t seem to work. Thank you.

signed: a desperate Admin with too many requests smile

Reply

gravatar

From Suzanne Kantra on January 17, 2022 :: 2:58 pm


Are you using the Outlook application on your computer or the online version? The online version does not support color coding. If you have a Microsoft 365 subscription, you can download the Outlook application. That said, there is a small change to the steps based on the most recent release of Outlook.

Go to the View tab.
Select Current View and then View Settings.

The rest of the instructions are the same. I just went through and retested them.

Let me know if you’re still having trouble.

Reply

gravatar

From Glenn Dortch on January 21, 2022 :: 6:52 pm


Suzanne,

I use Microsoft Outlook for Mac.  Is this functionality available for users like me?

Thanks,  Glenn

Reply

gravatar

From Suzanne Kantra on January 24, 2022 :: 1:32 pm


Unfortunately, Microsoft Outlook for MacOS does not support conditional formatting. What you can do is categorize incoming email.  Email that has been categorized will have a colored flag on it, so it stands out a bit more. Here’s how:

1. Go to the “Organize” tab.
2. Select “Rules.”
3. Select “Create Rule.”
4. In the pop up box, enter the email address of the contact you want to categorize (there is a box next to “From” “Is”).
5. In the “Do the following” section, select “Categories.” You can then choose from different colors.

Reply

gravatar

From Southern Sky on February 01, 2022 :: 8:35 pm


I find new messages on the Android Outlook app are difficult to determine if they have been read already, especially in sunlight.  If I do it on a PC will the conditional formatting carryover to my Android app or IOS app on my iPad?

Reply

gravatar

From Metin on April 21, 2022 :: 4:19 am


Hi,

I have used this feature many times, but at current system I use couldn’t apply at all. I use Office 365 on my laptop and althogh I apply correct settings, doesn’t effect. I still get default settings for receiving emails.

I am trying to color red the posts where I am the only person at To: section.

Reply

gravatar

From Pascal on May 24, 2022 :: 4:28 pm


I’m finding I’m limited to around 27 rules for this in Office 365.  Is this correct?  If this is so, this is ridiculous.

Reply

gravatar

From Suzanne Kantra on May 31, 2022 :: 10:43 am


Microsoft has a storage limit on rules for Office 365. Once you max out your rules storage, you can’t create more rules. For most people that’s around 25-30 rules.

If you’re using Microsoft 365 for work and they are running an Exchange server, you can ask your IT department to increase your rules storage. It defaults to 65KB, but can be raised to 256KB.

If you can’t increase your rules storage, consider how you might consolidate rules to create a single rule for many. You can also create contact groups and list the group instead of individuals to save storage space.

Reply

gravatar

From Skeleton O'Rourke on October 20, 2022 :: 6:45 am


I’d forgotten how to do this after I had to rebuild Outlook after MS bugs. Thanks for the reminder!

Reply

gravatar

From Denis on November 23, 2022 :: 2:26 am


Is there a way to add some colors to left pan, for Inbox sub-folders?
Thanks

Reply

gravatar

From RC on August 24, 2023 :: 5:52 pm


Hi - I’m using Outlook for Microsoft 365 (Build 16, 64-bit) and would like to know how to enter a condition to change the colour for all external domains.  It’s not feasible to enter every individual domain in the condition box, so is there a way to use a negative condition (i.e. change colour for any domain that is not @mycompanydomain.com)?

Reply

gravatar

From RC on August 25, 2023 :: 8:25 am


I figured it out by applying only an “@” in the “From” condition as directed by this website:
https://kalmstrom.com/tips/TrackEmailsfromOutside.htm#:~:text=Go to the View tab,not containing your own domain.

Reply

gravatar

From Paul Disney on May 10, 2024 :: 10:43 am


This is a fantastic article, thank you very much!

Reply

Read More Comments: 1 2

Home | About | Meet the Team | Contact Us
Media Kit | Newsletter Sponsorships | Licensing & Permissions
Accessibility Statement
Terms of Use | Privacy & Cookie Policy

Techlicious participates in affiliate programs, including the Amazon Services LLC Associates Program, which provide a small commission from some, but not all, of the "click-thru to buy" links contained in our articles. These click-thru links are determined after the article has been written, based on price and product availability — the commissions do not impact our choice of recommended product, nor the price you pay. When you use these links, you help support our ongoing editorial mission to provide you with the best product recommendations.

© Techlicious LLC.