Updated February 8, 2011 to account for changes to Facebook Privacy settings.
Privacy on Facebook has been a headache for years. At times, Facebook appeared far more intent on separating you from your privacy than protecting it. Among the biggest issues was the fact that the site had an "opt-out" policy when it came to sharing your information, which meant your data was automatically shared unless you went through the more than 170 privacy control options on Facebook to protect it.
After much consumer backlash, Facebook launched a new set of privacy controls that rolled out in June. The new controls were simpler, though to call them "simple" would be a gross overstatement. And the major concern around automatic "opt-in" was not been addressed—most info is shared unless you tell Facebook not to. And Facebook will opt you in to any new information sharing features they build without notifying you. Recent additions such as Facebook Places and Facebook Sponsored Stories bear this out.
So consider the following step-by-step privacy recommendations an ongoing maintenance task, rather than a one-time fix for managing your Facebook privacy. It's the price we need to pay for all of the convenience and features that Facebook has to offer.
Step 1 - Check your current settings
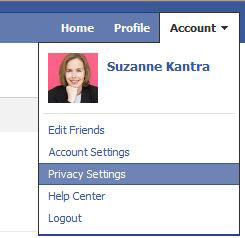
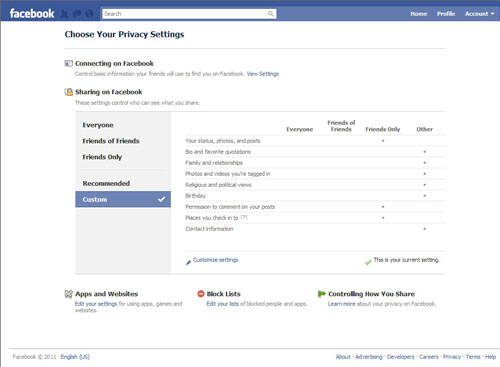
To access your Facebook privacy settings, click on the "Account" dropdown in the upper-right corner of the Facebook page and select "Privacy Settings".
 Easy so far? Good. Here's where the fun begins.
If you've never set your privacy settings in Facebook before, you'll see the Facebook "recommended" settings. As you can see, your photos, bio, family and relationships are all open to the world. In addition, your political and religious views, birthday and photos others have tagged you in (e.g., that picture your co-worker took of you chugging a cosmopolitan at last week's office bash) are viewable by all of your friend's friends. Have a friend who has 5,000+ other friends? Yep, they all can see it.
If you're not happy with this level of exposure, it's time to "Customize" your settings.
Step 2 - Customize your settings
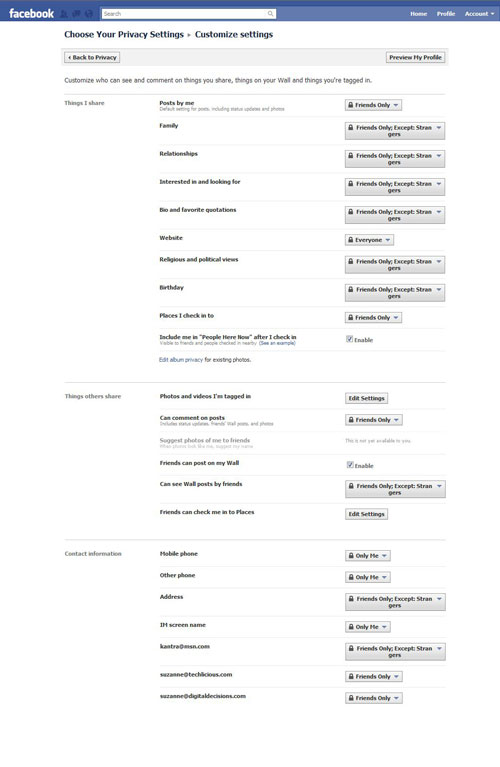
At the bottom of your settings, you'll see a little pencil with "Customize Settings". Click it and you get a page of 20 settings, plus additional choices for each email address you have registered with Facebook.
Consider what information you truly want to keep private and what would be valuable to share. Holding back too much means you're losing much of the "social" aspect of social networking—you won't develop as many new relationships and you will be less interesting to your current friends.
For each one, you have four choices: Everyone; Friends of Friends; Friends Only; Only Me. There is also a "Customize" setting that allows you to either hide your information from specific people or only let specific people view it. I can think of any number of badly messed up relationship situations where you may want to utilize the custom function, so set according to your needs.
My personal settings are in the screenshot below. You can choose to be more or less conservative—it's up to you.
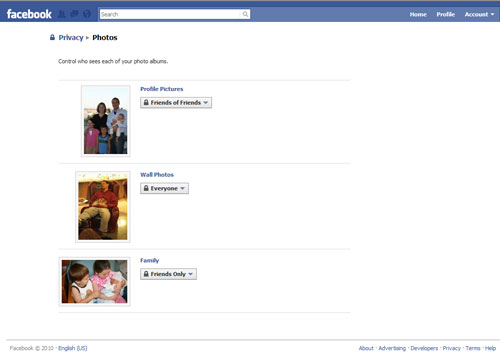
Think we're done? Nope, not yet. This is Facebook we're talking about, after all. So, before you leave this screen, see the little line "Edit album privacy for existing photos" in the "Things I share" area? Click it. Here you can set your sharing for each type of photo in your profile.
I tier my privacy based on the types of photos I place in each category. "Family" is for my family photos; I keep that just for friends. My "Wall Photos" are where I post random shots that show-off my clever humor and photographic prowess; everyone is welcome to view those.
Okay, we're making progress. Let's go back to the very first "Choose Your Privacy Settings" page because it's time to change our "Basic Directory Information".
Step 3 - Changing your Basic Directory Information
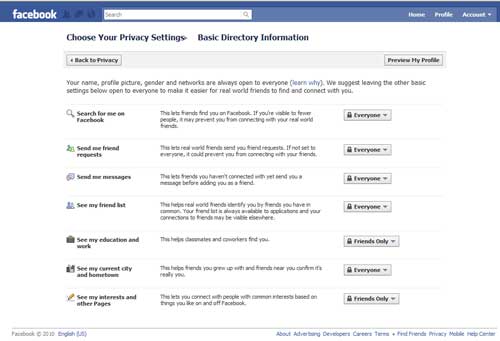
To get to the Basic Directory settings, you need to click "view settings" on the main Choose Your Privacy Settings page. It's not very obvious, so I circled it for you.
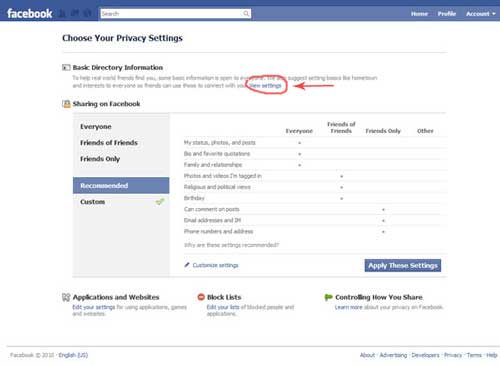
However, just because it's not obvious, doesn't mean it's not important. In fact, the Basic Directory page contains some of the most critical Facebook settings. Here are my settings—let's go through them one by one.
Search for me on Facebook. This setting determines who can find you on Facebook. If they can't find you, they can't connect. And you joined Facebook to connect with people, right? So unless you have an ex who's stalking you or are running from the law, setting this to "Everyone" probably is the way to go.
Send me friend requests. Doesn't help if people can find you but not connect. So this is set to "Everyone", too.
Send me messages. The description here is a little misleading since it let's ANYONE send you a message, not just friends. Luckily, spamming is pretty infrequent on Facebook and I like hearing from people I may know, even if they aren't actually a "Friend" in the Facebook sense, so I have it set to "Everyone". If that makes you uncomfortable, by all means set it to "Friends of Friends" or "Friends only".
See my friend list. This controls who can see your list of friends when viewing your profile. You can set limitations as with other settings, plus you can "customize" it. Also note that this setting does not affect how applications can access your friends list—we'll get to that in Step 4.
See my education and work. Why is this here and not in your Bio settings? I have no idea. However, what you need to know is that Facebook will automatically connect you with Facebook-generated "Community Pages" based on your education and work background. Today, your profile doesn't appear on the page unless you "Like" it. That could change tomorrow.
See my current city and hometown. Same story as with education and work above. It's not exactly a mystery that I live in NYC, so I don't mind everyone seeing it.
See my interests and other Pages. This is a trickier one. Want everyone to know you support the Militant Vegans Against Santa Claus page? Then "Everyone" is the setting for you. I prefer to err on the side of privacy with this, lest I offend any of the Carnivores in Favor of Fictional Gift Givers fans.
Step 4 - Setting application access
We've worked hard to get our privacy settings in place and then Facebook throws us a curveball with Applications. You see, applications your friends are using can access your information in the same way your friends can. So personal information you were intending to keep within your close circle can now be accessed by some dumb app one of your friends is using. You want to control this, right? Of course you do.
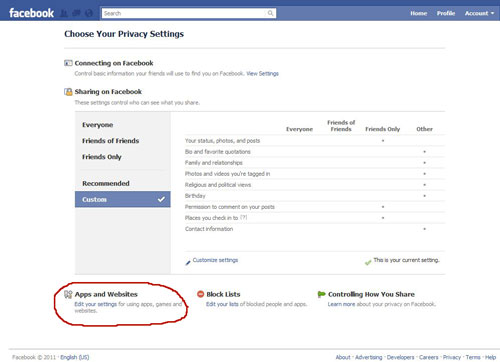
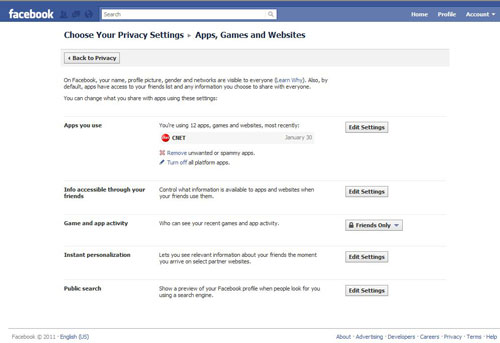
First, let's go to back to that main Choose Your Privacy Settings Page and click on "Apps and Websites".
Now, let's start at the top and work our way down.
Apps you use. This shows you all the apps and websites you've connected to with Facebook. Any websites that you use your Facebook ID to login with will also show up here. Want to get rid of some? Here's your chance.
Click on "Edit Settings". You will now see all of the applications, websites and desktop apps that you have authorized to connect with your Facebook account.
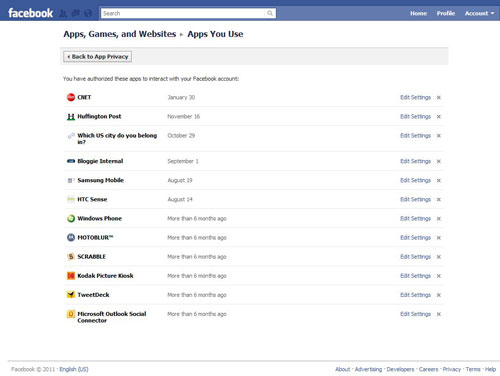
Next to each one is the ability to "Edit Settings". Click this for any apps you want to check. Here it will tell you what each app is permitted to do. It doesn't mean it actually does those things (for example, why CNET would need to access my family and relationships so i can comment on articles is beyond me), but it could.
Info accessible through your friends. This is the biggie. The checkboxes here let you restrict information accessible to apps your friends are using. There may be certain times when having this information available is a good thing. For instance, sharing your birthday will let your friend send you a cute birthday greeting through their dancing elf app. I prefer to forgo the dancing elf—so my info is all unchecked.
Game and app activity. Tell your friends about how you just saved a lost kitten in your farming game! Or don't. They'll probably appreciate it.
Instant Personalization. Turn this off. Why? Because it allows external sites to pull information about you and I don't believe Facebook has been adequately forthcoming about what data is shared or how it can be used. And, while the service is currently limited to a handful of partners, Facebook will add other partners in the future without telling us or giving us a chance to opt out.
Public Search. This controls whether data you've set to share with "Everyone" will appear in search engine results (e.g., Google) when people search for you. I like to be found, so I keep this checked. However, if you are looking for a job, or otherwise promoting yourself or your business, and you don’t want Facebook’s view of you being the first or only way people see you online, you should set “Public Search” to off. [Updated with excellent advice from Jay Fienberg in our comment section]
Step 5 - Limiting Facebook Places
Facebook Places is a relatively new feature that lets you "check-in" at a location to let your friends know where you are. But it poses risks in two unique ways.
First, it adds you to a "People Here Now" page that anyone checked into the same location can see—leading to potential embarrassment if your boss is attending the same Neil Diamond concert and you're supposed to be working. It also, potentially, makes you vulnerable to crime if any stranger at the event can see that you're not at home.
Second, it allows your friends to check you in places, even if you're not there. Your jokester friends may think it's funny to check you into the Ross Perot in 2012 fundraising dinner—you may disagree.
So, let's get this fixed.
Only Let Friends See My Facebook Places Check-ins
1. Go to your Privacy Settings in Facebook.
2. Click on "Customize Settings"
3. Under "Things I share", set the "Places I check in to" option to "Friends only"
Don't Post My Location in "People Here Now"
1. Go to your Privacy Settings in Facebook.
2. Click on "Customize Settings"
3. Under "Things I share", uncheck the box next to "Include me in "People Here Now" after I check in"
Stop My Friends from Checking Me In to Facebook Places
1. Go to your Privacy Settings in Facebook.
2. Click on "Customize Settings"
3. Under "Things others share", change the setting of "Let Friends Check Me In" to "Disabled".
Step 6 - Protect yourself while on public Wi-Fi networks
A major Facebook security flaw was brought to light recently that allows anyone with some basic network knowledge to steal your identity if you're using Facebook on a public Wi-Fi network—at your favorite coffee shop, for example. This problem is not unique to Facebook.
Fortunately, Facebook has provided a fix that causes Facebook to use a secured Internet connection when you log-in. They could (and should) have made it the default choice, but so far, haven’t taken that step. So you have to take care of it yourself.
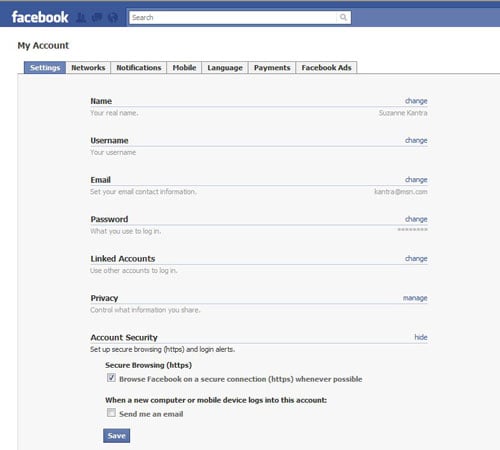
To enable a secured connection for Facebook, go to Account Settings, and under Account Security check the box that says “Browse Facebook on a secure connection (https).” If it's working correctly, you should see the url start with "https" after you log-in.If not, stay off public Wi-Fi networks!
There you have it. Everything you need to know to maintain some modest semblance of privacy on Facebook. Now get out there and start posting!



From Jay Fienberg on July 09, 2010 :: 2:57 pm
Great article!
I would warn people more, though, about allowing “Public Search” to be on. I would say something more like:
If you are ever looking for a job or meeting someone or wanting to promote yourself or your business, and you don’t want Facebook’s view of you being the first or only way people see you online, you should set “Public Search” to off.
Also, if you or your business have your own website or blog, and don’t want Facebook competing with it, set “Public Search” to off.
Part of the misunderstanding about the Facebook “privacy” issue is that it’s also an issue of how Facebook “publicizes” you to the world. Facebook is seeking to control your or your business’, etc., online publicity / PR.
Also, although this is potentially a bit NSFW, I think people should take a look at http://youropenbook.org/ to get a sense of how much info (about you) Facebook exposes on the web.
Reply