If you haven't been organizing and discarding files as you go, it's likely your hard drive is stuffed with downloads, unwanted photos, file copies and other digital dust bunnies. This can reveal itself in slower performance, that unsettling humming noise, and the Mac's dreaded spinning wheel or Windows' spinning circle.
Deep cleaning your computer of unwanted files and streamlining your folder system can not only free up storage space, but improve your computer's performance. From decluttering tips to apps that do your organizing for you, here's how to spruce up your computer and make sure it stays that way.
Cleaning out your computer
1. Find duplicate files
You'd be surprised how much storage is used up by duplicate files, whether they're files you saved twice to different locations or multiple downloads of the same file. If you buy music on iTunes, you may have a few gigabytes of duplicate songs from, say, buying a greatest-hits album that contains tracks you already own.
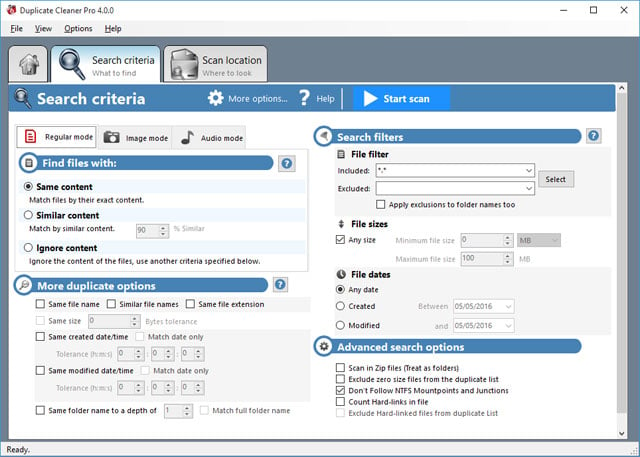
The easiest way to find those superfluous files is to download a third-party app that will scan your folders for duplicate content, then let you review the dupes to decide if the extras should be deleted.
If iTunes is your only bugbear
After you’ve ensured you’re on the latest version, select File > Library > Show Duplicate Items. Sort the dupes by tapping the Name or Artist tabs in the toolbar. You may see different mixes of the same song marked as duplicates because the matches are initially based on track name and artist; to keep multiple versions – such as versions from different albums – press Option (Mac) or Shift (Windows) and select File > Library > Show exact duplicate items to only flag songs with same name, artist and album.
For clearing other types of duplicate files:
Mac: Head to the App Store on your computer and search for “duplicate cleaner.” We like Duplicate Detective ($4.99), a simple app with a straightforward interface for hunting down duplicates. For free options, Duplicated Cleaner does a similar job, while Duplicate Cleaner For iPhoto is an easy-to-use app for zapping double images, even if they've been edited.
If you fancy doing it manually, you can also click All My Files, order the files by selecting Name from the drop-down sorting icon, then scan for files that have the same name. However, this method is less effective if you've saved the same file under different names.
Windows: There are quite a few good options for free duplicate zappers for Windows, so we'll skate over the manual method, and recommend NirSoft's SearchMyFiles (free). If you want to find and zap similar photos even when they’ve been edited or resized, as well as music files with exact or similar name and other tags, try Duplicate Cleaner ($30, on sale now for $25.45).
2. Delete temporary files
The processes your computer runs through when you use files or programs creates tons of tiny, temporary files that help it retrieve the information you need faster. Clearing your computer of all these can often help speed up its performance.
Mac: Start with Disk Utility (Applications > Utilities), and hit First Aid > Repair to scan and patch up your hard drive. Next, search for “Mac cleaner” apps on the App Store, such as MacPaw's CleanMyMac X ($39.95), to clear your computer's cache of temporary files from browsers and other programs.
Windows: For Windows 10, search for "Disk Cleanup" in the search box, and for Windows 8, head to the Control Panel and find Disk Clean-up. If you're on older versions of Windows, find it in System Tools. You can then start cleanup for temporary and system files that are no longer needed.
3. Clear the downloads folder of unnecessary files
The Downloads folder can be expunged of detritus such as PDFs of old plane tickets, GIFs and humorous cat pics from emails, torrent links to files you now have, .dmg (Mac) or .exe (Windows) installers of apps you now have, and so on.
Mac and Windows: Open the Downloads folder, and view its contents by file type, then go through each category and drag the unneeded files to the Trash (Mac) or Recycle Bin (Windows) or right click and select Delete (both Mac and Windows). Make sure you Empty the Trash or Recycle Bin when you're done.
Leave the documents, photos, music and videos for now. They can be dealt with when you're ready to start sorting the files you want to keep (see the next section).
4. Delete unused applications
Mac: You can delete unused programs by dragging them from the Applications folder into the Trash, or right-clicking and selecting to send to Trash. This deletes most files associated with the app, such as data generated, but not preference files and support files. Preference files contain info about your settings in the app and are usually only a few kilobytes, while application support files can range from kilobytes to gigabytes when it comes to large media apps such as DVD Studio Pro or GarageBand.
To delete these, head to Finder, click on Macintosh HD (or Home) > Library > Application Support, where the files will be listed by app. You may even find some old files from apps you'd thought you were totally rid of. Dump them in the trash by dragging and dropping. Be careful in here: only delete files from apps you know you deleted, otherwise, you may end up deleting crucial files from, say, Microsoft, which makes the Silverlight video plugin you probably use regardless of whether you have any Microsoft programs. Don’t forget to empty your trash afterward – before that you don’t actually free up any space.
Alternately, try out App Cleaner PRO ($9.99), which lets you delete apps with one click. You'll need to upgrade to the Pro version after downloading the free app to delete programs.
Windows: Windows PCs have a pretty spiffy uninstall feature that removes everything associated with an app, so for all versions of Windows, head to Settings > Apps & Features, select a program and select uninstall.
Although some programs may leave behind settings info in the registry, a database of configuration settings, the data is minimal and Microsoft recommends not modifying the registry unless you really know what you're doing.
5. Should you still defrag your drive?
In the long-ago times of early 2000s computing, most of us incorporated disk defragmentation into our cleaning rituals. Disk fragmentation occurs as a file system loses its ability to keep related data together, causing the hard drive to work harder to bring up data related to current tasks, thus slowing down performance.
In general, Mac computers don't need to be defragged, especially newer Mac laptops that have solid-state drives (SSD), use a different method of maintaining data. Windows 8 and Windows 10 automatically run a disk defrag (now called disk optimization) on a weekly schedule for machines with hard drives.
Windows 8 and 10 users can hasten a defrag (or optimization), type “optimize” in the taskbar, and choose “Defragment and Optimize Drives”. then “Analyze” on the hard drive. You’ll then have the option to “Optimize”, which may improve performance.
Windows support has the lowdown on doing this for PCs running Windows 7 or older.
6. Zap spyware and trackers
It's possible that in the course of your internet browsing, you acquired some trackers, spyware or even minor viruses (unless, of course, you have been using up-to-date security software). Even so, malware is an ever-evolving beast, so it's a good idea to run a scan of your system with an anti-malware program - such as BitDefender Antivirus Free Edition (PC) or Avast Security for Mac (Mac) – to check for viruses, trojans, trackers and other malware.
7. Finishing touches
Mac: In Finder, if your Favorites column contains links to unused folders, delete them by right-clicking and selecting “Remove from Sidebar.” And don't be afraid to remove applications from your Dock unless you really need daily access to them. Just close the app first, then hold on its icon in the Dock, and drag it to the Trash.
Windows: Minimize the number of programs that get to be in the Start Menu (Windows 10 and Windows 7) or Start Screen (Windows 8) by right-clicking the unwanted app, and selecting “Unpin from Start Menu.”
Organize your computer files
Now that we've cleaned things up a bit, we can get down to gathering all files of a type.
1. Merge duplicate folders
If you have two folders with the same name and they should really be the same folder -- say, two "Invoices" folders squirreled away in different parent folders (or in my case, two of every important folder) -- you can manually merge them.
Mac and Windows: Choose which folder will be the one you use henceforth, then select all the files from the other folder and drag or Copy/Cut+Paste into the desired folder. If files have the same name – either because you saved twice to different locations, or simply because you accidentally named different things the same – select to “Keep Both” and sort out the naming later.
2. Find a home for photos
First, identify where all your pictures might be – for example, the Downloads folder if you often download from email or Facebook; folders for imports from phones and digital cameras; or a cloud storage service such as Google Photos or iCloud Photo Library where they may have auto-synced from your smartphone.
If you use an iPhone and a Mac, assuming you're on iOS 7 or newer, your most recent 1000 photos will be synced to Photo Stream (if you have it turned on at Settings > Photos > My Photo Stream) and viewable on Photos on the Mac.
If you use an iPhone and a Windows PC, Apple's My Photo Stream automatically downloads the most recent photos to your PC, viewable in C:\\Users\[user name]\Pictures\iCloud Photos\My Photo Stream. Make sure you have iCloud installed and that Photo Stream is turned on in Settings > Photos and turn on iCloud Photo Library. If you have a lot of photos, you may find that you'll need to buy more iCloud storage.
If you use an Android phone, your photos may be auto-synced to your Google Photos account (on the phone, open the Google Photos app > Settings > Auto-backup toggle), or you can import them via USB connection to a folder on your computer.
Mac and Windows: Next, create the master collection of photos. You may want to simply download all photos from, say, Photo Stream or Google+ to your computer, but with digital cameras allowing infinite shots of the same scenes, this can quickly fill up your hard drive.
A cloud storage service for your photos can be a handy means of ensuring a backup even if your devices are lost or damaged. We like Google Photos, which can automatically back up photos taken with your phone and its Backup and Sync desktop software will take care of photos stored on your computer. Storage is free for photos up to 20MP.
3. Move all your documents to the Documents folder
Sounds obvious, but I have docs floating on my Mac desktop, in my Users folder and in Downloads. Comb each folder for documents then move them to their rightful home via copy/cut and paste.
4. Move all songs to the Music folder and all video to the Movies/Videos folder
There are a finite number of file types you use on your computer, and both Macs and Windows PCs come with predefined folders for them: Documents, Movies (Videos in Windows), Music, Pictures. Sort each file type into its appropriate “master” folder, and further sort the files into sub-folders later.
Now that you're free of all digital flotsam, the next step is to build a folder system that will allow you to save files where they should go and incorporate an intuitive naming system so that when you forget where you put things, it's not so hard to find them again.
5. Build a folder system
Make a nest of folders and sub-folders. Take Documents: within this master folder, create sub-folders for major categories. For example, Work and Personal, or more specific folders such as Invoices, House Budget, or Ideas. Browse your Documents folder to get an idea of the types of files you've built up, then create the folders-within-folders you need.
Sort out your photo folders. The task of ordering the volume of photos coming together from your phone, email or social network accounts can overwhelm your best efforts at digital tidying. To keep your photos organized, tag and name digital photos so they’re easily found.
Make sure to download new files to the Downloads folder. Then implement a regular Downloads cleaning schedule where you manually sort files into Documents, Movies, Music, or Pictures. If you have a bit of time to invest in building simple software rules, you can also check out a couple of apps that automate the process.
6. Organize new files as they arrive
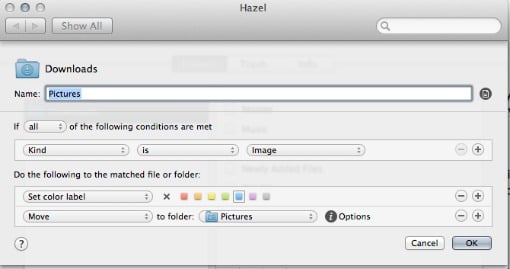
Mac: Hazel is an intuitive, easy to use app for monitoring and auto-sorting any folder on your Mac. Setting up rules is extremely simple in an interface with dropdown options for each aspect of a rule (see screenshot). For example, when setting up a rule for moving music files out of downloads, instead of needing to specify file extensions (of which there may be several), you can simply select “Image” as a file type. You specify which folders that your rules apply to at the start of setting up each rule and then Hazel works in the background, popping up notifications when it moves files. It's $32, with a 14-day free trial and works on Mac OS X 10.7 or newer.
Windows: DropIt is a free, open-source app that allows you to set up rules for what to do with particular file types so that you can, for example, dictate that all .jpg files are to be moved to Pictures. To apply that rule to the Downloads folder, you can add a monitoring option so that DropIt scans Downloads for new files to apply the rule to. Other actions include copying, compressing, as well as extracting – handy to apply to downloaded .zip image or music packs that you want unzipped straight into the correct folder. Setting up a rule is a straightforward process: name the rule, select the file type, pick the action from a dropdown menu, then type in the destination folder the file should be sent to afterward -- for example C:\Users\[Your Name]\Pictures.
A similar app with a more novice-friendly interface is File Juggler, which can also scan for phrases to automatically file bills and invoices; rename music files with album and artist data, and automatically extract zipped files when they’re downloaded. It costs $40 and features a 30-day free trial.
7. Back up efficiently
Setting up a backup system is crucial. Better yet, it's a system you've taken the time to automate so that in the event of a computer crash or data loss, your most valuable documents will still be safe. For example, a cloud storage service such as Google Drive or Dropbox is handy for automatically backing up smaller files.
When you sign up for a cloud storage service, it will create a folder on your computer that constantly syncs to the cloud so that anything in the folder is saved online as well as on your computer. You might want to save all insurance applications or a long-term project to the cloud-synced folder. Depending on how much storage you have, you may want to save special photos. Amazon Prime subscribers, for example, get unlimited storage for full-resolution photos. Check out our feature on cloud storage services to see what works best for you.
If you're backing up larger media files, such as songs or videos, you can purchase external hard drives with 1TB or more of storage (A terabyte is 1000GB, which can hold up to 250,000 photos or 1,000 HD movies). We like the Western Digitial My Passport hard drive which comes in 1TB, 2TB, 3TB and 4TB capacities, starting at $59 (check price on Amazon).
Updated on 2/6/2019
[Frustrated woman with computer image via Shutterstock]


From Nora Martinez on January 22, 2015 :: 5:24 pm
For the Mac ... just curious as to why you specify to drag the application and the files to the trash. Normally, I right-click and send to trash. Is the drag and drop method more efficient, or just a matter of personal style?
Reply
From Josh Kirschner on January 23, 2015 :: 7:06 am
Either drag-and-drop or using the right-click menu will have the same effect. What’s not stated above, but is probably worth emphasizing, is that you don’t actually free up any space until you EMPTY the trash.
Reply
From Nora Martinez on January 24, 2015 :: 1:25 am
Totally agree. You should get into the habit of emptying the trash on a regular basis. I do it daily.
Reply