Updated on 10/30/2023 with new Airdrop features for iOS 17.
AirDrop is the fastest, easiest way to share photos (and other content) with other nearby iPhone, iPad, or Mac users if you use an iPhone. With just a few taps, you can send photos and videos to one person or a whole group of people much faster than using email or text.
AirDrop is built into Apple's iOS and uses Bluetooth and WiFi to transmit content – photos, videos, contacts, links, and documents – to nearby Apple devices with a single tap. There's no limit on file size and no app to install; it's a share option you'll find in Photos, Safari, Contacts, and other apps.
Here's how to use AirDrop on your iPhone.
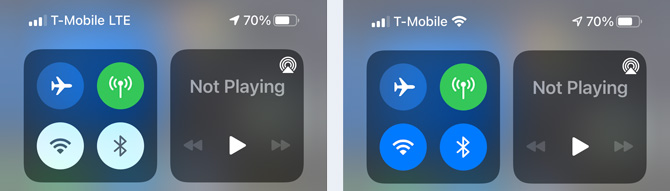
1. Turn on Bluetooth and WiFi
Since AirDrop works using both Bluetooth and WiFi, make sure they are both turned on. The quickest and easiest way to do this is to access your Control Center by swiping down from the top right corner of your phone's screen (or swipe up from the bottom if your phone has a Home button). If WiFi and Bluetooth in the communication widget are on, the icons will both be blue. If either is gray tap it to turn it on.
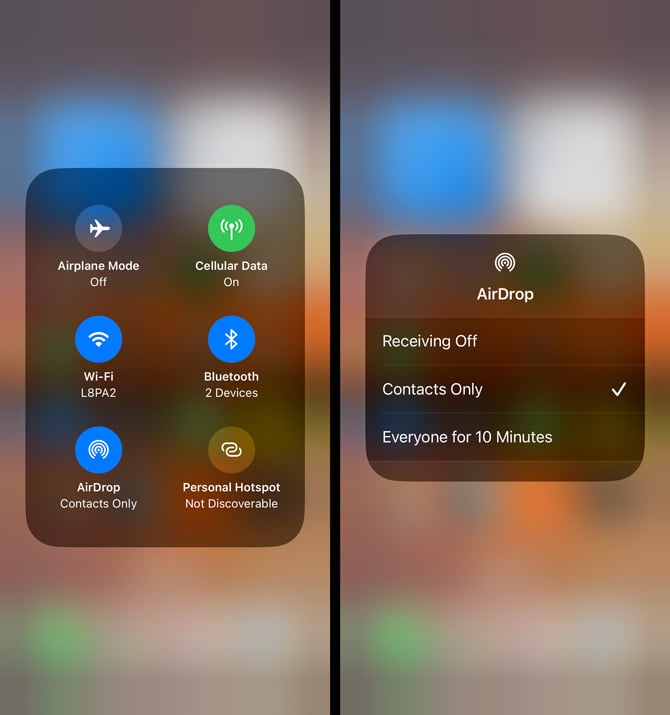
2. Enable AirDrop
In the same Control Center area where you checked that Bluetooth and WiFi are turned on, long-press anywhere in the communication widget until a screen with more options appears.
Tap the button to turn on AirDrop and you'll see three options:
- Receiving Off: You won't receive AirDrop requests.
- Contacts Only: Only your contacts can see your device.
- Everyone for 10 minutes: All nearby Apple devices using AirDrop can see your device for the next 10 minutes.
3. Make sure your friend's AirDrop, Bluetooth, and WiFi are turned on
Next, you need to check that the person you are sharing with also has Bluetooth and WiFi turned on and their AirDrop set to receive. I recommend that you have them set AirDrop to “Everyone for 10 minutes.”
4. Select the content that you want to share
AirDrop is a sharing option whenever you see the Share icon (a rectangle with an arrow pointing up). You'll also find it in some apps, like Contacts, under a specific share menu option. Here are four of the most common share scenarios.
Photos and Videos
From Photos Library, tap on "Select" and mark all of the photos and videos you want to share. You can also select the share icon from the bottom navigation bar when viewing individual photos and videos in the Photos app.
Web pages
In Safari and other browser apps, select the share icon from the bottom navigation bar.
Contacts
If you and the person you're sharing with are both running iOS 17, you can use a form of AirDrop called NameDrop to share your contact information. To initiate the transfer, you simply move your iPhone next to theirs.
Otherwise, in Contacts, open the contact you want to share, then scroll down and select Share Contact.
Passwords
If you save your passwords to iCloud Keychain, you can share them securely with others. Go into Settings > Passwords, select the account you want to share, and tap the share icon.
Read more: iOS 17 Now Lets You Share Passwords Securely through iCloud Passwords & Keychain.
5. From the sharing options, select AirDrop
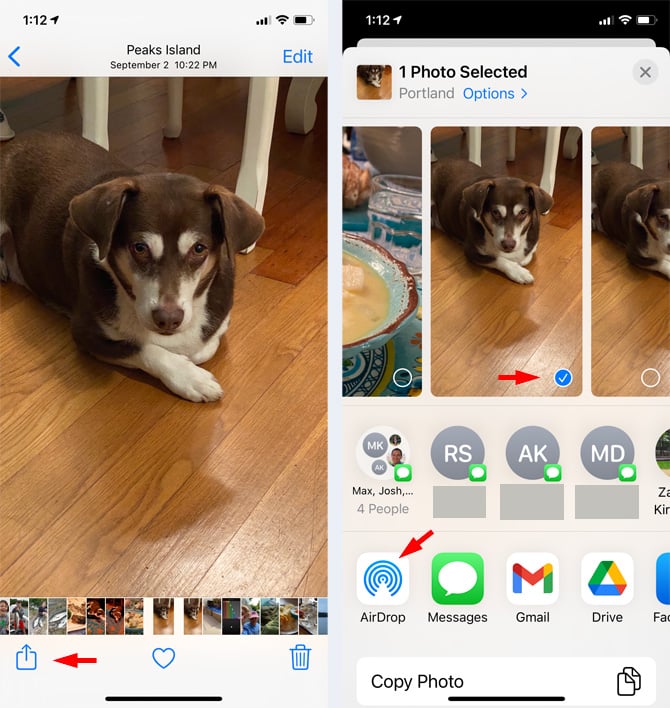
6. Select the person or people with whom you want to share
When you select AirDrop, you'll see the names of nearby iPhone users pop up on your screen. If they're in your contacts, you'll also see their picture. Select the person or people with whom you want to share.
7. Have the recipient/s accept the content
Your recipient/s will see a notification on their screen with the option to accept the content or decline it. When the person accepts, the content starts transferring. Even for large files and multiple photos and videos, the process is a matter of seconds.

8. Turn off AirDrop
In the Control Center, long-press on the communications widget, and a screen with options will come up. Tap the AirDrop button. Select "Receiving Off."
While your AirDrop settings will change to "Contacts Only" after 10 minutes of inactivity, I recommend turning it off after use to avoid leaving an open connection to your phone.
[Image credit: Screenshots via Techlicious, a hand holding iPhone mockup via Canva]
Andrea Smith is an award-winning technology broadcast journalist, reporter, and producer. Andrea was the Technology Producer and an on-air Technology contributor at ABC News for over two decades before becoming the Lifestyle Channel Editor at Mashable, where she explored the ways in which real people, not just geeks, began using technology in their everyday lives.