Whether you want to create a full back-up of all your photos or download a select few, it’s easy to transfer photos from your iPhone to your computer. Here’s how to download iPhone photos to a Windows PC or Mac with a cable and wirelessly.
How to download iPhone photos to a Windows PC
The easiest way to move your photos from your iPhone to your Windows PC is to use the Photos app that comes pre-loaded in Windows. With the Photos app, you can import all your photos, or just some of them, and choose the folder they’ll be transferred to, so you know where to find them later.
- Plug your iPhone charging cable into a USB port on your PC.
- Make sure your phone is unlocked. You may see the option to “Allow this device to access photos and videos?” Click “Allow” and then enter your phone's passcode. You’ll likely need to do this each time you connect your device to your computer.
- Open the Photos app.
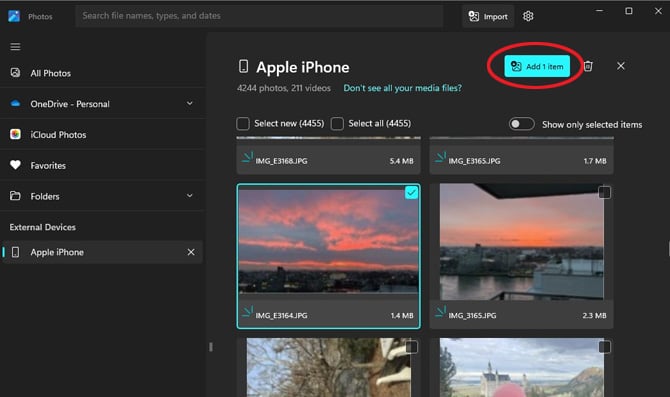
- On the left of your screen, select "Apple iPhone" in the "External Devices" section. (If you have a lot of photos, it may take a while for them to all load.) You have a few options here. You can import all the images, all the images since your last import, or manually select images to import.
- Then click the "Add" button.
- On this screen you can choose where your photos will go in OneDrive or the "Pictures" folder on your computer. Then click the "Import" button.
How to download iPhone photos to a Mac
If you want to download a large number of photos to a Mac, I recommend using the Photos App on your computer.
- Connect your phone to your Mac using a USB cable.
- Unlock your phone and click “Trust This Computer” on your device.
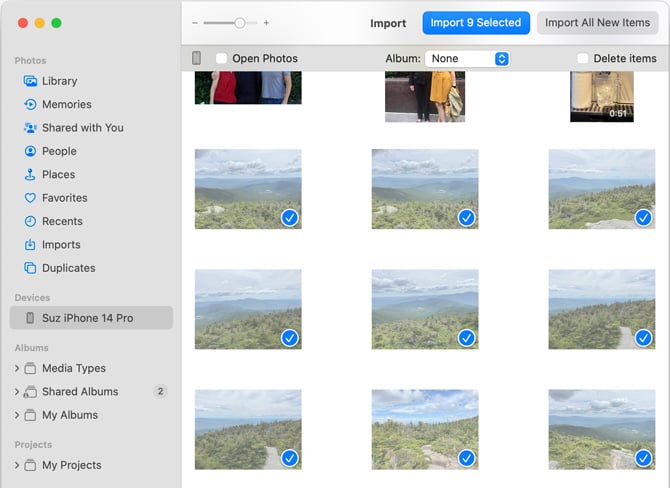
- Open the Photos app, and you’ll see a screen with all the photos on your connected device. You may have to click your device’s name in the Photos sidebar if it doesn’t immediately populate.
- Select the photos you want to transfer to your Mac. Click “Import Selected” if you want to move a group of photos or you can choose to import “All New Photos” to back up your most recent photos to your Mac.
If you’re looking for the photos you’ve imported, you’ll find them stored in the Photos Library in the Pictures folder.
Pro Tip: If you are logged into more than one profile on your Mac, your iPhone may not appear as a device in Photos. To make it appear, log out all profiles except yours and restart the Photos app.
How to download iPhone photos to a Mac wirelessly
If you’re just looking to download a few photos to your Mac, I recommend using AirDrop, Apple’s wireless transfer protocol. You may be familiar with AirDrop as a way to send images to other iPhones and iPads near you without having to email or text the photos.
- Ensure your Mac can receive AirDrop requests by going to Finder and selecting “Go” and then “AirDrop.” In the dropdown next to “Allow me to be discovered by,” select "Contacts Only."
- On your iPhone, open the Photos app.
- In the upper right corner tap “Select” and tap all the images you want to download. Tap the Share button (the square with an arrow on top).
- Look for the name of the computer that you are sending them to. If it doesn’t come up, make sure the computer is awake.
- Once you see the name of the Mac computer, tap on it. As long as you’re signed in with the same Apple ID on both devices, you won’t need to accept the transfer, it should happen automatically.
How to download iPhone photos to your computer if you use iCloud Photos on your iPhone
If you use iCloud Photos on your iPhone, you can download your iPhone photos to your computer by logging into iCloud.com.
- Log into your account on iCloud.com
- Click the photos icon and all the photos saved in your iCloud will populate on the screen.
- Select one or multiple photos. By default, you'll download a JPEG file. If you want the unmodified original photos, click on the triple dots on the photo and select "Move Download Options" and then choose “Unmodified Originals.”
- Choose your file destination and select “Save.”

Why we don’t recommend using the iCloud computer app to download your photos to your computer
The iCloud computer app doesn’t merely download photos, it syncs your photos across all your iPhone, iPad, Mac, and Windows PC running iCloud Photos. So, if you delete a photo on any of your iCloud Photos devices, that photo will be deleted on ALL of your devices.
If keeping a single synced library does sound like the right solution for you, here’s how to set up iCloud Photos on your computer.
- On your iPhone, go to “Settings.”
- Click on your name (your Apple ID).
- Select "iCloud" and then "Photos."
- If “Photos” is off, tap to turn it on. Now your photos will be automatically stored and saved in their original resolution on iCloud. You have the option to download original full-resolution photos to your devices, or you can choose to download optimized, space-saving versions instead.
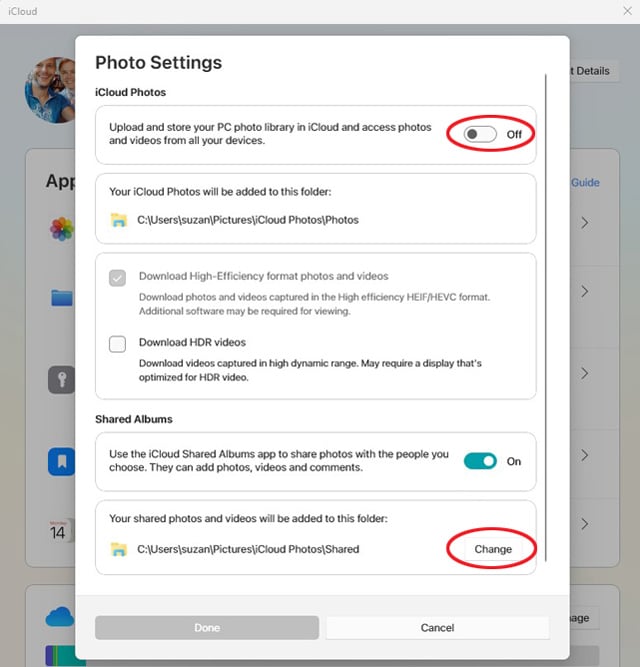
- If you’re using Windows, download and install iCloud for Windows. Sign in with your Apple ID. In the "Photos" click the arrow to the right of "Shared Albums." Turn on "Upload and store your PC photo library in iCloud..." Click "Done." Any photos you download will go to your iCloud Photos folder on your PC, but you can click “Change” to sync them to a different folder.
If you’re using a Mac, iCloud will already be installed on your computer. Set up your Mac to sync iCloud Photos by going to Apple menu, selecting “System Settings,” and then choosing Apple ID. Select “Photos.” Toggle on "Sync this Mac." Once it’s selected, your iPhone photos will automatically sync with your Mac.
[Image credit: Screenshots via Techlicious, laptop mockup via Canva]
Updated on 6/5/2024 with updated instructions for all Windows and Mac.
Andrea Smith is an award-winning technology broadcast journalist, reporter, and producer. Andrea was the Technology Producer and an on-air Technology contributor at ABC News for over two decades before becoming the Lifestyle Channel Editor at Mashable, where she explored the ways in which real people, not just geeks, began using technology in their everyday lives.


From SM on February 11, 2021 :: 10:19 pm
Please do a similar article but about downloading from Android phones. Thx
Reply
From brenda on February 12, 2021 :: 12:30 am
yes yes for android. is it possible i will be able to use these directions and adapt to my android.??? I really do not want another gadget to accomplish this if i do not have to.
thank you
Reply
From Suzanne Kantra on February 12, 2021 :: 8:11 pm
Yes! The story for downloading Android phone photos is in the works. I’ll post the link here when the story is live.
Reply
From James beck on February 13, 2021 :: 5:01 pm
Can you transfer an attached photo in an iPhone message to a computer for purpose of copying. Or can such a photo be copied directly from the iPhone?
From Suzanne Kantra on February 26, 2021 :: 2:18 pm
Here’s the story on how to download Android phone photos to your computer:
https://www.techlicious.com/tip/how-to-download-photos-from-android-phone-to-computer/
Reply