Updated on 12/1/2023 with current information about backing up Google Authenticator.
When you operate your phone, it stores bits of data from the apps and features you use to help them run more smoothly. Over time, this data can pile up and cause multiple issues on your phone, including running slowly and becoming unresponsive. Sometimes freeing up space on your phone will help, but often, clearing the data by resetting your phone is the best way to address the problem
There are two types of reset, a soft reset and a hard reset. To perform a soft reset, you power off your phone and turn it back on. Restarting your phone closes all the processes and apps running on your phone and loads all the system files from scratch. A soft reset does not come with the risk of losing your data.
Read More: The Power of Restarting: Why Turning Devices On and Off Fixes Them
The second type of reset is a hard reset, also known as a factory reset. A factory reset removes all the files stored on your Android phone, including your data, and brings the condition of your device back to how it was when it left the factory. But if you follow these steps carefully, you can perform a factory reset on your Android phone without losing your data.
1. Back up your authenticator app
Two-factor authentication adds an extra layer of security to your accounts by requiring you to provide a one-time passcode in addition to your password. If you use an authenticator app to generate those one-time passcodes, you need to back it up separately from your phone backup. Most authenticator apps have the option to backup to the cloud, including Microsoft Authenticator (see how), Authy (see how), Duo Mobile (see how), and Google Authenticator. Google Authenticator backs up automatically to the cloud whenever you back up your phone, so your codes will transfer automatically when you sign in to Google Authenticator on a new device.
2. Back up your phone
The only way to keep your data when doing a factory reset is to back it up and restore it when the reset is complete. Google's built-in backup feature is the easiest way to back up your data.
- Open Settings.
- Select Google.
- Select Backup., If you have backed up your phone before, you will see a list of what's backed up. If everything is backed up or if this is the first time you're backing up to Google, proceed to the next step. If you don't see everything being backed up, open the Google One app and select Storage. Then select View details. Now, you can select Manage backup to select the data you want backed up.
- Select Back up now. If this is your first backup, you will be able to select what you want backed up.
Note that it can take up to 24 hours to back up your data for the first time. When your data is saved, you'll see the amount of data below all of the data types you selected for backup.
Now that you have created a backup of your data, let us check out the steps to factory reset your smartphone.
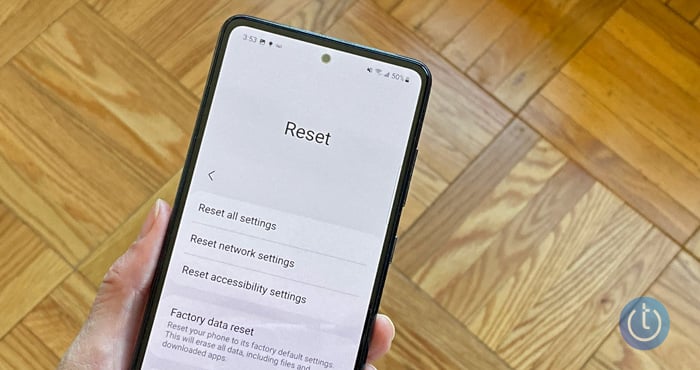
3. Perform a factory reset
If you own an Android smartphone running plain Android, you can follow the steps below (steps may vary slightly depending on the manufacturer and version of Android).
- Open Settings.
- Scroll down and select System.
- Expand the Advanced option. (For some manufacturers, you may see a reset option here. If you see a reset option, select it and go to step 5.)
- Select Reset options.
- Select Erase all data for some manufacturers, you may see Factory reset).
- On the confirmation page, select Reset phone.
- Another confirmation screen will show up, and you need to select Erase everything.
- You will be asked to confirm your pattern.
- That's it.
If you own a Samsung phone, follow the steps below. If you have encrypted the microSD card, you must decrypt it before resetting the phone. Otherwise, your phone will not be able to read the data on the card. From Settings, search for and select “Decrypt SD card,” and then follow the on-screen prompts.
- Open Settings.
- Select General management.
- Scroll down and select Reset.
- Select Factory data reset. You will see a list of the data and accounts that will be removed from your phone after the reset.
- Select Reset.
- If your phone is protected by a pattern or PIN code, you will be asked to re-enter it.
- Select Delete All. Your phone will start the reset process and will boot up once the process is completed.
Now that you have factory reset your phone, the next step is to set up your phone and restore your data.
4. Restore your data
When you set up your device again, you'll be able to restore your data from the backup you just created.
- Select Copy apps & data.
- Connect to your WiFi network.
- On the Bring your data from screen, select A Backup from an Android phone.
- When prompted, log into the Google account you used to create your backup.
- Select the backup you just created to restore your data.
- Select the apps you want to restore.
- Follow the prompts to finish setting up your phone. The apps and data will be restored in the background.
[Image credit: Techlicious]
Sagar Naresh Bhavsar has been writing about technology for more than two years. Previously, he was a staff writer at Guiding Tech and TechWiser. He loves working out, having a cup of coffee, and playing guitar.


From John Ostrowski on August 27, 2022 :: 2:26 pm
I’m surprised that no mention was made of fully charging your battery before beginning this process and/or having your phone connected to a charger while the process is running. A dead battery halfway through either data transfer phase might be problematic.
Reply