If you’re a Windows user who’s still on the older Windows 7 or 8 OS, it’s time to join 300 million users across the world and grab that free upgrade to Windows 10, Microsoft’s new OS for computers and tablets. After July 29, 2016, Windows 10 will have to be purchased.
You can check what version of Windows you’re currently running by hitting this handy page. If you’re on Vista or XP, you’re not eligible for the free upgrade, though if your system meets the minimum hardware requirements, you can still buy Windows 10 Home for $119 or 10 Pro for $199. If you’re eligible for the free upgrade, you’ll automatically receive the Home or Pro edition of Windows most similar to the Windows edition you run now.
It’s worth upgrading to Windows 10 if your device supports it. The new OS offers some powerful, convenient new features. But Windows 10 also comes with some terms of service and default settings that give Microsoft the power to collect a ton of data about the people using its software, including what you search for, your contact book details and your browsing habits. Set up your new system with privacy settings you’re happy with by following this step-by-step guide to installing Windows 10.
Before you start
Completing a few housekeeping chores in your tablet or computer will help your upgrade go smoothly and ensure that in the event of any problems with the upgrade, you won’t lose any data.
1. Back up your computer or tablet.
This will allow you to restore your system, including all files, programs and settings.
If you’re on Windows 8, go to Control Panel > File History > System Image Backup.
You’ll be asked where you want to save the backup. Microsoft recommends saving it on a different hard drive than the one Windows is installed on (for example, save it on an external disk). If this is your first backup, you’ll also be taken through the process to set up a drive for File History.
If you’re on Windows 7, go to Control Panel > System and Maintenance > Backup and Restore.
2. Download the latest drivers for your computer or tablet.
These are the software for your particular model, which you can find from the support section of your manufacturer’s site. Microsoft maintains an updated list of drivers for its Surface Pro tablet here.
3. Download any updates to your current OS.
Before you can upgrade to Windows 10, you need to be running the latest version of Windows for your current license; that is, you need to have installed the latest available update to your computer or tablet OS. To see if there are any updates to install, hit Start > All Programs > Windows Update. In the left pane, click Check for updates, and choose to install them if there are.
Once that’s done, you’re ready to start your upgrade to Windows 10.
Getting your Windows 10 upgrade
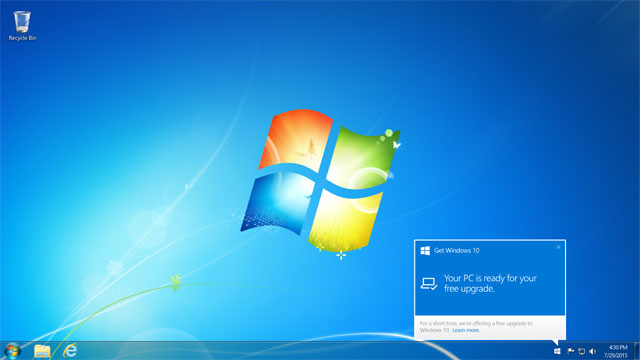
4. Reserve your Windows 10 upgrade.
Check your taskbar for a Windows icon with an alert that says “Get Windows 10,” and click to select “Reserve my upgrade.” It should pop up when your computer has all the necessary updates and is ready to be upgraded. If you don’t see this icon, check Microsoft’s support page here for possible issues and how to resolve them.
5. Download your upgrade.
Wait for Microsoft to verify your computer is eligible for the upgrade, which may take days or weeks. You’ll receive a notification when your upgrade is ready to be installed. Click on it to immediately upgrade, or schedule the upgrade for a more convenient time.
6. Choose “Upgrade.”
Choose “Upgrade.” The free upgrade doesn’t include a Custom installation, although after it’s installed, you’ll be able to reinstall using the Custom option.
Perfecting your Windows 10 settings
After Windows 10 installs, your PC will reboot, and the next thing you’ll see is the Express Settings screen. If you agree to that, it will set up many privacy-eroding permissions. Instead, hit the “Customize” tab in the bottom right and make the following adjustments.
7. Turn off all Personalization Settings.
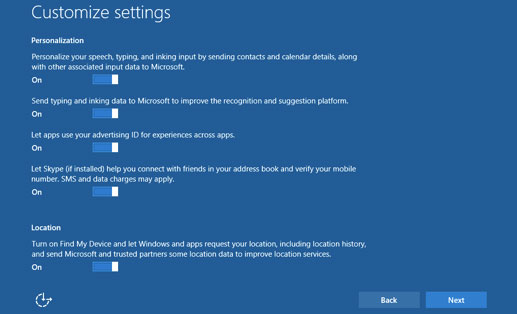
The top three default settings rope you into automatically sending contacts, calendar, speech and typing data to Microsoft in the name of improved personalization and word suggestions, as well as allowing all apps to use your “advertising ID for experiences across apps.” In other words, you'll be getting targeted ads based on how you use apps and browse the web on your computer or tablet.
8. Consider turning off Location.
The final setting in the screen above means you allow Windows and third-party apps to request your location and location history. It also automatically sends Microsoft your location data in order to improve location services.
Location data is used in targeting ads and to improve some apps’ services. The benefits to this include better location-based recommendations such as traffic tips or restaurant details and help locating lost devices (the Find My Device app). But if the device you’re upgrading is a computer tethered to your wall, you can turn the slider off without impacting your usage. If it’s a laptop or tablet that you often take to other places, you may want to keep the Location slider on.
9. Turn off all Connectivity settings.
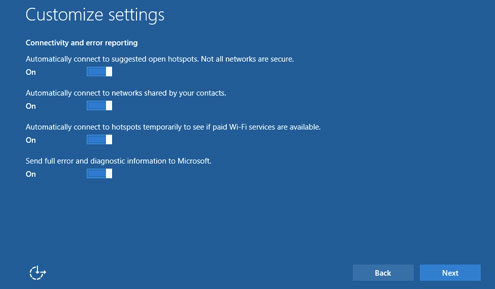
These settings pertain to automatic connections with Wi-Fi networks, including open hotspots, friends’ shared networks and paid networks.
The first setting involves Microsoft’s crowdsourced database of open hotspots where a decent percentage of Windows users have reported a good connection. Based on the perils of connecting to public Wi-Fi, we recommend toggling off both automatic connection to open hotspots and paid networks. You can always manually search for such networks if and when the need arises.
According to the Wi-Fi Sense FAQ, the shared networks feature, which allowed anyone in your Outlook, Skype or Facebook contacts book to automatically connect to your home Wi-Fi if they brought their laptop to your house, is no longer available. It's worth toggling the setting off anyway.
10. Consider turning off error reporting.
Microsoft says this information helps it to diagnose crashes and fix glitches, so leave it on if you want, but turning it off won’t affect your usage.
11. Leave SmartScreen on.
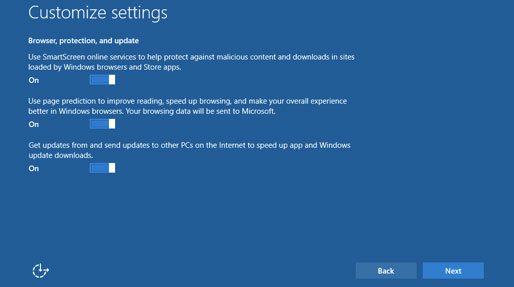
This feature filters malicious content and phishing links in Windows apps and the Edge browser. It’s worth leaving on, unless you find you’re being blocked from sites you visit often. For example, some legitimate sites may have malware-containing ads that nonetheless can’t harm your computer as long as you don’t click on them.
12. Turn off Page Prediction.
This allows Windows to send data about your web browsing (on Edge) in order to “improve the browsing experience.” Microsoft says this entails loading up the page you’re likely to browse to next to speed up browsing. In practice, this means a lot of data about your browsing habits gets stored in the cloud, potentially able to be used for profiling and ad targeting purposes.
13. Consider turning off “Get updates from and send updates to other PCs on the Internet.”
This peer-to-peer file-sharing of Windows updates allows you to download updates faster, in exchange for allowing other users to download them from you.
It might not be an immediate privacy concern but could end up using a lot of data. If you use a metered connection or your service plan has a data cap, head to Settings > Network & Internet > WiFi > Advanced options, and select “Set as metered connection.” You’ll be asked to confirm any uploading/downloading first.
If you need to change your privacy settings after install, you can head to Settings > Privacy, where you’ll be able to tweak Wi-Fi, location and other settings.
14. Sign in with your Microsoft account.
If you have an Xbox, Skype, Outlook.com or Windows phone login, you can use it to sign into Windows 10, which offers the usual lineup of convenience features such as access to your apps, settings, files and photos across all your devices.
If you're concerned about privacy, this also means yet another company gets to build an ever-more-detailed profile about you across yet more accounts. But since a Microsoft account gives you access to Cortana and makes it easier to purchase apps on the Windows Store, we recommend using it to log in. Do pay attention to your privacy settings thereafter.
15. Use OneDrive.
It’s a good idea to automatically back up your photos, documents and PC settings to Microsoft’s cloud storage (accessible from anywhere). Go ahead and leave this setting on.
If you’re upgrading Windows 10 using the free upgrade option, you won’t be able to choose a “clean install” of Windows 10 (where the old operating system is erased along with all user files and programs), simply an upgrade. In other words, your new Windows 10 system will have access to all your programs, files and settings exactly as they were. That's convenient unless you’ve picked up bloatware, malware or other digital flotsam that slows down your computer. In that case, you’ll want to declutter and organize your beast. Once you've upgraded to Windows 10, you’ll be able to reinstall it “clean” on the same device.
If you've already upgraded to Windows 10 and want to change the important privacy-related settings, read our story 5 Key Windows 10 Privacy and Sharing Settings You Need to Change.
[image credit: Microsoft]