If your desktop is running out of storage space on your current drive or you want to upgrade an existing hard disk drive to a far faster SSD, it's a really simple and inexpensive process to add a new SSD to your PC. You can get everything you need to install a 1TB SSD on Amazon for around $75, and installation is simple for anyone willing to pick up a screwdriver and plug in a couple of cables.
While this article focuses on desktops, the advice is largely the same for laptops. However, there are some differences in the installation process. Follow my guide on how to replace a hard drive with an SSD on a laptop if that is your goal.
Before you get started, there are two basic things you need to know:
- Are you adding a storage hard disk drive, or do you want to replace your existing Windows system hard drive with a new SSD? If you are using the SSD to create a new Windows system drive, you will need to follow the steps below to clone your existing drive. Otherwise, you can skip that section.
- What type of SSD do you need – a 2.5-inch SATA SSD or an NVMe M.2 PCIe SSD? Many newer desktops use M.2 slots for storage, and these interfaces are faster (and more expensive) than SATA ports, which are typically used for hard drives and 2.5-inch SSDs. However, your M.2 slots may already be in use by other cards (my Dell XPS desktop has two M.2 slots, one is used by my NVMe system drive and the other by my wireless/Bluetooth combo card), and most users won't see much of any difference in speed between the two formats for standard computing tasks. If you have the choice, go with an M.2 SSD. They're faster for some (rare) uses, easier to install, and you won't need to buy an adapter cage or cable, bringing the overall price in line with 2.5-inch SATA SSDs.
As every PC is different, you should confirm your port situation in your manufacturer specs before making any purchase. Also, since manufacturer specs can be unclear (or even wrong), it is wise to physically check the ports inside your computer to see what is actually installed and available.
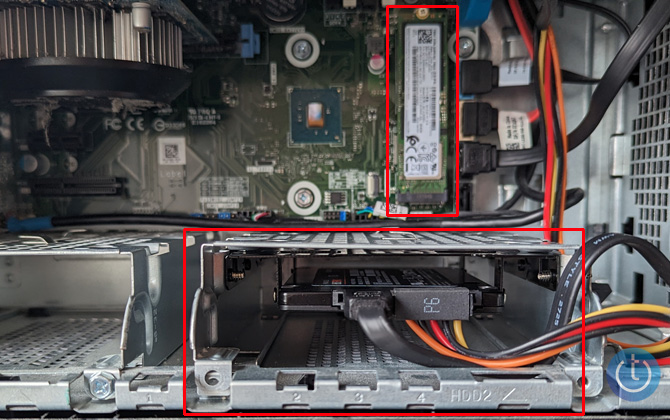
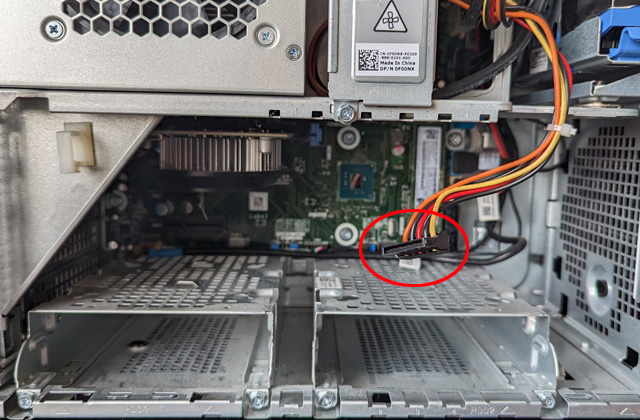
An NVMe M.2 PCIe SSD is installed in the upper right, and a SATA SSD is in a bay in the lower right.
Buying an SSD drive and mounting components
What size SSD to buy
Storage prices have dropped considerably over the years. At the same time, now that every smartphone is capable of taking hi-res photos and videos, storage requirements have grown significantly. So, I wouldn't skimp on space – a 1TB drive should provide ample storage for most people. Pricing-wise, going with 500GB will save you about $30, and doubling up to 2TB will roughly double the price of whichever drive you're considering.
What brand/model to buy
There are hundreds of SSD models from dozens of brands on the market, but since the drive will hold all your computer's critical information, this is not the time to go with the cheapest model. I would also avoid the ultimate performance models intended for server applications and 3D graphics professionals – they cost significantly more money and will offer no performance benefit for typical users.
SATA SSD
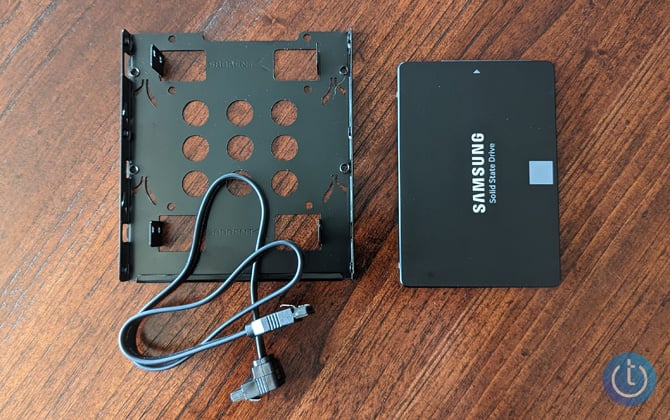
My top recommendation is the Samsung 870 EVO, which is an upgrade to the 860 EVO I have installed in my own laptop (and costs $40 less than I paid a few years ago). It is consistently rated at or near the top in performance tests versus competitive models and offers a leading 5-year or 600 TBW (for 1TB model) warranty. TBW (terabytes written) is a good indication of the drive's robustness – the more, the better. Under normal usage, you would never come close to hitting that TBW limit (600 TBW is equivalent to about 200 million photos). Samsung also comes with Samsung Data Migration software, an easy-to-use program for cloning your existing drive onto the SSD. As of the time of writing, you can get the 1TB for $89.99 on Samsung.com or Amazon.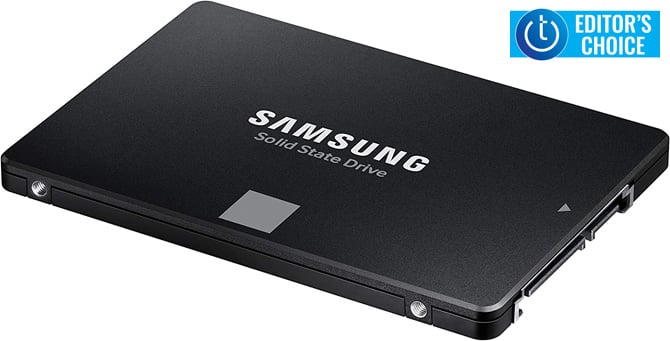
If you want to save a little money, the Crucial MX500 is arguably every bit as good as the Samsung 870 EVO. Data transfer speeds will be the same and Crucial offers its own Acronis True Image software for easy drive cloning. The Crucial MX500 also comes with a five-year warranty, though its 360 TBW limit for the 1TB model is lower than the limit for the Samsung 870 EVO, meaning it may be slightly less robust (realistically, that's still far, far above what most people would ever hit). The MX500 also happens to be the same budget pick I recommended three years ago. But don't let that deter you. Not much has changed in the world of 2.5-inch SATA SSD drives, and this tried-and-true model remains just as highly rated. As of the time of writing, you can get the 1TB for $65.99 on Crucial.com or for a few bucks less on Amazon.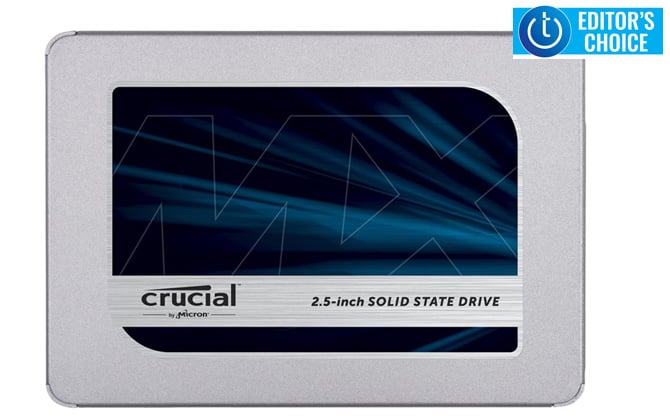
If you're purchasing a SATA SSD, you will need a SATA cable to connect it to the SATA port on your motherboard. The cable brand doesn't really matter much; just go for one that is highly rated on Amazon and is the right length to reach from the motherboard to where you will be mounting the drive (18 inches is usually a safe length). I also suggest going for one with a right-angle connector to help fit in tight spaces. I went with this Cable Matters 3-pack for my install (I didn't need three cables, but for only $6.99, it was the same price as many single packs).
Most desktop PC drive bays are sized for 3.5-inch drives, so you should buy a 2.5-inch drive adapter for mounting. Again, the brand doesn't matter – it's just a piece of metal to screw your drive into. The Sabrent 2.5 to 3.5 inch mounting bracket I chose gets very high ratings (no issues with misaligned screws) and was under $7. Technically, you don’t have to buy the adapter, you could just have the SSD placed loosely inside your case, but it seems wise to secure it to ensure cables don’t wiggle loose when you move the computer around.
This is also a good time to pick up a basic computer screwdriver set if you need one. This screwdriver set has tons of heads (including the non-standard ones) and a tool to help you open your laptop case if needed. It's the one I use for my computer repairs (and a thousand other little things around the house).
NVMe M.2 SSD
There are various flavors of M.2 cards out there. High-end models run the newer PCIe Gen4 (or even Gen5) for faster read/write speeds, while lower-cost drives are still using PCIe Gen3. Some come with onboard cache memory; others leverage your system memory. And there is no shortage of benchmark tests comparing them all. But the net-net is that all NVME M.2 PCIe drives are very, very fast – so fast that the typical user will never notice any difference in their performance. So, the only considerations that should matter when picking out an NVME M.2 drive are storage size, price, and reliability.
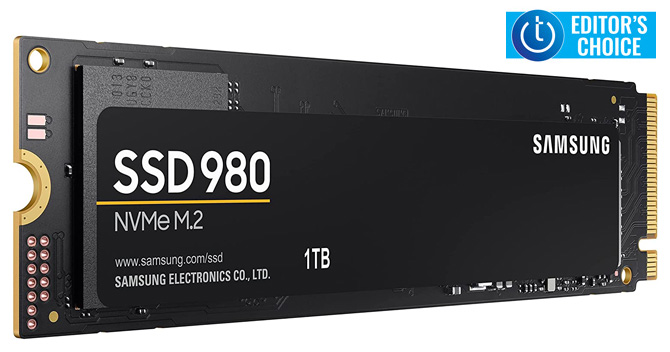
And in that vein, my recommendations largely mirror the choices for the SATA drives above. My top pick is the Samsung 980 PCIe 3.0 NVMe SSD. It has a strong 600 TBW warranty (for 1TB) and high ratings across the board for performance and reliability. Yes, it's running older PCIe Gen3, but it won't matter in real-life performance. Because the 980 doesn't have onboard cache memory, it's also $10 cheaper than Samsung's 970 EVO, which has the onboard cache. The Samsung 980 PCIe is currently $89.99 on Amazon or Samsung.com.
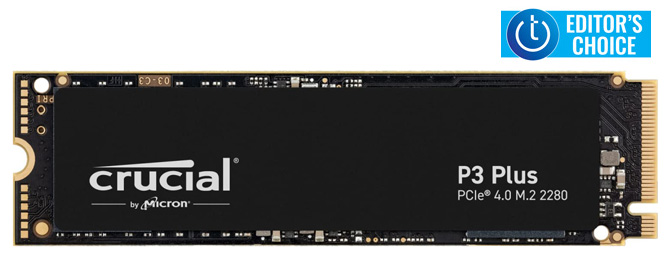
My budget pick is the Crucial P3 Plus PCIe Gen4 NVMe M.2 SSD. As a PCIe Gen4 device, it is technically more advanced than the Samsung 980, with far higher maximum read/write capabilities, but you're not going to see a real-world difference in normal use. The Crucial drives get very strong reviews in both benchmark testing and among owners. The downside of the Crucial versus the Samsung is its lower 220 TBW warranty (for 1TB); though that is still far beyond what typical owners would ever hit, it suggests a slightly cheaper component build. At $66.99 on Amazon and Crucial.com, it makes a great budget choice.
Installation steps for your new SSD
Once you have your new drive and any necessary mounting hardware, it's time to get it installed and running on your PC. These steps will guide you through it.
Installing the physical SATA SSD
- Turn off the power to your PC and unplug it.
- Open up the case to access the internal ports and bays (every case is different, so refer to your manufacturer's instructions if unsure).
- Screw your new SSD into the 2.5 inch to 3.5 inch mounting adapter.
- Screw the mounting adapter with the drive into a free drive bay inside your PC.
- Attach one end of your SATA cable to the drive and the other end to a free SATA port on your motherboard (it doesn't matter which end you use, so whatever fits best if using a right-angled connector).
- Attach a free power cable jack into your SSD (look at the power cable running to your existing internal drives – there should be an extra power cable there)
- Close up your case and power everything back up.
Installing the physical NVME M.2 SSD
- Turn off the power to your PC and unplug it.
- Open up the case to access the internal ports and bays (every case is different, so refer to your manufacturer's instructions if unsure).
- Find the M.2 PCIe slot on your motherboard and insert the gold pins on your drive into the slot at about a 30-degree angle. There may be a screw that should be removed before insertion, which you will then reinstall after the drive to hold it in place.
- Close up your case and power everything back up.
Setting up your SSD drive
Format your SSD
Most SSDs will come unformatted. So, the first step after installation is to format the drive so your system can recognize it.
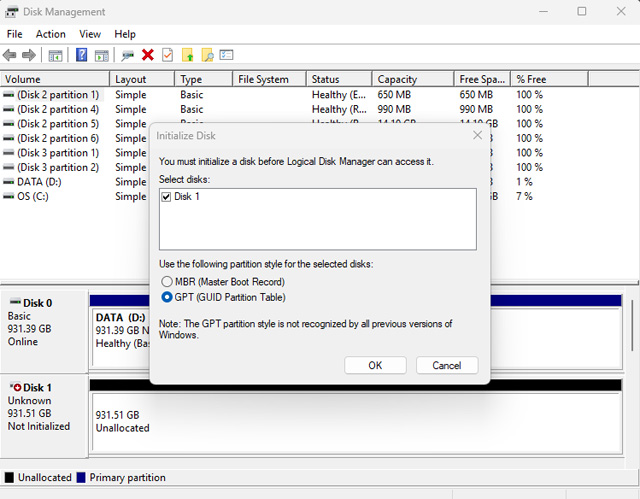
- Click the Windows Start (or use Windows Search Bar) and search for “disk management”. Chose “Create and format hard disk partitions”. This will open Windows Disk Management app.
- You should see your new SSD in the lists of disks. The disk may need to be initialized so Windows will recognize it as a drive. If you are using the SSD as a storage drive, choose GPT for the initialization. If you will be using the SSD as your system disk, choose GPT for all 64Bit Windows versions and MBR for all 32-bit versions.
- Now right click on the newly initialized disk in your drive list and select “New Simple Volume” to bring up the New Simple Volume Wizard that will walk you through the rest of the process.
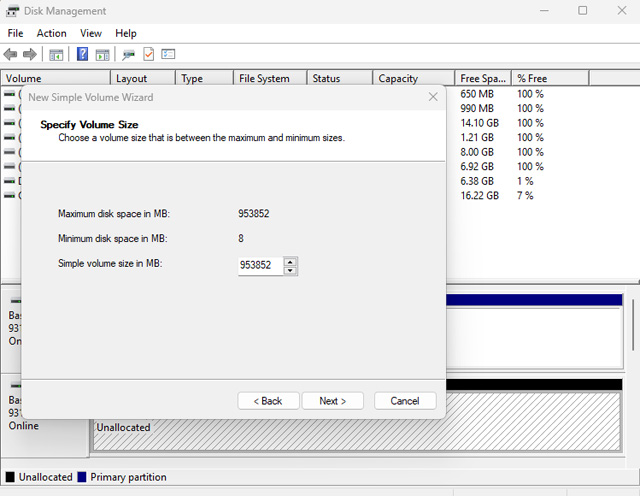
- The first option is to choose a volume size. You can set up multiple volumes on the disk, if desired, but assuming you are setting it up as a single volume, just select the maximum volume size.
- Select a drive letter for your new SSD (doesn’t matter what you pick)
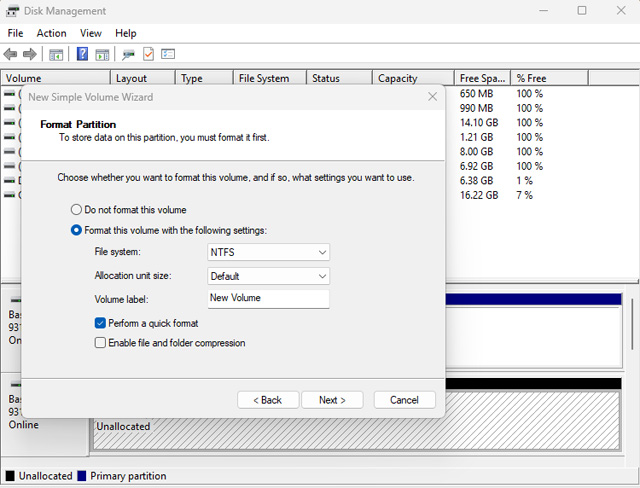
- Format your drive. Choose NTFS for the file system (read more about file system choices), change the Volume label to whatever you want to call your new drive (you can always change this later), and check “Perform a quick format”. Click “Next,” and your drive will be formatted and ready for use.
Install your manufacturer's drive management software
Most manufacturers have a drive management program, like Samsung Magician, that will keep your drive firmware up to date and allow you to customize the performance and other settings. It's worth installing for the firmware updates but leave the other settings alone unless you really know what you're doing. Your SSD will be plenty fast out of the box, and most performance tweaking will have limited benefit in normal use.
Clone your existing Windows OS drive
If you're buying the SSD to replace a drive running your Windows operating system, you should follow these steps to clone your old drive onto your new one. The cloning program that comes with your SSD – Samsung Data Migration, Acronis True Image – will make an exact replica of your current hard drive on your new SSD, so there's no need to reinstall anything or transfer any files. If you purchase a drive that doesn't include the software, there are many free disk cloning programs you can download yourself.
To get going with Samsung Magician:
- Download and install Samsung Magician onto your PC.
- Open Samsung Magician. You should see both your existing system drive and your new Samsung SSD in the bar at the top.
- Select your system drive and select “Data Migration” in the left column.
- Choose your new SSD as the “Target Drive” and then click “Start” to begin the cloning process.
If you're using Acronis:
- Download Acronis True Image onto your existing hard drive.
- Launch the program.
- On the sidebar, click "Tools," and then click "Clone disk."
- Acronis recommends using Automatic transfer mode to configure the partitions of your new disk to match your old one. If Acronis finds two disks, one partitioned and another unpartitioned, it should begin the cloning process automatically. Otherwise, continue with steps 5 through 7.
- On the Source Disk step, select the disk that you want to clone.
- On the Destination Disk step, select the destination disk for the cloned data.
- On the Finish step, check the setting and then click "Proceed."
- Follow the steps to clone your drive.
The cloning process will take a while to transfer your data onto your new drive. Don't use your computer while the cloning process is happening because any changes you make to settings or files may not be cloned to the new drive.
Once your new system drive is created, you will need to set this as the new boot drive for your computer. If you are removing your old system drive, your PC should find and boot from your new drive automatically. However, if you are having any issues or want to keep your old drive while booting from the new one, you can adjust your boot settings in your system BIOS. The exact process for this will vary by manufacturer, but you usually access your boot settings by pressing a function key while powering on your system. Follow the options in the BIOS menu to change your boot drive.
[Image credit: Techlicious, Samsung, Crucial]
Josh Kirschner is the co-founder of Techlicious and has been covering consumer tech for more than a decade. Josh started his first company while still in college, a consumer electronics retailer focused on students. His writing has been featured in Today.com, NBC News, and Time.