Congratulations! You've gotten (or have ordered and are now anxiously awaiting) your new iPhone 14. So how do you get your new iPhone up and running? What should you expect during setup? Here are the steps for a smooth transition.
1. Update your current iPhone
First and foremost, update your old iPhone to the latest version available (currently iOS 15.7 for most phones) to ensure everything during the data transfer works as it's supposed to.
DO NOT UPDATE YOUR OLD iPHONE TO iOS 16.
The original version of iPhone 16, which is pre-loaded on iPhone 14, has been reported as "incredibly" buggy, particularly where Messages and FaceTime are concerned, which Apple freely admits. So, iOS 16 on your old iPhone may be too buggy at the moment to effectively complete a transfer of your data to a new iPhone 14. If you have updated your old phone to iOS 16, though, don't panic. Many people who updated to iOS 16 had no issues moving their data to an iPhone 14, including Techlicious Editor-in-Chief, Suzanne Kantra.
If you're prompted to update your new iPhone 14 to iOS 16.0.1, do it. If you're not prompted, don't worry. You can also update to the latest version of iOS 16 at the end of the setup process.
2. Back up your current iPhone
After upgrading your current iPhone to the latest version of iOS, back it up. You'll need a fresh backup to set up your new device.
You can back up your current iPhone's content, data, and passwords to iCloud or your computer. Depending on how much stuff you've got on your iPhone, backing up to iCloud should take 5-10 minutes; to your computer, around twice to three times as long.
To back up your current iPhone, go to Settings and tap on your Apple ID name/photo > iCloud > iCloud Backup > Back Up Now (should be the third item listed). You'll get a progress bar and estimated time remaining.
I'm a paranoid belt-and-suspenders kind of tech person, so I also made a backup of my retiring iPhone to my Mac. To back up your current iPhone to your computer, connect your iPhone to your computer with a Lightning-to-USB cable. On a Mac, your iPhone will appear as a listed device or icon in Finder; on Windows, your iPhone will appear as an icon at the top left of the iTunes app window.
Click on the iPhone icon in iTunes on your Windows PC or double-click on the iPhone icon in Finder on your Mac, and you'll get a window that looks like this:
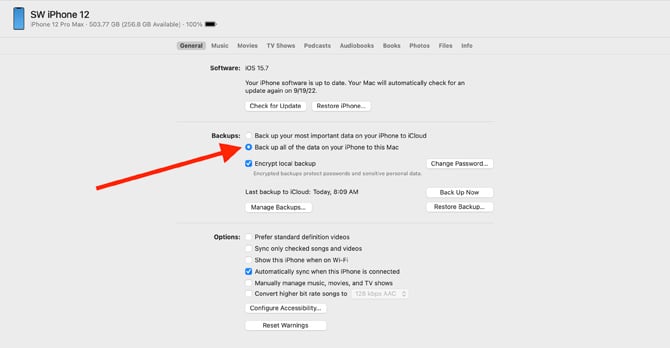
You want to back up your iPhone manually. Click "Back up all of the data on your iPhone to this…." Mac or PC. Choose to encrypt your backup. If you choose not to encrypt your backup, Apple warns you, "If you proceed without encryption, the backups will not include sensitive data. Restoring a device from a backup will result in loss of your saved passwords, Health, and HomeKit data." If you hadn't already, you'll be prompted to create a password for this encrypted backup. After tapping in your PIN code on your iPhone, you'll click "Back Up Now."
Once your soon-to-be-ex iPhone is all backed up, you're ready to set up your new iPhone 14.
3. Activate your new iPhone
You'll turn on your new iPhone 14 – it should come fully charged, but feel free to connect it to power – and step through the initial location and language questions.
You can choose how to transfer data to your new iPhone, but you want to select Quick Start to activate your new device and initiate the iPhone-to-iPhone transfer.
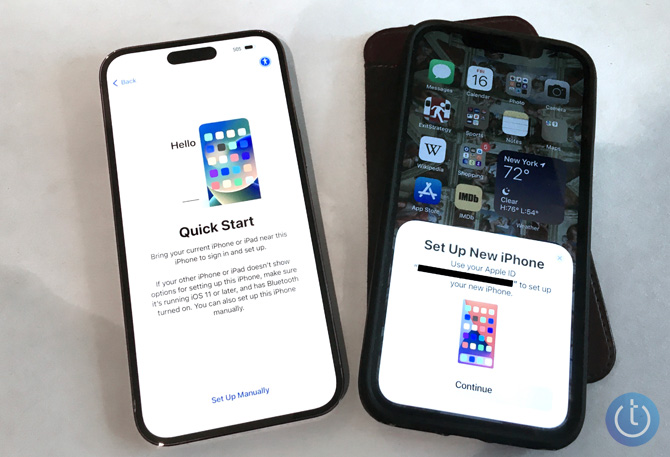
All you need to do is place the new and old iPhones next to one another. On your new iPhone 14, you'll see what looks like a teal-colored cloud. Next, a camera window will open on your old iPhone. Finally, you hold the old iPhone camera over the teal cloud on your new iPhone 14, and in less than five minutes, your new iPhone 14 is ready for its data transfer.
4. Transfer your phone number
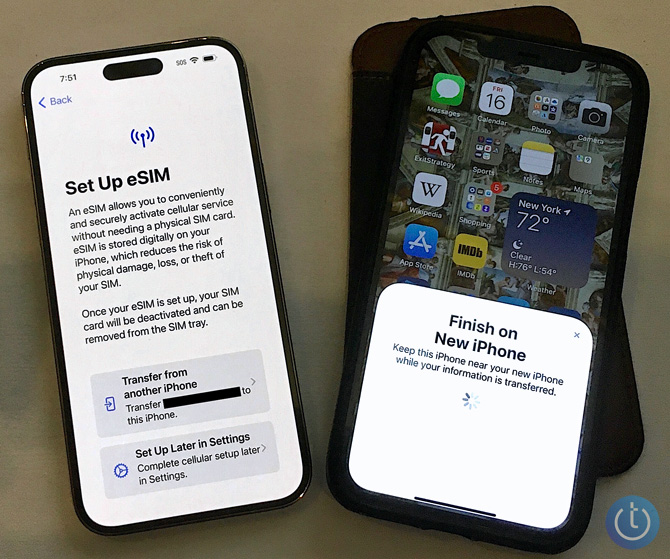
When your new iPhone 14 is ready, you'll be asked if you want to transfer your phone number to your new iPhone, which we assume you do. iPhone 14 eliminates the SIM card drawer and the physical pinky nail-sized SIM card in favor of a digital electronic SIM, or eSIM. So, just tap on Transfer from Another iPhone. For some reason, it took a couple of attempts for me, but ultimately my number was successfully transferred.
If you have a Mac, expect a series of notifications alerting you of FaceTime and Message changes along with options to turn on WiFi calling.
5. Transfer your data
You'll then be prompted to Transfer Your Data. You can choose to transfer from your iCloud or your local computer backup. If you choose iCloud, you'll be able to use your new iPhone in around 15 minutes since most of your data will download afterward in the background. A transfer from your Mac or PC via a USB cable could take a couple of hours or more. So, I recommend choosing to transfer from iCloud.
You're then asked if you want to Make This Your New iPhone, with choices of exactly what data you want to transfer. Just click "Continue" if you're going to make your new iPhone 14 a clone of your old iPhone.
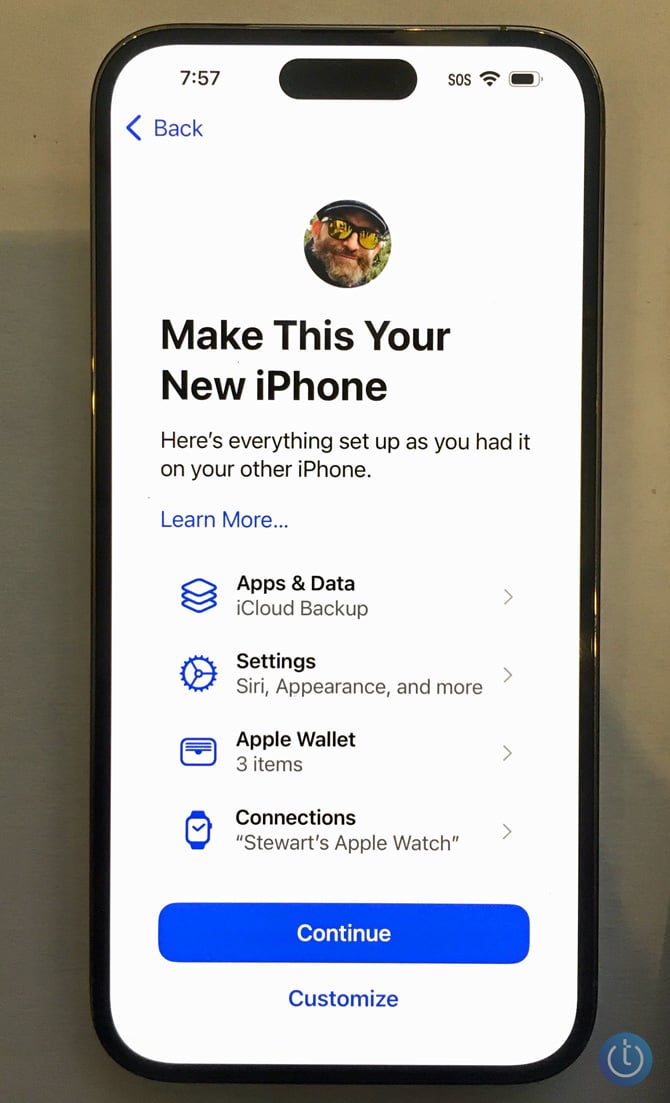
For me, the iCloud iPhone-to-iPhone 14 transfer took almost exactly the estimated 15 minutes. But not everything is actually transferred at this point.
Once your old iPhone contents are successfully transferred via iCloud, your phone number and financial data need to be moved.
If you've enrolled in Apple Cash and/or have registered credit cards in Apple Wallet, you'll need to enter their security codes to add them to your new iPhone.
You'll also be asked to activate your new iPhone's Emergency SOS; you'll be told that the iPhone 14's new Emergency SOS via Satellite will be coming in the fall.
You'll also be prompted to create a new FaceID, for which several options now exist: without Covid mask, with mask, with or without glasses. You can also add "alternate" faces – a loved one, wearing a hat or your hair differently, etc., all of which you can skip for the time being and set up after your iPhone 14 is completely ready to go.
Finally, you'll be asked what you want to do with your old iPhone, with an option to erase it for trade-in or sale. If you use an authenticator app, don't erase your old iPhone. You'll need to transfer your authenticator account to the new iPhone, which is much easier if you have access to your old iPhone. I like to keep my old phone active (albeit now running only on WiFi) until I'm sure everything is copacetic with my new iPhone.
Once your phone content transfer is complete, your iPhone 14 will shut down and restart.
6. Complete the downloads
Believe it or not, if you use iCloud to transfer your data, your iPhone 14 content download isn't yet done. Once your iPhone 14 restarts, and while you're setting up your financial info and FaceID, your new iPhone 14 is busily downloading all the stuff you had stored on your old iPhone – apps, photos, videos, music, etc. The 15-minute iCloud data transfer simply told your new iPhone 14 what stuff you had on your old iPhone. Now, your new iPhone is downloading this stuff.
Depending on how much actual stuff you had stored on your old iPhone, this data download process could take an hour or more. If you go to Settings, you'll see how much data still needs to be downloaded to your new iPhone. But this combined iCloud transfer/download process is still shorter than the wired PC-to-iPhone 14 transfer, during which you wouldn't be able to use your new iPhone.
So, while this download proceeds, you can use your new device. However, we recommend waiting.
7. Update Your iPhone 14
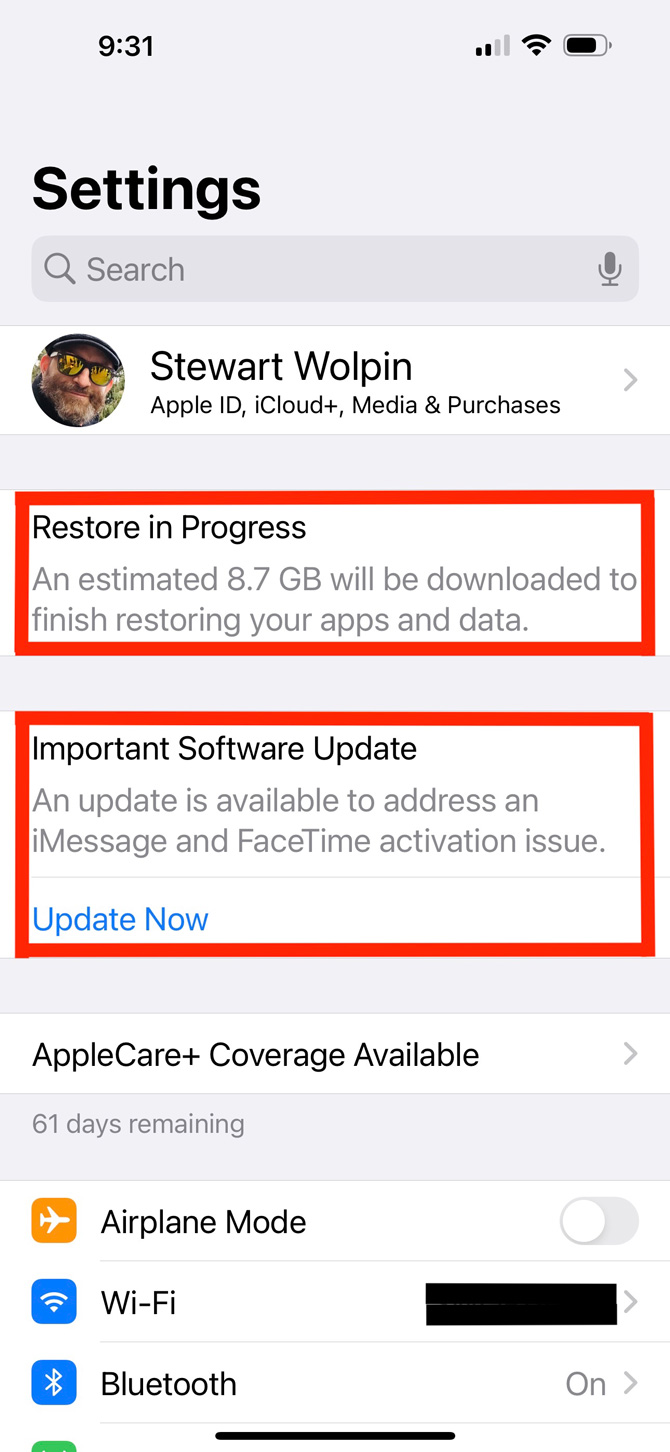
As previously noted, the initial release of iOS 16 has been reported to be problematic for Messages and FaceTime, and Apple immediately issued an iOS update, iOS 16.0.1. So, update your iPhone 14 to iOS 16.0.1. Apple even provides a notice to do so in the main Settings screen.
Even after all this transferring, you'll find passwords to some apps, email, and other online accounts and subscriptions may not have transferred, and you'll have to fill them in manually. And if you have an Apple Watch, you will be prompted to pair it with your new iPhone.
Because your new iPhone 14 has been cloned from your current iPhone, your new iPhone's name will be the same as your old one. To update your new iPhone's name, go to Settings, then General > About > Name.
And if you use your iPhone's name in your email replies, update your email Signatures by going to Settings > Mail > Signature.
Now, you're ready to enjoy your iPhone 14 and iOS 16.
[Image credit: Stewart Wolpin/Techlicious]
Stewart Wolpin has been writing about consumer electronics for more than 35 years, including news, reviews, analysis and history, and has attended and covered nearly 50 Consumer Electronic Shows and around a dozen IFA shows in Berlin. For the Consumer Technology Association (CTA), he is an elector for and writes the official biographies of the annual CT Hall of Fame inductees, and is the keeper of the industry’s official history.
From Walter Li on December 18, 2022 :: 6:52 pm
I would appreciate a step-by-step transfer procedure. Thank you.
Reply