Do you get annoyed when your PC continuously asks you to restart after it automatically installs a Windows 11 update? You aren’t alone. And unfortunately, Windows 11 doesn’t fix this problem.
Just like with Windows 10, there isn’t a clear process to stop automatic updates in Windows 11 – but there is a reason behind it. The updates are primarily security patches that keep Windows 11 secure, safeguarding your PC from newly found software bugs and malware.
However, not all updates are necessary, and sometimes they can be buggy and cause problems. So, if you’re willing to take on the burden of frequently checking for updates and installing them, you can turn off automatic updates or at least postpone them. Here are the three ways to disable automatic updates on your Windows 11 PC that I recommend for most people.
Pause Automatic Windows 11 Updates
While Microsoft did not provide a button to stop Windows 11 automatic updates, there is an option to pause it. It isn’t a permanent solution, and you can only postpone automatic updates for a maximum of 5 weeks, but it does provide some reprieve. Here’s how to pause Windows 11 updates.
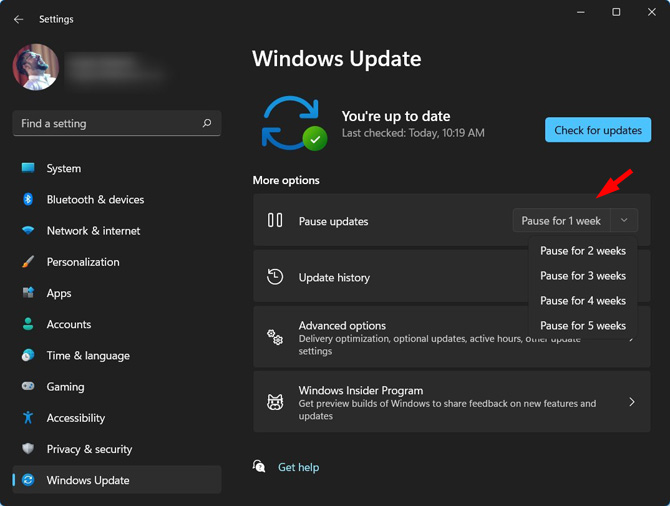
- Right-click on the Start menu button on the Windows Taskbar below.
- Select “Settings.”
- From the left panel, click on “Windows update.”
- You will see a Pause updates option. A drop-down selection menu with options to pause for one week and up to five weeks is to the right. Select the number of weeks you want to stop automatic updates on your PC from the drop-down menu.
Even if your PC doesn’t check for updates automatically for a select time, you should manually check for Windows 11 updates.
Use Windows Update Blocker Utility to stop automatic Windows 11 updates
The easiest way to permanently block automatic Windows 11 updates is to use Sordum’s Windows Update Blocker Utility tool. This tool was originally developed for Windows 10, but it also works on Windows 11 and is the method I recommend most people use.
- Head over to Sordum.com to download the Windows Update Blocker Utility. Scroll all the way down to the bottom of the page and click on the “Download” button. There are a lot of ads on the page, so make sure you click on the last button with just the word “Download” (see what the correct download button looks like below).
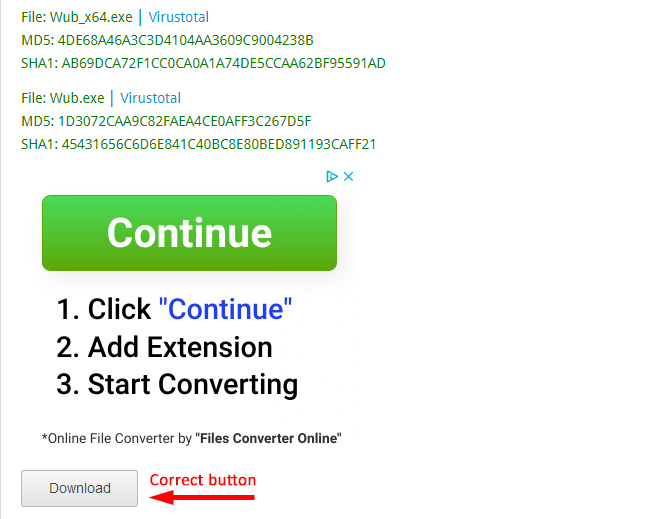
- Click to close the ad that opens.
- Wait for a window to pop up that lets you choose the location to save the "Wub" file
- Double click on the “Wub.zip” file.
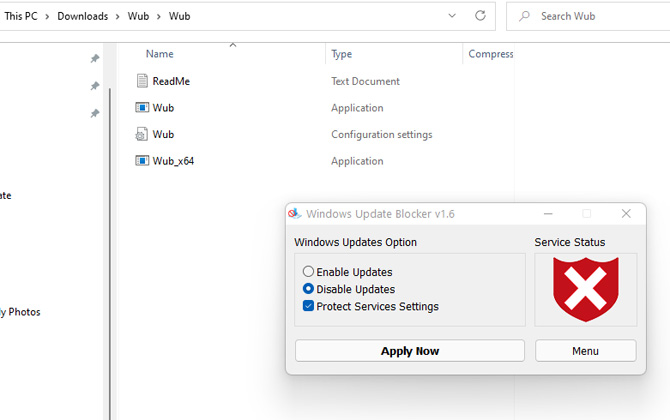
- Open the “Wub” folder.
- Double click on the “Wub_x64” file.
- Select “Extract all” and then “Extract” in the popup window.
- Open the “Wub” folder and double-click on the “Wub_x64” file to run the program.
- Select Disable updates and click on “Apply Now” to save changes.
The service status will turn red with an "X" if everything is applied successfully.
If you change your mind, you can double-click on the “Wub_x64” file to run the program, and instead of selecting “Disable Updates," select “Enable Updates” to resume automatic Windows 11 updates.
Turn Off Windows 11 Update Service
If you’re not comfortable installing Sordum’s Windows Update Blocker Utility tool, you can also turn off Windows 11 Update Service to stop Windows 11 updates permanently. Here’s how.
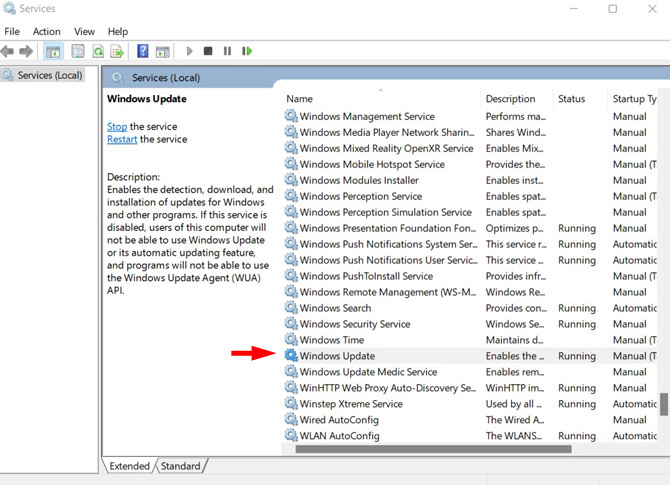
- Press Win + R buttons at the same time on your keyboard to open the Run command.
- Type “services.msc” in the box next to “Open” and select “OK.”
- On the services page, scroll down and search for Windows Update. Double-click on it to open the properties window.
- Under the General tab, select “Disabled” from the “Startup type” drop-down menu.
- Click OK and Apply to save your changes.
Now, Windows won’t check for updates automatically. However, if you have a change of heart, you can follow the same steps above, and instead of selecting “Disabled” from the drop-down menu, select “Automatic” to resume automatic Windows 11 updates.
Editor’s Note: If you turn off automatic updates, do not forget to manually check for and install important Windows 11 updates. If you don’t check, you will miss out on essential software patches that fix major vulnerabilities.
[Image credit: Screenshots via Techlicious, SmartMockups]
Sagar Naresh Bhavsar has been writing about technology for more than two years. Previously, he was a staff writer at Guiding Tech and TechWiser. He loves working out, having a cup of coffee, and playing guitar.