There's a reason why 900 million people have a Gmail account. It's a powerful, comprehensive email program. Unless you routinely explore the email service’s Settings, though, you’re missing out on the many useful tools you can use to streamline your inbox. Here are our top tips for getting the most out of Gmail and helping you get closer to inbox zero.
1. Unsend an email
You’ve got to act quick, but there is a way to unsend an email using Gmail. To turn this feature on, click the gear at the top right hand corner, then Settings. Under the General tab, there is an “Undo Send” option. Enable it, then choose a cancellation period of 5, 10, 20 or 30 seconds. It’s always better to go with the longer option, though, just in case. After this option is turned on, every time you send an email, a pop-up will say, “Your message has been sent. Undo.” If you weren’t quite finished or forgot to attach a document, just select “Undo.”
2. Format your email on-the-go
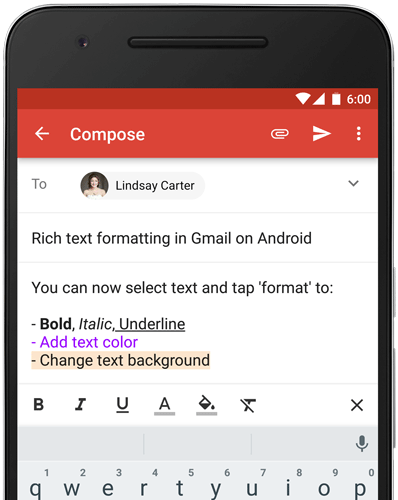
Android users now have an even better Gmail experience awaiting with new, rich-formatting options. Previously, you could only bold, italicize or underline text in the Gmail app. Now, the Android app includes these formatting options, along with text and background color options, as well.
3. RSVP to an event quickly
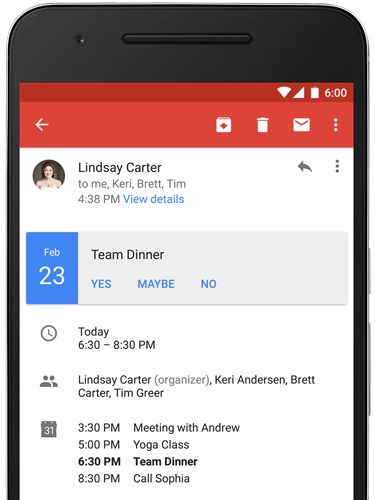
Instant RSVP is another added bonus that was just released for Android users. Now, if you receive a Google Calendar or Microsoft Exchange invitation, you will be able to select “Yes,” “No,” or “Maybe” within the email itself. If you tap on the event, you will be able to see what else you have scheduled for that day. And if you decide you’ve got time to go to that book club happy hour, pressing "Yes" will automatically add it to your calendar.
4. Make labels and filters
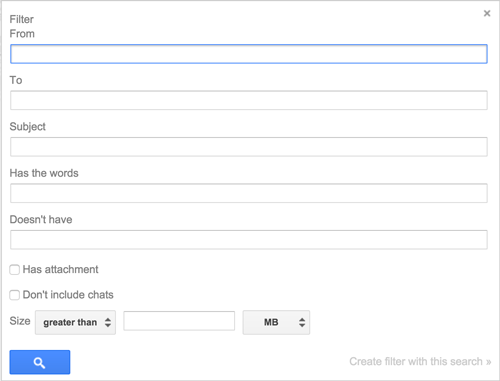
If you have a cluttered inbox, it’s a hassle to have to manually sort through emails. That’s where labels and filters come in handy. Labels let you save related emails in a folder. You're not actually moving the email, so you can add multiple labels to single email. Filters let you tell Gmail what to do with an email with it comes from a specific person, includes specific words and much more.
To make a label, say of all the emails you receive from your mom, scroll down at the left of your screen where you see "Inbox," "Starred" and "Important" labels. Further down, you'll see “Create new label.” Once you've created a label, you can change the label color or edit the label by hovering to the right of the label until a white or black downward triangle appears.
To apply a filter to automatically apply a label when an email arrives, go to the gear icon in the upper right corner and then select "Settings," then "Filters and Blocked Addresses." Scroll to the bottom of the screen and press “Create a new filter.” You can filter by sender, subject, words, size… there are a ton of options. So if you wanted all the emails from your mother in one folder, you'd enter her email address under “From.” Now, all of your emails from Mom can be found in one place.
5. Visualize your inbox all at once
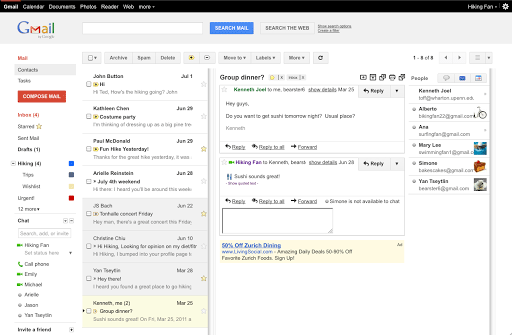
The standard Gmail view isn’t exactly great for multitasking. After all, when you click on an email, it takes you to the message, but you can’t see any of the other messages in your inbox. The preview pane view takes your email game to a whole other level. To turn it on, go to the gear, then Settings, then select the Labs tab. Next, go to Preview Pane and enable the function. It looks a lot like Gmail on a tablet, and makes it much easier to digest all of the info in your inbox.
6. Use Gmail without Internet access
If you’re planning on flying, taking the subway, or going somewhere else that has a limited Internet connection, you’re going to want to enable Gmail Offline. It’s a Google Chrome app, so you have to be using Google’s Chrome browser to make it work. Download Gmail Offline from the Chrome Web Store. Once you've installed the app, go to the gear, Settings, then the Offline tab. You’ll be taken to the Chrome Web Store, where you should click on the "Visit Website" button. There, you'll see a stripped down version of Gmail. You can then read and respond to emails without Internet service. Once you log back on, Gmail Offline will sync all of the changes you made and send any emails you wrote during that time.
7. Use shortcuts
Keyboard shortcuts will help turn you into a Gmail machine! To turn them on, click the gear, then Settings. In the general tab, turn the keyboard shortcuts on. If you press “c,” the compose email box shows up. Hate that email chain you’re cc’ed on? Press “m” to mute it. “#” sends that email to the trash. There are a whole lot more shortcuts where those came from; find the rest of them here.
8. Send a canned response
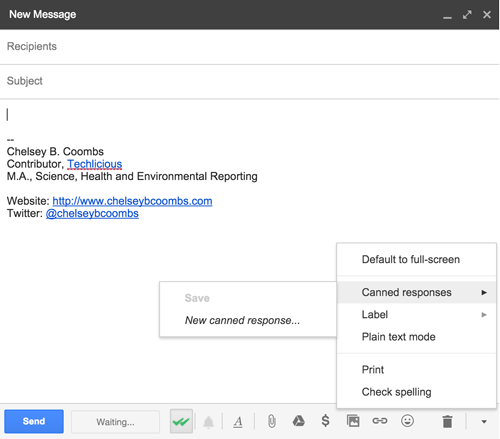
If you frequently have to send the same email over and over again, a canned response can keep your wrists from the unnecessary copy-and-paste strain. Go to the gear, Settings, then the Labs tab. Then enable “Canned Response.” To create your own, Compose a new email, then click the downward arrow at the bottom right corner of the message box. Click “Canned Responses” and then enter its name. Write the email and send it. Then, whenever you create a new email, that particular response will be ready to go.
9. Always remember to attach your email
Google will always keep you from having to send an embarrassed second email with a document attached as long as you use the phrase “I have attached” in your email. If you use the phrase in the body of your email, Gmail will you’ll pop up a reminder that says:
"It seems like you forgot to attach a file. You wrote "I have attached" in your message, but there are no files attached. Send anyway?”
10. Send (and receive) money
You can email someone money just by pressing the dollar sign at the bottom of a new message. Put in the amount you’d like to send, then send the email. That money will go into the other person’s Google Wallet. You can also request money from someone. To send and receive money, both people have to have an active Google Wallet Account. To set up a Google Wallet account, go to wallet.google.com and then add a credit card, debit card or bank account to the account.
11. Easily unsubscribe from annoying email lists
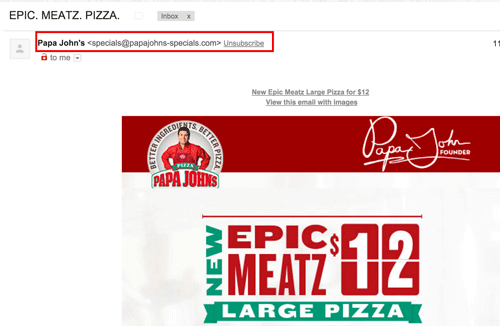
If you’re a Gmail user, you don’t have to go searching for a tiny Unsubscribe button at the bottom of emails to stop receiving those pesky offers. Google has put an Unsubscribe option to the right of the sender’s email address. Click it and you’re done.
We’ve got even more great tips for becoming a professional Gmail user. And if you prefer Google Inbox, check out the awesome Smart Reply feature.
3/1/2016 Updated with correct information on how to access Gmail offline.
[Gmail on Macbook via Shutterstock; All others via Google]








From Fern on March 01, 2016 :: 3:47 pm
I can’t locate the Offline tab under settings. Please help.
Reply
From Suzanne Kantra on March 02, 2016 :: 6:48 pm
The Offline tab only appears after you’ve installed the app. You need to download Gmail Offline from the Chrome Web Store. Once you’ve installed the app, go to the gear, Settings, then the Offline tab. You’ll be taken to the Chrome Web Store, where you should click on the “Visit Website” button. There, you’ll see a stripped down version of Gmail. I’ve corrected the instructions in the post.
Thanks for flagging the error!
Reply