Have you ever wanted to capture a screenshot of your computer screen to send to a friend helping you troubleshoot an issue with your PC? Or capture an image to use in a document or to have as a legal record?
Many people struggle to find a solution for this common need (my mother has been known to take pictures of the computer with her phone and send them to me in all their blurry glory!). But Windows has a built-in tool few people know about that makes it super simple to capture screenshots of a portion of your screen, an individual window or the entire display. Called Snip & Sketch. I use it so often for capturing images on my computer that I have it as a permanent shortcut in my taskbar.
How to open Snip & Sketch
If you’re on Windows 10, the easiest way to open Snip & Sketch is to type “Snip” in the Windows search box.
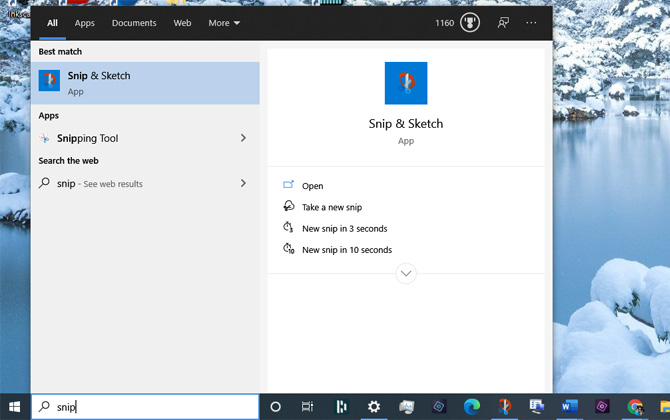
Then just select it in the search results (it should look like an icon of scissors cutting a red oval).
Using Snip & Sketch to capture the screen
Snip & Sketch is incredibly easy to use. Click on the "New" button to capture your screen immediately. Or, you can select the arrow down next to "New" to delay taking the screenshot for 3 or 10 seconds (useful if you want to capture a pull down menu or typing something into a field).
Once you select "New," there are four different modes that you can select (from the left):

- Select and capture a rectangular block
- Free-form capture
- Capture a single window
- Capture your full screen
Choose the mode that is most appropriate for what you want to capture (I find that I usually use the Rectangular Snip mode because it offers the most flexibility to capture exactly what I want and nothing else) and then click New. If your selected Full-screen Snip, the entire screen will automatically be captured. If you chose Window Snip, click on the window you want to capture. Rectangular Snip will grey your screen and bring up a crosshair to select the area you want to capture. And Free-form is, obviously, just that (hope you have a steady hand).
If you make a mistake with your capture, just click New to try again. Snip & Sketch has some basic editing tools, including a pen and highlighter for basic annotations, an eraser and a cropping tool.
Once you’ve captured what you want to capture, you can save it to your computer as an image file (PNG, GIF or JPEG) or copy it to your clipboard to paste into a document or email. You can also set up Snip & Sketch to send emails directly, but that requires setting up your email accounts within the tool, which is probably overkill for most users.
Under Settings, you can choose to add a colored border around your selection and you can turn on reminders to save your screenshots before taking a new screenshot or closing the app.
Pin Snip & Sketch to your taskbar
If you think you will be using Snip & Sketch often (or that you may forget what it’s called when you need it in the future), it’s worth adding to your Windows taskbar for easy access. Just search for Snip & Sketch from the Windows search box, as you did before, right click on it and choose Pin to Taskbar.
Is there a similar screen capture tool for Mac users?
Starting with macOS Mojave has a screen capture function similar to the Snip & Sketch that you can open by pressing Shift-Command (⌘)-5 on your keyboard. For those with earlier macOS versions, there are keyboard shortcuts that provide similar capture functions, but with far fewer options for editing or saving.
[Image credit: screenshots via Techlicious]