Tech Made Simple

Hot Topics: How to Fix Bluetooth Pairing Problems | Complete Guide to Facebook Privacy | How to Block Spam Calls | Snapchat Symbol Meaning

We may earn commissions when you buy from links on our site. Why you can trust us.

author photo

How to Connect a Monitor to Your Windows Laptop

by Andrea Smith on September 15, 2022

Laptops are great for moving your "office" around the house, but sometimes you want or need a little more on-screen real estate. Connecting a larger external monitor to your laptop can more than double your screen size, as well as let you multitask like a pro. Here's how to make it happen.

1. Choose the right port and cable

Most laptops have at least one port you can use to connect a monitor. However, not all ports deliver the same quality video and features. Here's how to choose the right one for you.

HDMI and DisplayPort

HDMI and DisplayPort

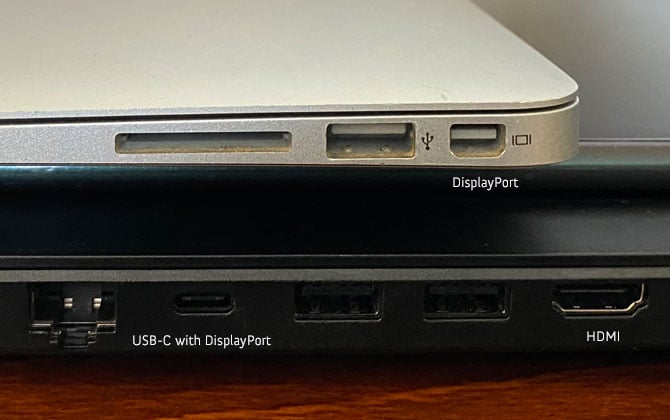
For most people, the best options are HDMI and DisplayPort. Both send audio and video signals over one cable, which makes them an easy way to connect a laptop to a monitor. DisplayPort has the additional benefit of being able to connect more than one monitor to a laptop. DisplayPort is also a better option for gamers with laptops that have high-end graphics cards with AMD's FreeSync and NVIDIA's G-Sync technology.

Some laptops have USB-C port that can also function as a DisplayPort port. Check the specs of your laptop to verify compatibility with DisplayPort.

You can buy an HDMI to DisplayPort adapter, though you will only be able to access the HDMI features.

If you're buying an HDMI cable and have a 4K monitor, get a cable that is certified Premium High Speed HDMI (yes, that is a thing). We like the Monoprice cables (starting at $4.93 on Monoprice, check price on Amazon). Older HDMI cables will work, but they may not deliver the full depth of color and resolution.

VGA and DVI

VGA and DVI

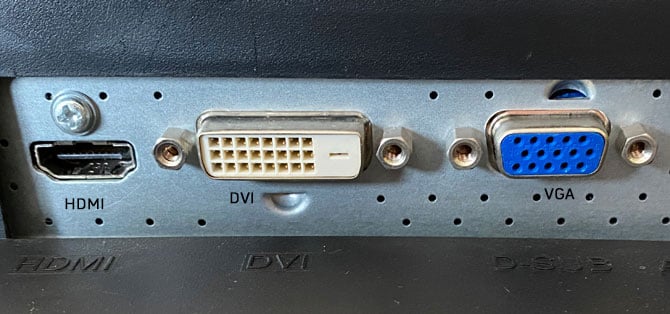
If you have an older laptop or monitor, it will likely have a VGA port or a DVI port for connecting to a second screen. VGA supports standard definition video (640 x 480), while DVI can send a signal at up to Full HD (1920 x 1080). Neither sends audio. If you want to play audio on your monitor, you will have to plug in a cable from your computer's headphone jack to the audio input on your monitor.

If you have an older laptop, you can buy a DVI or VGA adapter to plug into an HDMI or DisplayPort input on your monitor. However, the quality of the video will be limited to standard definition for VGA or high definition for DVI and you'll still have to run a separate audio cable.

2. Connect your monitor

Connect the monitor to your laptop with a cable and then turn on your monitor. Windows should detect the monitor and display what's on your laptop screen. If this doesn't happen, make sure the monitor is set to the correct input. You may have to scroll through the inputs to find the correct video input, HDMI, DisplayPort, etc. If you're still not seeing an image on your monitor, you'll need to head into Windows Display Settings. For Windows 11, click Start >Settings > Display > Multiple Displays and click on "Detect." For Windows 10 click Start > Settings > System > Display and click on "Detect" to get your laptop to recognize the monitor

3. Choose what you see on your monitor

When you connect your monitor, you can choose what appears on the screen. Here are your options.

Windows 10 external monitor options

Show the same output on your laptop and monitor

Windows defaults to "Duplicate these displays." So, what you see your laptop screen is what you see on your monitor, and when you move your mouse on one screen, it will also move on the other. In this mode, your monitor may not receive a full resolution video signal if your laptop graphics card is not powerful enough to deliver the full resolution to both displays.

Show output only on the external monitor

If you want to use only the external monitor, choose "Show only on 2." This will ensure your monitor receives the highest resolution from your laptop, and you can work with your laptop closed. (Selecting "show only on 1" will make your laptop screen your only display.)

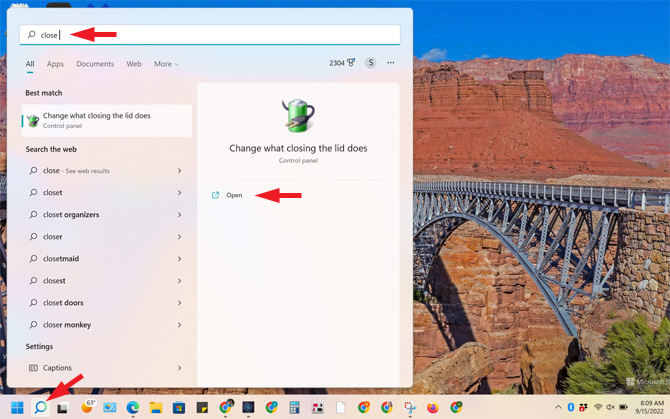
If you want to close your laptop while using your monitor, you'll need to make sure the computer doesn't go to sleep when you close the lid. For Windows 11, click on the search button in the task bar at the bottom. Type "close lid" into the search bar and click on "Open" under "Change what close the lid does.

Screenshot of the Windows 11 desktop with the search window open. Pointed out at the bottom of the screen is the search icon. In the search box the search bar is pointed out next to the word close. In the right pane, the word Open is pointed out under the words change what close the lid does.

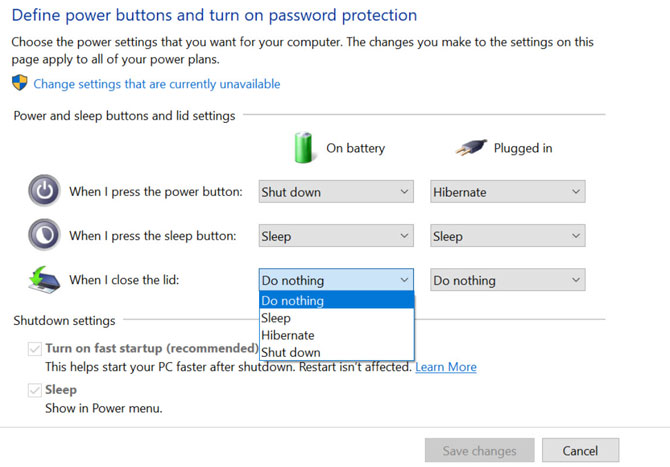
For Windows 10, go to Start > Settings > System > Power & Sleep and select “Additional power settings.”

For both Windows 11 and Windows 10, a new window will open. Select "Choose what closing the lid does." Select "Do nothing" in the drop-downs for when the laptop is "on battery" and "plugged in" so your laptop won't go to sleep.

Screenshot of the Windows System Settings menu for Define power buttons and turn on password protection. You see settings for What happens with the lids closes. The options are Do nothing, Sleep, Hibernate and Shut down.

Spread your desktop across your laptop and monitor

You can show different content on your laptop and monitor by selecting "Extend these displays." In this mode, you can move your mouse beyond the edge of one screen to enter the other. This also lets you drag and drop windows onto both displays. So, you could have one program open full-screen on your laptop display and another on your monitor.

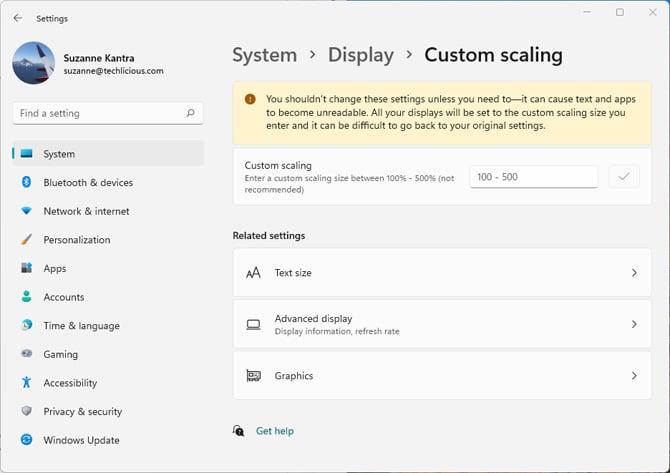
4. Optimize the size of your text and app icons

You might find that the text and images appear too small. To correct this, you can change the size of the text to make sure you can easily read what's on the screen.

For Windows 11, click Start >Settings > Display > Scale.

Screenshot of Windows 11 Display settings showing the Custom scaling option. You see a warning to not change the settings unless you need to.

For Windows 10 click Start > Settings > System > Display > Scale and layout.

Screenshot of Windows 10 Display settings showing scale and layout options.

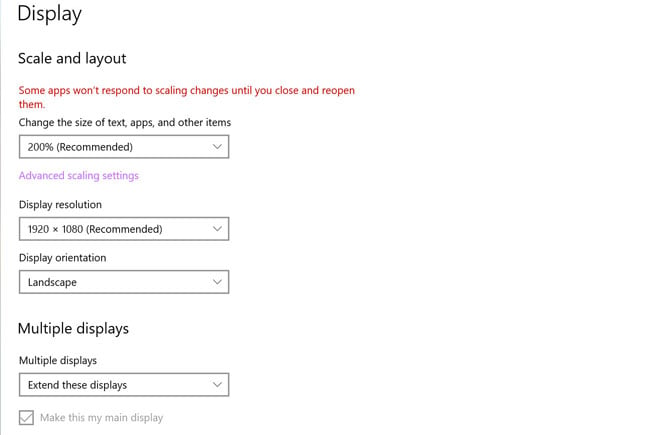
Windows will recommend a setting between 150-250 percent, but you can play around with it and see what works best for you.

Updated on 9/15/2022 with Windows 11 information

[Image credits: Techlicious]

Andrea Smith is an award-winning technology broadcast journalist, reporter, and producer. Andrea was the Technology Producer and an on-air Technology contributor at ABC News for over two decades before becoming the Lifestyle Channel Editor at Mashable, where she explored the ways in which real people, not just geeks, began using technology in their everyday lives.


Topics

Tips & How-Tos, Computers and Software, Computers & Accessories, Computer Monitors, Tech 101


Discussion loading

gravatar

From Bob on July 29, 2020 :: 8:44 am


A very good guide overall, but, almost any laptop that’s new enough to still be viable will achieve 1920 x 1080 through its VGA port. I have connected many monitors to VGA ports at 1920 x 1080. smile

Reply

gravatar

From Thomas L Rozzi on July 31, 2020 :: 11:14 am


what about blue tooth..

Reply

gravatar

From Ramesh K. Pujara on December 11, 2020 :: 3:18 am


I want tohave everything on added monitor

Reply

gravatar

From Dar Dar on December 14, 2020 :: 12:05 am


Thank you very much, this article was very helpful.

Reply

gravatar

From Erika Rose on January 19, 2021 :: 12:29 pm


do you know why when I connect my large monitor my access to my remote network gets kicked off?

Reply

gravatar

From Josh Kirschner on January 19, 2021 :: 3:15 pm


Can you clarify what you mean by “remote network”? Are you losing internet connection entirely or is something else going on? Nothing about connecting a monitor to your laptop should impact network connectivity of any kind.

Reply

gravatar

From Felipe Ferreira on January 19, 2021 :: 8:12 pm


I tried using a simple adapter (DVI female - HDMI male) with a regular DVI - DVI cable.

The monitor perceives that something is conected and I get a “no signal”.

On display settings, if I click “detect”, it says that nothing can be detected.

Read something about a diference in HDMI and DVI in terms of ANALOG or DIGITAL signals, but I cannot seem to find a work aroud the issue.

Help would be really appreciated!

Thanks!

Reply

gravatar

From Felipe Ferreira on January 19, 2021 :: 8:28 pm


By the way, I am using a DVI-D (Dual Link) cable, which shoul send a DIGITAL signal, just as the HDMI does.

Reply

gravatar

From Josh Kirschner on January 20, 2021 :: 2:26 pm


Once you have the cables connected, you may still have to manually set your laptop to send output to the external monitor since automatic detection may not work via DVI. For most laptops, this is done via one of the function keys. Have you already tried that?

Reply

gravatar

From Felipe Ferreira on January 20, 2021 :: 4:01 pm


If you mean the function to select how a second monitor would behave (duplicate desktop; extend desktop etc), then yes I have tried that and still nothing happened.

Reply

gravatar

From Josh Kirschner on January 20, 2021 :: 7:13 pm


Ok, thought I would try the easy stuff, first. It’s possible you could also have a bad cable, so if you have others you may want to try swapping them (another easy, though probably unlikely, potential fix). Beyond that, it would be helpful to know more about your equipment. What model laptop and monitor are you using?

gravatar

From Felipe de Lima Ferreira on January 20, 2021 :: 8:08 pm


Inspiron 13 5368 2-in-1

Intel(R) Core(TM) i5-6200U CPU @ 2.30GHz   2.40 GHz

8,00 GB

Windows 10 Home x64

Monitor:

Samsung SyncMaster 2233

Only DVI in

gravatar

From Josh Kirschner on January 21, 2021 :: 6:50 pm


There is a menu setting on the Samsung monitor to switch between analog and digital inputs: see https://downloadcenter.samsung.com/content/UM/200905/20090526190001531/BN59-00950A-02Eng.pdf. Have you tried that?

You could also try downloading the drivers and see how that goes: https://www.samsung.com/us/support/owners/product/led-monitor-2233sw-series. Thought the drivers are 12-years old and were written for Vista, so I think that’s a long shot.

At the end of the day, if the above things don’t work, you’re probably just better off buying a new monitor. There are plenty of 22” monitor options out there for under $100 which will perform vastly better than this 12-year old Samsung, with far fewer headaches.

gravatar

From Felipe de Lima Ferreira on January 23, 2021 :: 11:56 am


Unfortunately, I was not able to make it work.

I plan on buying a new monitor soon.

Thanks a lot for your help anyway!

Reply

gravatar

From Bonnie Sullivan on October 03, 2023 :: 7:43 am


I have connected a 32” monitor to my laptop but how do I make the added monitor full use and not be blurry

Reply

gravatar

From Josh Kirschner on October 03, 2023 :: 7:59 am


Hi Bonnie,

Can you provide more information on your monitor model, laptop model and what type of cable you are using to connect the two? To try to resolve, on your own, go to Advanced display settings and make sure Windows is properly detecting your monitor model, and all resolution and refresh rate settings are correct. Also, check your custom scaling options to see if that makes a difference. My money is on something off with the resolution.

Best,
Josh

Reply

Home | About | Meet the Team | Contact Us
Media Kit | Newsletter Sponsorships | Licensing & Permissions
Accessibility Statement
Terms of Use | Privacy & Cookie Policy

Techlicious participates in affiliate programs, including the Amazon Services LLC Associates Program, which provide a small commission from some, but not all, of the "click-thru to buy" links contained in our articles. These click-thru links are determined after the article has been written, based on price and product availability — the commissions do not impact our choice of recommended product, nor the price you pay. When you use these links, you help support our ongoing editorial mission to provide you with the best product recommendations.

© Techlicious LLC.