I've been a Facebook user since 2008, and in that time, I've posted hundreds of photos and videos of my kids growing up and other wonderful life events. So it would be a shame to lose it all if my account were hacked or I decided to delete or deactivate my Facebook account.
Fortunately, it's easy for us to download all of our Facebook data. And Meta lets you pick and choose precisely what you want to export for off-Facebook use, so you don't have to download everything if you don't want to.
Understanding what you can download
Before diving into the process, it's important to know what type of data Facebook allows you to download. This includes:
- Your Profile Information: Your profile details, posts, and photos.
- Activity Log: Every action you've taken, like comments, likes, and reactions.
- Messages and Chat Conversations: All the messages you've sent and received.
- Uploaded Media: Photos and videos you've uploaded to Facebook. You will only receive copies of what you’ve posted, not the photos and videos you’ve been tagged in. For those, you’ll have to download them manually.
- Advertisement Information: Ads you've clicked on and advertisers who've obtained your contact information.
If you want to preview the information that Facebook has gathered, you can check out the Facebook Your Information page.
Downloading your Facebook data
When you're ready, follow these steps on your computer or phone.
Step 1: Accessing the Download Your Information tool
On your computer
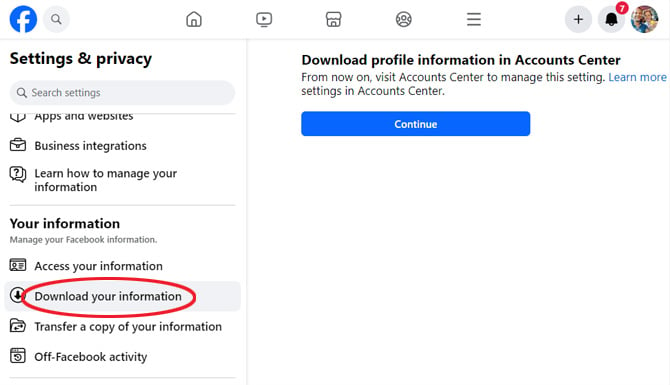
- On Facebook.com, select your profile icon in the upper right corner.
- Select 'Settings & Privacy' and then 'Settings.'
- Scroll down the left nav bar to the 'Your Facebook Information' section, select 'Download your information,' and click the 'Continue' button.
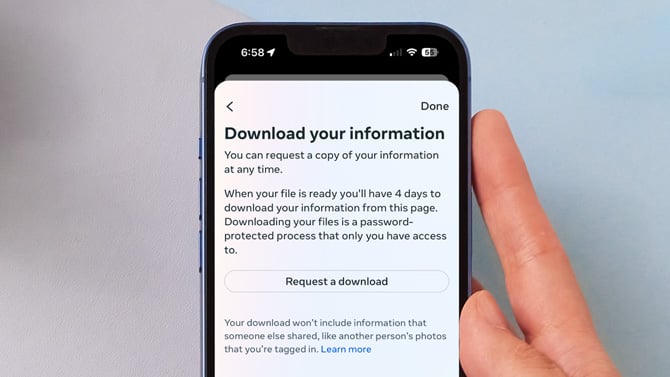
- In the pop-up window, click on the 'Request a download' button.
- Select the accounts and profiles you want to download and click the 'Next' button.
On your phone
- Open the Facebook app.
- Tap your profile icon in the lower right corner.
- Select 'Settings' (cog icon) in the upper right corner.
- Scroll down to 'Your Information' and select 'Download your information.' Then tap on 'Continue.'
- In the pop-up window, click on the 'Request a download' button.
- Select the accounts and profiles you want to download and click the 'Next' button.
Step 2: Customizing your download
At this point, Facebook allows you to tailor the data download to your needs
Select information to download
You can download all your data or select specific categories.
Pick your download categories
If you choose to customize your download, you have many options to choose from in different categories.
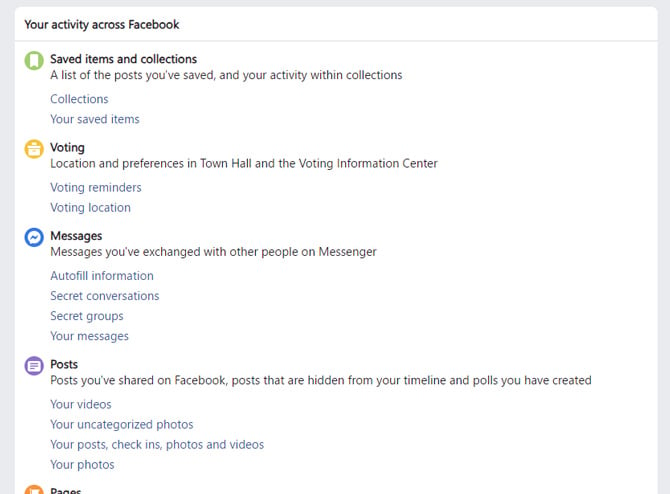
- The 'Your activity across Facebook' section allows you to select content you've shared or actions you've taken.
- The 'Personal information' section lets you choose from the information you've provided about yourself.
- In 'Connections,' you'll find your Friends and Followers.
- The 'Logged information' section has information on things like your search history, music recommendations, and location.
Important: Make sure you select 'Posts' in the 'Your activities across Facebook' section if you want copies of your photos and videos.
Choose the date range
Select a specific range or choose 'All of my data.'
Select the download format
Choose 'HTML' for an easy-to-navigate format. The 'JSON' format is only for importing into other services.
Media quality
Decide on the quality of photos and videos. High quality will result in a larger file size.
Step 3: Requesting Your download
After customizing your preferences, click 'Create File': Facebook will begin compiling your data. Facebook will notify you when your file is ready for download, which varies depending on the amount of data.
Step 4: Downloading your information
When you receive the notification that your data is ready, go to the 'Available Files' section of the 'Download Your Information' tool (see Step 1 for how to get there). Click 'Download': You'll be prompted to re-enter your password for security reasons.
Step 5: Exploring your data
Once you download your file, you’ll need to extract the files to browse your data.
Extract the ZIP file
For Windows users, right-click on the file name in File Explorer and select 'Extract All.' In the popup window, choose where you want the font files saved, check the box 'Show extracted files when complete,' and click on 'Extract.' A window will open with a folder that contains all of your files.
For Mac users, Double-click the .zip file. The unzipped items will appear in the same folder as the .zip file.
Open the HTML file to browse your data
Facebook offers a friendly user interface to browse all of your data. You can access it by double-clicking on the 'start_here' file in your extracted folder. You can explore each of the categories, like messages, timeline information, and photos, as though you were browsing an offline webpage.
This process works well for posts, but when you try to see your photo albums, it just shows you the first image in the album.
To see all of your photos and videos, you will need to access your folders directly in File Explorer (Windows) or Finder (Mac). The file will be stored in the folder your_activity_across_facebook > posts > media' folder, then posts, and then media. There, you’ll find your media files saved in folders by the albums you posted or, if they were individual photos, in the 'your_posts' or 'Timelinephotos' albums.
For this reason, I find it easier to use the Facebook transfer tool if you're just interested in media files, which lets you back up your photos and videos directly to a cloud storage service like Google Photos or Dropbox. (We provide step-by-step instructions for how to do that in our story How to Export Your Facebook Photos and Videos to Cloud Storage.)
Final thoughts
Downloading your Facebook data is a simple yet powerful way to take control of your digital information. Whether for data portability or just to have a backup of your digital memories, this guide should help you navigate the process with ease.
With your Facebook data safely downloaded, you might also consider taking a break or permanently moving away from Facebook. Check out our guides on How to Deactivate Your Facebook Account and How to Delete Your Facebook Account.
[Image credit: screenshots via Techlicious, phone mockup via Canva]
Josh Kirschner is the co-founder of Techlicious and has been covering consumer tech for more than a decade. Josh started his first company while still in college, a consumer electronics retailer focused on students. His writing has been featured in Today.com, NBC News and Time.