 Setting up a new PC for the family may seem like a daunting task, especially during the holidays when everyone wants to get down to playing with the new apps, games and touchscreen awesomeness that comes with Windows 8. Before you let the kids get started, take time to do a few important things to create a safe, custom experience for each family member.
Once you’ve started using your new PC in earnest, you'll find that Windows 8 is very different from Windows 7 and Windows XP in key ways. We'll help you get started understanding the differences and walk you through how to make Windows 8 feel more like using Windows 7 if that's what you prefer, as well as how to bring all your data over from your old PC.
Start the setup process
The first time you boot up your new Windows computer, you need to set up the first administrator profile. Your PC will prompt you to tie this profile to an existing Microsoft account or to create a new one. You can skip this step and create a normal profile, but it's better in the long run to make one associated with a Microsoft login.
With a Microsoft account, you automatically have password protection on your profile. And if you use any other Microsoft products like Xbox Live, SkyDrive, Outlook.com or Windows Phone, your data, content and some settings will sync automatically to your new computer. Plus, you'll need to sign in to the account if you want to download apps from the Microsoft Store.
If you don't have a Microsoft account already, you can sign up for a free one on your new PC during setup or online. Use an existing email as your login, or get a new Outlook.com address.
Create a profile for every family member
 Once the initial setup is complete, set up profiles for other members of the family. Each person can set their own preferences for colors, background images, pinned apps and more in their profile.
These user accounts also have varying levels of control over the PC.
- Administrator accounts have full control over settings, apps and security. These accounts should be reserved for parents.
- Standard accounts can't install or uninstall apps or programs or make other major changes to the computer that affect all other users, but they act otherwise like normal accounts. Create this type of user account for family members who don't need to install software on their own, won't perform maintenance or are less tech-savvy.
- Child accounts give parents control over how kids use the PC. You can set time limits, restrict apps and set up web filters. Kids get their own email inbox (if you allow it) and can't access other family members'.
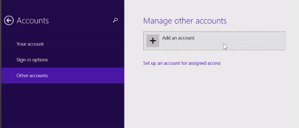
To set up user accounts, swipe in from the right edge of the Start screen and tap Settings > Change PC Settings > Accounts > Other Accounts > Add An Account.
Following the prompts will automatically create a standard account; you can upgrade it to administrator later, if needed. To create a Child account, look for the "Add a child's account" link on the first screen. Give each account you create a password for privacy and security (though parents should always know their child's password). See more on parental controls and Child accounts below.
Just as with your main profile, you have the option of tying new accounts to a Microsoft account in order to sync settings, files and more. Young children don't need a Microsoft account, but older kids who use the PC for homework and research can benefit from the free SkyDrive space and syncing.
If you don't want to use a Microsoft account, look on the bottom of the first screen for the "Sign in without a Microsoft account" link. Then tap Local account on the next page.
Set parental controls for Child accounts
To customize parental controls, go to Desktop from the Start screen, then swipe in from the right edge of the screen and tap Control Panel > User Accounts and Family Safety > Family Safety. There, you can select the account you want to manage and set Web filtering, time limits and game and application restrictions, as well as turn on activity reporting and Family Safety settings.
To do more, you must log into Microsoft's Family Safety site with your Microsoft account. From there, you'll see all of the devices associated with your account and all of the users on your new PC. You can designate another admin or standard user account as a parent, which gives that account the ability to change settings, too.
On the Family Safety site, you can turn on multi-level Web filtering, set time limits for use, restrict or allow specific apps and choose the rating level of allowed games. Child accounts can't download apps from the Windows Store, but they can request access to apps and files that are blocked. You can approve or deny these requests from Family Safety, which then syncs to the PC.
Download Windows 8.1
![]() New PCs built in the last few months come with Windows 8.1, the newest version of Windows, pre-installed. If you happen to buy a slightly older model that has Windows 8, it's easy to upgrade to 8.1 for free. Go to the Windows Store (shopping bag icon); the update should be prominently featured on the opening page. Tap it and the update will download in the background.
New PCs built in the last few months come with Windows 8.1, the newest version of Windows, pre-installed. If you happen to buy a slightly older model that has Windows 8, it's easy to upgrade to 8.1 for free. Go to the Windows Store (shopping bag icon); the update should be prominently featured on the opening page. Tap it and the update will download in the background.
If you don't see the update listed, you may need to run Windows Update first to get critical update packages. To do this, bring up the right-side charm menu (swipe in from the right edge of the screen) and tap Settings > Change PC settings > Windows Update. After Windows 8 gets the latest packages and restarts, return to the store to start upgrading to Windows 8.1.
After the update, which requires a reboot, your desktop apps will still be installed, but you'll have to reinstall apps you downloaded from the Windows Store. To find the apps associated with your account, go to the store, swipe down from the top of the screen and tap My Apps.
Organize the Windows 8.1 start screen
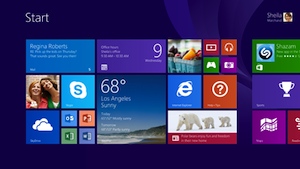
The Start screen is the hub of the Windows PC experience. It comes pre-populated with apps from Microsoft and the manufacturer. You can customize this screen by adding your favorite apps, deleting the icons you don't care about and arranging your favorites in groups.
The process for doing this is different from Windows 8. In 8.1, you organize with the Customize menu, which you access by swiping down from the top of the screen.
To add apps to Start, first swipe up anywhere on the screen to see the list of all apps. Activate the Customize menu, then tap and hold an app you want to move for a second; a checkmark will appear next to it. Tap any other apps you want to move to the Start screen. Then tap Pin to Start in the bottom left corner of the screen. The app icons will appear in Start in their own group.
Icons on the Start screen are arranged in groups. You can name these groups (Finances, Web, Games) or leave them unnamed. Grouping icons together helps the Start screen look cleaner and makes finding apps easier. To rearrange app icons and create or name groups, activate the Customize menu. Now you can tap and hold an icon and drag it where you want on the screen.
 To name a group, tap Name Group and a text box will appear. To delete a group, either move all the app icons to a different group or unpin all icons in a group.
You can also change the size of app icons. Some apps like Weather, News and Mail are Live Tiles, meaning they update with important information and display more or less of it depending on the size. Other app icons are static, so making them smaller won't impact the Start screen experience.
To resize an app, tap and hold for a second; a checkmark will appear. Tap Resize on the bottom left of the screen and choose Large, Wide, Medium or Small for Live Tiles or Wide, Medium or Small for static icons.
To remove apps from Start, activate the Customize menu, tap on the app or apps you want to remove, and tap Unpin from Start on the bottom left of the screen. This does not uninstall the apps; it just puts them back in the list of all apps. To actually uninstall the apps (removing them from the PC completely), do the same as above but tap Uninstall on the bottom left instead.
Set up the desktop and desktop programs
Windows 8 has two environments: the full screen, touch-centric Windows Store App interface (also called Metro) and the Desktop interface, which looks and acts like Windows 7. If you install programs you used on previous versions of Windows (XP, Vista or 7), they will open in the Desktop environment. If you prefer this mode to Windows App, it's possible to work only or mainly in the Desktop. With Windows 8.1, you can skip seeing the Start screen altogether.
The biggest difference between Desktop apps and Windows Store apps is that the latter tend to be more touch-friendly, while Desktop apps have smaller menus and icons, so it's more comfortable to use a mouse. Also, in Desktop mode each program operates in a distinct window that can be moved around, resized and minimized (again, like Windows 7).
Windows Store apps are full screen. You can split the window to see two apps side by side, but you can't tile four or five apps the way you can in Desktop.
Both Desktop and Windows Store Apps can be launched from the Start screen. If you plan on spending most of your time using, you will want to make sure your default programs are Desktop programs and even start up in Desktop (Find out how in our story How to Stay in Desktop on Your Windows 8 PC).
Move files and programs from your old PC
Moving data to your new PC is easy if your old PC uses Windows. All you need is an external hard drive, a large USB flash drive or a transfer cable.
Microsoft provides a program called Windows Easy Transfer to move everything except actual software from an old PC to a new one. If your previous computer runs Windows 7, the Easy Transfer program is already installed. Just click Start and type the name in the search box. If you're upgrading from Windows XP or Vista, you can download the program from Microsoft. Easy Transfer will walk you through the process step by step.
Transferring programs from an old PC is trickier. There are no reliable utilities that will take an installed program from one computer and install it on another. You will have to reinstall the programs yourself. Most program install files are available online from the software maker.
However, if you installed a program from a CD that you no longer have or the program version you like is older and not available from the publisher, all is not lost. Look for older software on OldApps.com and OldVersion.com.
If you have the installation file or CD but no longer have the product/license key, you can try to find it on your old computer using Recover Keys or Magical Jelly Bean Keyfinder.
From Jeffrey Campbell on October 10, 2017 :: 1:16 pm
I am a substitute teacher: I need to have at least a placard for Aseop application for DSUSD school district.
Reply